Create an Azure Kubernetes Service cluster
Your company is looking at ways to deploy your cloud-based video rendering service. You've chosen Azure Kubernetes Service (AKS) as your cloud-native development platform. Before you can deploy any application, you need to create your AKS cluster.
We'll review a few concepts that allow you to deploy a new AKS cluster successfully.
Kubernetes clusters
Kubernetes is based on clusters. Instead of having a single virtual machine (VM), it uses several machines working as one. These VMs are called nodes. Kubernetes is a cluster-based orchestrator. It provides your application with several benefits, such as availability, monitoring, scaling, and rolling updates.
Cluster nodes
A cluster is node-based. There are two types of nodes in a Kubernetes cluster that provide specific functionality.
Control plane nodes: These nodes host the cluster's control plane aspects and are reserved for services that control the cluster. They're responsible for providing the API you and all the other nodes use to communicate. No workloads are deployed or scheduled on these nodes.
Nodes: These nodes are responsible for executing custom workloads and applications, such as components from your cloud-based video rendering service.
Cluster architectures
A cluster architecture allows you to conceptualize the number of control planes and nodes you'll deploy in your Kubernetes cluster.
For example, the number of nodes in a cluster should always be more than two. When a node becomes unavailable, the Kubernetes scheduler will try to reschedule all the workloads running on this node onto the remaining nodes in the cluster.
There are two popular cluster architectures for Kubernetes-based deployments.
Single control plane and multiple nodes
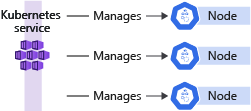
The single control plane and multiple nodes architecture is the most common architectural pattern, and is the easiest to deploy, but it doesn't provide high availability to your cluster's core management services.
If the control plane node becomes unavailable for any reason, no other interaction can happen with the cluster. This is the case even by you as an operator, or by any workloads that use Kubernetes' APIs to communicate until, at least, the API server is back online.
Despite being less available than others, this architecture should be enough for most situations. It's less likely that the core management services become unavailable compared to a node going offline. The control plane nodes are subject to fewer modifications than nodes and more resilient.
If you're dealing with a production scenario, this architecture might not be the best solution.
Single control plane and a single node
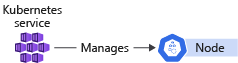
The single control plane and single node architecture is a variant of the previous architecture and is used in development environments. This architecture provides only one node that hosts both the control plane and a worker node. It's useful when testing or experimenting with different Kubernetes concepts. The single control plane and single node architecture limits cluster scaling and makes this architecture unsuitable for production and staging use.
Configure an AKS cluster
When you create a new AKS cluster, you have several different items of information that you need to configure. Each item affects the final configuration of your cluster.
These items include:
- Node pools
- Node count
- Automatic routing
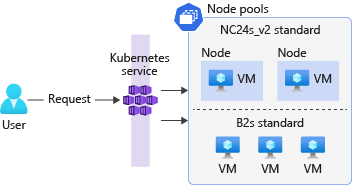
Node pools
You create node pools to group nodes in your AKS cluster. When you create a node pool, you specify the VM size and OS type (Linux or Windows) for each node in the node pool based on application requirement. To host user application pods, node pool Mode should be User otherwise System.
By default, an AKS cluster will have a Linux node pool (System Mode) whether it's created through Azure portal or CLI. However, you'll always have an option to add Windows node pools along with default Linux node pools during the creation wizard in the portal, via CLI, or in ARM templates.
Node pools use Virtual Machine Scale Sets as the underlying infrastructure to allow the cluster to scale the number of nodes in a node pool. New nodes created in the node pool will always be the same size as you specified when you created the node pool.
Node count
The node count is the number of nodes your cluster will have in a node pool. Nodes are Azure VMs. You can change their size and count to match your usage pattern.
You can change the node count later in the cluster's configuration panel. It's also a best practice to keep this number as low as possible to avoid unnecessary costs and unused compute power.
Automatic routing
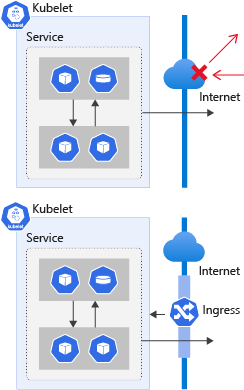
A Kubernetes cluster blocks all external communications by default. For example, assume you deploy a website that's accessible to all clients. You need to manually create an ingress with an exception that allows incoming client connections to that particular service. This configuration requires network-related changes that forward requests from the client to an internal IP on the cluster, and finally to your application. Depending on your specific requirements, this process can be complicated.
AKS allows you to overcome the complexity by enabling what's called HTTP application routing. This add-on makes it easy to access applications on the cluster through an automatically deployed ingress controller.
Ingress controllers
Ingress controllers provide the capability to deploy and expose your applications to the world without the need to configure network-related services.
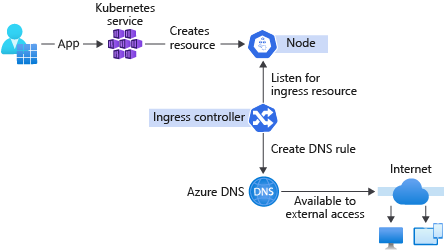
Ingress controllers create a reverse-proxy server that automatically allows for all the requests to be served from a single DNS output. You don't have to create a DNS record every time a new service is deployed. The ingress controller will take care of it. When a new ingress is deployed to the cluster, the ingress controller creates a new record on an Azure managed DNS zone and links it to an existing load balancer. This functionality allows for easy access to the resource through the internet without the need for additional configuration.
Despite the advantages, HTTP application routing is better suited to more basic clusters. It doesn't provide the amount of customization needed for a more complex configuration. If you plan to deal with more complex clusters, there are better-suited options like the official Kubernetes ingress controller.
Exercise - Create an Azure Kubernetes Service cluster
In this exercise, you'll create an AKS cluster that uses several nodes to meet the demand of many customers using the service. You decide to use the single control plane and multiple nodes architecture because it provides the best way to create and manage workload resources.
AKS supports both Linux and Windows node pools via the Portal or Azure CLI, however, if you're going to use Windows node pools, the cluster must be created with extra prerequisites and commands. Make a selection below, based on which type of node pools you want to add.
Important
You need your own Azure subscription to run this exercise, and you might incur charges. If you don't already have an Azure subscription, create a free account before you begin.
-
Sign in to Azure Cloud Shell with the account you want to deploy resources into.
Important
We'll run all the scripts with Bash, so if you haven't created a Cloud Shell yet, select Bash as the running shell.
-
Create variables for the configuration values you'll reuse throughout the exercises.
BashCopy
export RESOURCE_GROUP=rg-contoso-video
export CLUSTER_NAME=aks-contoso-video
export LOCATION=<myLocation>
Update the LOCATION variable with the region closest to you; for example:
eastus. -
Run the
az group createcommand to create a resource group. You'll deploy all resources into this new resource group.Azure CLICopy
az group create --name=$RESOURCE_GROUP --location=$LOCATION -
Run the
az aks createcommand to create an AKS cluster.Azure CLICopy
az aks create \
    --resource-group $RESOURCE_GROUP \
    --name $CLUSTER_NAME \
    --node-count 2 \
    --enable-addons http_application_routing \
    --generate-ssh-keys \
    --node-vm-size Standard_B2s \
    --network-plugin azure \
    --windows-admin-username localadmin
The command creates a new AKS cluster named
aks-contoso-videowithin therg-contoso-videoresource group. The cluster will have two nodes defined by the--node-countparameter. We're using only two nodes in this exercise for cost considerations. The--node-vm-sizeparameter configures the cluster nodes as Standard_B2s-sized VMs. The HTTP application routing add-on is enabled via the--enable-addonsflag. These nodes will be part of System mode.The
--windows-admin-usernameparameter is used to set up administrator credentials for Windows containers, and prompts the user to set a password at the command line. The password has to meet Windows Server password requirements. -
Run the
az aks nodepool addcommand to add another node pool that uses the Windows operating system.Azure CLICopy
az aks nodepool add \
    --resource-group $RESOURCE_GROUP \
    --cluster-name $CLUSTER_NAME \
    --name uspool \
    --node-count 2 \
    --node-vm-size Standard_B2s \
    --os-type Windows
The command adds a new node pool (User mode) to an existing AKS cluster (created in the previous command). This new node pool can be used to host applications and workloads, instead of using the System node pool, which was created in the previous step using
az aks create.The
--os-typeparameter is used to specify operating system of the node pool. If not specified, the command will use Linux as operating system for the nodes.
Link with kubectl
-
Link your Kubernetes cluster with
kubectlby running the following command in Cloud Shell.Azure CLICopy
az aks get-credentials --name $CLUSTER_NAME --resource-group $RESOURCE_GROUPThis command will add an entry to your
~/.kube/configfile, which holds all the information to access your clusters. Kubectl enables you to manage multiple clusters from a single command-line interface. -
Run the
kubectl get nodescommand to check that you can connect to your cluster, and confirm its configuration.BashCopy
kubectl get nodesThe output should list four available nodes for two node pools.
- [Linux]
- [Windows]
OutputCopy
NAME                                STATUS   ROLES   AGE    VERSION
aks-nodepool1-40010859-vmss000000   Ready    agent   245s   v1.23.12
aks-nodepool1-40010859-vmss000001   Ready    agent   245s   v1.23.12
aksuspool000000                     Ready    agent   105s   v1.23.12
aksuspool000001                     Ready    agent   105s   v1.23.12
Deploy an application on your Azure Kubernetes Service cluster
Your company is looking at ways to deploy your cloud-based video rendering service. You've chosen Azure Kubernetes Service (AKS) as your cloud-native development platform. With the cluster configured, you're ready to deploy one of the components in your video rendering application. You decide to deploy a static version of your company's website to explore the Kubernetes deployment process.
Before we discuss the Kubernetes way of deployment, let's review some of the steps you'd take to deploy a similar application to a non-Kubernetes environment.
Assume you're using an Azure virtual machine (VM) as your target platform. The first step is to prepare the server software to host the application. You will:
- Install the operating system.
- Make sure to update the OS to the latest security and software patches.
- Install and configure the web server software.
- Deploy the web application.
You'll repeat this process for each new VM when you decide to scale the website out to handle an increase in demand from customers.
An alternative approach is to run the website on a container-based platform like Azure Container Instances. You don't need to worry about the underlying server technology, but you'll have to configure and manage several containers to use this strategy manually.
Kubernetes and AKS help you orchestrate containers. The Kubernetes container orchestration features make it easy to manage workloads on the cluster. You deploy workloads by using containers built from container images to run your applications within an AKS cluster.
Here you'll explore how to create workloads in your AKS cluster.
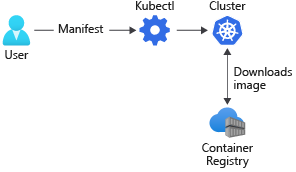
What is a container registry?
A container registry allows you to store container images safely in the cloud for later deployment. You can think of the container registry as an archive that stores multiple versions of your container image. Each stored image has a tag assigned for identification.
For example, you might have the image contoso-website:latest, which would be a different version of the image with the tag contoso-website:v1.0.0.
Container registries might be public or private. Private registries require credentials to access and download images and will be the strategy you'll follow when you store container images.
Kubernetes only allows you to deploy images hosted in a container registry. Creating a private container registry will normally be part of your standard AKS deployment strategy.
What is a Kubernetes pod?
A Kubernetes pod groups containers and applications into a logical structure. These pods have no intelligence and are composed of one or more application containers. Each one has an IP address, network rules, and exposed ports.
For example, if you wanted to search all workloads related to the contoso-website, you'd query the cluster for pods with the label app and the value contoso-website.
What is Kubernetes deployment?
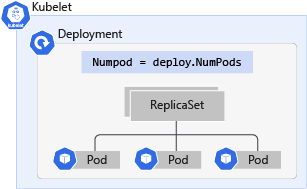
A Kubernetes deployment is an evolution of pods. A deployment wraps the pods into an intelligent object that allows them to scale out. You can easily duplicate and scale your application to support more load without the need to configure complex networking rules.
Deployments allow users to update applications just by changing the image tag without downtime. When you update a deployment, instead of deleting all apps and creating new ones, the deployment turns off the online apps one by one and replaces them with the newest version. This aspect means any deployment can update the pods inside it with no visible effect in availability.
Kubernetes manifest files
A Kubernetes manifest file allows you to describe your workloads in the YAML format declaratively and simplify Kubernetes object management.
Imagine you have to deploy a workload by hand. You need to think about and manage several aspects. You'd need to create a container, select a specific node, wrap it in a pod, run the pod, monitor execution, and so on.
Manifest files contain all the information that's needed to create and manage the described workload.
What is a Kubernetes label?
A Kubernetes label allows you to logically group Kubernetes objects. These labels enable the system to query the cluster for objects that match a label with a specific name.
The structure of a manifest file
The structure of manifest files differs depending on the type of resource that you create. However, manifest files share common instructions. These instructions define various aspects, such as the APIs to use and the type of workload to create.
The first two entries in all manifest files have two important keys, apiVersion and kind. Here's an example of a deployment file.
YAMLCopy
apiVersion: apps/v1 # Where in the API it resides
kind: Deployment # The kind of workload we're creating
The apiVersion key defines the API server endpoint that manages the object you'll deploy.
The kind key defines the workload this deployment will create.
Other common keys for all the files are the metadata and name keys. All Kubernetes resources must have a name. This name goes inside the metadata key.
YAMLCopy
apiVersion: apps/v1
kind: Deployment
metadata:
  name: contoso-website # This will be the name of the deployment
Group objects in a deployment
Deployments make use of a label to find and group pods. You define the label as part of your deployment's manifest file.
Here's an example. Notice the matchLabels value defined in the selector definition added to the spec definition.
YAMLCopy
# deployment.yaml
# ...
spec:
  selector:
    matchLabels:
      app: contoso-website
# ...
From this point on, all files have different structures based on what kind of resource you're telling Kubernetes to create.
Apply a deployment file
You deploy a Kubernetes deployment manifest file by using kubectl. Here's an example of the command.
BashCopy
kubectl apply -f ./deployment.yaml
Exercise - Deploy an application on your Azure Kubernetes Service cluster
In this exercise, you'll deploy your company's website as a test app onto Azure Kubernetes Service (AKS). The website is a static website with an underlying technology stack of HTML, CSS, and JavaScript. It doesn't receive as many requests as the other services and provides us with a safe way to test deployment options.
Note
The code for the web app is available in this GitHub repository if you want to explore the source code further. Also, this sample app will be deployed on a Linux node pool only.
Important
You need your own Azure subscription to run this exercise, and you might incur charges. If you don't already have an Azure subscription, create a free account before you begin.
Create a deployment manifest
You create a deployment manifest file to deploy your application. The manifest file allows you to define what type of resource you want to deploy and all the details associated with the workload.
Kubernetes groups containers into logical structures called pods, which have no intelligence. Deployments add the missing intelligence to create your application. Let's create a deployment file.
-
Sign in to Azure Cloud Shell if you haven't done so already.
-
In Cloud Shell, create a manifest file for the Kubernetes deployment called
deployment.yamlby using the integrated editor.BashCopy
touch deployment.yaml Open the integrated editor in Cloud Shell by entering
code .-
Open the
deployment.yamlfile, and add the following code section of YAML.YAMLCopy
# deployment.yaml
apiVersion: apps/v1 # The API resource where this workload resides
kind: Deployment # The kind of workload we're creating
metadata:
  name: contoso-website # This will be the name of the deployment
In this code, you added the first two keys to tell Kubernetes the
apiVersionandkindof manifest you're creating. Thenameis the name of the deployment. You'll use it to identify and query the deployment information when you usekubectl.Tip
For more information about
apiVersionand what values to put in this key, see the official Kubernetes documentation. Find a link at the end of this module. -
A deployment wraps a pod. You make use of a template definition to define the pod information within the manifest file. The template is placed in the manifest file under the deployment specification section.
Update the
deployment.yamlfile to match the following YAML.YAMLCopy
# deployment.yaml
apiVersion: apps/v1
kind: Deployment
metadata:
  name: contoso-website
spec:
  template: # This is the template of the pod inside the deployment
    metadata: # Metadata for the pod
      labels:
        app: contoso-website
Pods don't have given names when they're created inside deployments. The pod's name will be the deployment's name with a random ID added to the end.
Notice the use of the
labelskey. You add thelabelskey to allow deployments to find and group pods. -
A pod wraps one or more containers. All pods have a specification section that allows you to define the containers inside that pod.
Update the
deployment.yamlfile to match the following YAML.YAMLCopy
# deployment.yaml
apiVersion: apps/v1
kind: Deployment
metadata:
  name: contoso-website
spec:
  template: # This is the template of the pod inside the deployment
    metadata:
      labels:
        app: contoso-website
    spec:
      containers: # Here we define all containers
        - name: contoso-website
The
containerskey is an array of container specifications because a pod can have one or more containers. The specification defines animage, aname,resources,ports, and other important information about the container.All running pods will follow the name
contoso-website-<UUID>, where UUID is a generated ID to identify all resources uniquely. -
It's a good practice to define a minimum and a maximum amount of resources that the app is allowed to use from the cluster. You use the
resourceskey to specify this information.Update the
deployment.yamlfile to match the following YAML.YAMLCopy
# deployment.yaml
apiVersion: apps/v1
kind: Deployment
metadata:
  name: contoso-website
spec:
  template: # This is the template of the pod inside the deployment
    metadata:
      labels:
        app: contoso-website
    spec:
      containers:
        - image: mcr.microsoft.com/mslearn/samples/contoso-website
          name: contoso-website
          resources:
            requests: # Minimum amount of resources requested
              cpu: 100m
              memory: 128Mi
            limits: # Maximum amount of resources requested
              cpu: 250m
              memory: 256Mi
Notice how the resource section allows you to specify the minimum resource amount as a request and the maximum resource amount as a limit.
-
The last step is to define the ports this container will expose externally through the
portskey. Theportskey is an array of objects, which means that a container in a pod can expose multiple ports with multiple names.Update the
deployment.yamlfile to match the following YAML.YAMLCopy
# deployment.yaml
apiVersion: apps/v1
kind: Deployment
metadata:
  name: contoso-website
spec:
  template: # This is the template of the pod inside the deployment
    metadata:
      labels:
        app: contoso-website
    spec:
      nodeSelector:
        kubernetes.io/os: linux
      containers:
        - image: mcr.microsoft.com/mslearn/samples/contoso-website
          name: contoso-website
          resources:
            requests:
              cpu: 100m
              memory: 128Mi
            limits:
              cpu: 250m
              memory: 256Mi
          ports:
            - containerPort: 80 # This container exposes port 80
              name: http # We named that port "http" so we can refer to it later
Notice how you name the port by using the
namekey. Naming ports allows you to change the exposed port without changing files that reference that port. -
Finally, add a selector section to define the workloads the deployment will manage. The
selectorkey is placed inside the deployment specification section of the manifest file. Use thematchLabelskey to list the labels for all the pods managed by the deployment.Update the
deployment.yamlfile to match the following YAML.YAMLCopy
# deployment.yaml
apiVersion: apps/v1
kind: Deployment
metadata:
  name: contoso-website
spec:
  selector: # Define the wrapping strategy
    matchLabels: # Match all pods with the defined labels
      app: contoso-website # Labels follow the `name: value` template
  template: # This is the template of the pod inside the deployment
    metadata:
      labels:
        app: contoso-website
    spec:
      nodeSelector:
        kubernetes.io/os: linux
      containers:
        - image: mcr.microsoft.com/mslearn/samples/contoso-website
          name: contoso-website
          resources:
            requests:
              cpu: 100m
              memory: 128Mi
            limits:
              cpu: 250m
              memory: 256Mi
          ports:
            - containerPort: 80
              name: http
Note
In an AKS cluster which has multiple node pools (Linux and Windows), the deployment manifest file listed above also defines a
nodeSelectorto tell your AKS cluster to run the sample application's pod on a node that can run Linux containers.Linux nodes can't run Windows containers and vice versa.
Save the manifest file and close the editor.
Apply the manifest
-
In Cloud Shell, run the
kubectl applycommand to submit the deployment manifest to your cluster.BashCopy
kubectl apply -f ./deployment.yamlThe command should output a result similar to the following example.
OutputCopy
deployment.apps/contoso-website created -
Run the
kubectl get deploycommand to check if the deployment was successful.BashCopy
kubectl get deploy contoso-websiteThe command should output a table similar to the following example.
OutputCopy
NAME READY UP-TO-DATE AVAILABLE AGE contoso-website 0/1 1 0 16s -
Run the
kubectl get podscommand to check if the pod is running.BashCopy
kubectl get podsThe command should output a table similar to the following example.
OutputCopy
NAME                               READY   STATUS    RESTARTS   AGE
contoso-website-7c58c5f699-r79mv   1/1     Running   0          63s
Enable network access to an application
An Azure Kubernetes Service (AKS) cluster blocks all inbound traffic from the internet to the cluster to assure network security. Deployed workloads in Kubernetes are, by default, only accessible from inside the cluster. To expose the applications to the outside world, you need to open specific ports and forward them to your services.
The configuration of ports and port forwarding in Kubernetes is different from what you might be used to in other environments. On a virtual machine (VM), you'll configure the OS-level firewall to allow inbound traffic to port 443 and allow HTTPS web traffic. In Kubernetes, the control plane manages network configuration based on declarative instructions you provide.
Networks in Kubernetes
The network configuration for containers is temporary. A container's configuration and the data in it isn't persistent between executions. After you delete a container, all information is gone unless it's configured to use a volume. The same applies to the container's network configuration and any IP addresses assigned to it.
A deployment is a logical grouping of pods. It isn't considered a physical workload and isn't assigned an IP address. But each pod is automatically assigned an IP address. When the pod is destroyed, the IP address is lost. This behavior makes a manual network configuration strategy complex.
Kubernetes has two network availability abstractions that allow you to expose any app without worrying about the underlying infrastructure or assigned pod IP addresses.
These abstractions are the services and ingresses. They're both responsible for allowing and redirecting the traffic from external sources to the cluster.
What is a Kubernetes service?
A Kubernetes service is a workload that abstracts the IP address for networked workloads. A Kubernetes service acts as a load balancer and redirects traffic to the specified ports by using port-forwarding rules.
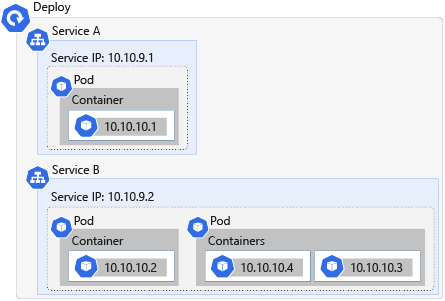
You define a service in the same way as a deployment, by using a YAML manifest file. The service uses the same selector key as deployments to select and group resources with matching labels into one single IP.
A Kubernetes service needs four pieces of information to route traffic.
Information
Description
Target resource
The target resource is defined by the selector key in the service manifest file. This value selects all the resources with a given label onto a single IP address.
Service port
This port is the inbound port for your application. All the requests come to this port from where the service forwards the requests to the resource.
Network protocol
This value identifies the network protocol for which the service will forward network data.
Resource port
This value identifies the port on the target resource on which incoming requests are received. This port is defined by the targetPort key in the service manifest file.
Kubernetes service types
Services can be of several types. Each type changes the behavior of the applications selected by the service.
ClusterIP: This value exposes the applications internally only. This option allows the service to act as a port-forwarder and makes the service available within the cluster. This value is the default when omitted.
NodePort: This value exposes the service externally. It assigns each node a static port that responds to that service. When accessed through
nodeIp:port, the node automatically redirects the request to an internal service of theClusterIPtype. This service then forwards the request to the applications.LoadBalancer: This value exposes the service externally by using Azure's load-balancing solution. When created, this resource spins up an Azure Load Balancer resource within your Azure subscription. Also, this type automatically creates a
NodePortservice to which the load balancer's traffic is redirected and aClusterIPservice to forward it internally.ExternalName: This value maps the service by using a DNS resolution through a CNAME record. You use this service type to direct traffic to services that exist outside the Kubernetes cluster.
What is ingress?
Ingress exposes routes for HTTP and HTTPS traffic from outside a cluster to services inside the cluster. You define ingress routes by using ingress rules. A Kubernetes cluster rejects all incoming traffic without these routes defined.
Assume you want to allow clients to access your website through the http://contoso.com web address. For a client to access your app inside the cluster, the cluster must respond to the website's CNAME and route the requests to the relevant pod.
How to use ingress controllers in Kubernetes
Kubernetes uses ingress controllers to manage the configuration of ingresses in a cluster and provides several features. An ingress controller:
- Acts as a reverse proxy to allow external URLs.
- Might act as a load balancer.
- Terminates SSL/TLS requests.
- Offers name-based virtual hosting.
In AKS, the ingress controller links to a DNS Zone resource in your Azure subscription. The DNS Zone is automatically created as part of the cluster creation process on your behalf. The link makes it possible for the cluster to automatically generate a zone record that points the DNS name to the exposed application's IP address and port.
In AKS, the HTTP application routing add-on allows you to create ingress controllers.
What are ingress rules?
Ingress rules define where traffic is coming from and where to direct it within a cluster. You define ingress rules in an ingress deployment manifest file.
These rules are defined in the rules key of the manifest file. Each rule is a set of values that describes the rule.
For example, assume you want to allow clients to access your website by using the URL http://example.com/site. You want to route traffic to your video rendering service website. Here's an example of the defined ingress rule to allow this behavior.
YAMLCopy
rules:
  - host: example.com # A FQDN that describes the host where that rule should be applied
    http:
      paths: # A list of paths and handlers for that host
        - path: /site # Which path is this rule referring to
          backend: # How the ingress will handle the requests
            serviceName: contoso-website # Which service the request will be forwarded to
            servicePort: 80 # Which port in that service
This example defines a rule that allows all traffic using the address example.com and path /site to enter the cluster. This traffic is then routed to the contoso-website service on port 80.
What is an annotation?
An annotation allows you to attach non-identifying metadata, such as ingress configurations, for workloads. You can think of the annotation as an internal label that defines specific configurations for resources. For example, you might want to use a specific ingress controller that supports name rewriting or payload limiting.
Here's an example of the annotation in a manifest file that specifies the use of the HTTP application routing add-on.
YAMLCopy
#ingress.yaml
apiVersion: extensions/v1beta1
kind: Ingress
metadata:
  name: contoso-website
  annotations:
    kubernetes.io/ingress.class: addon-http-application-routing # Use the HTTP application routing add-on
In the next exercise, you'll define a service of type ClusterIP and expose your company's web app through an ingress.
Exercise - Enable network access to an application
You successfully deployed the video rendering service website to your cluster. But you noticed that you couldn't access the website from any client external to the cluster. The problem is that you haven't exposed your application to the internet yet. By default, Kubernetes blocks all external traffic. You'll need to add an ingress rule to allow traffic into the cluster.
Important
You need your own Azure subscription to run this exercise, and you might incur charges. If you don't already have an Azure subscription, create a free account before you begin.
Create the service manifest
Like all resources, services also have manifest files that describe how they should behave. Let's create a new service description.
-
Sign in to Azure Cloud Shell if you haven't done so already.
-
In Cloud Shell, create a manifest file for the Kubernetes service called
service.yaml.BashCopy
touch service.yaml Open the integrated editor in Cloud Shell by entering
code .-
Open the
service.yamlfile, and add the following code section of YAML.YAMLCopy
#service.yaml
apiVersion: v1
kind: Service
metadata:
  name: contoso-website
In this code, you added the first two keys to tell Kubernetes the
apiVersionandkindof manifest you're creating. Thenameis the name of the service. You'll use it to identify and query the service information when you usekubectl. -
You define how the service will behave in the specification section of the manifest file. The first behavior you need to add is the type of service. Set the
typekey toclusterIP.Update the
service.yamlfile to match the following YAML.YAMLCopy
#service.yaml apiVersion: v1 kind: Service metadata: name: contoso-website spec: type: ClusterIP -
You define the pods the service will group and provide coverage by adding a
selectorsection to the manifest file. Add theselector, and set theappkey value to thecontoso-websitelabel of your pods as specified in your earlier deployment's manifest file.Update the
service.yamlfile to match the following YAML.YAMLCopy
#service.yaml apiVersion: v1 kind: Service metadata: name: contoso-website spec: type: ClusterIP selector: app: contoso-website -
You define the port-forwarding rules by adding a
portssection to the manifest file. The service must accept all TCP requests on port 80 and forward the request to the HTTP target port for all pods matching the selector value defined earlier.Update the
service.yamlfile to match the following YAML.YAMLCopy
#service.yaml
apiVersion: v1
kind: Service
metadata:
  name: contoso-website
spec:
  type: ClusterIP
  selector:
    app: contoso-website
  ports:
    - port: 80 # SERVICE exposed port
      name: http # SERVICE port name
      protocol: TCP # The protocol the SERVICE will listen to
      targetPort: http # Port to forward to in the POD
Save the manifest file by pressing Ctrl-S, and close the editor by pressing Ctrl-Q.
Deploy the service
-
In Cloud Shell, run the
kubectl applycommand to submit the service manifest to your cluster.BashCopy
kubectl apply -f ./service.yamlThe command should output a result similar to the following example:
OutputCopy
service/contoso-website created -
Run the
kubectl get servicecommand to check if the deployment was successful.BashCopy
kubectl get service contoso-websiteThe command should output a result similar to the following example. Make sure the column
CLUSTER-IPis filled with an IP address and the columnEXTERNAL-IPis<none>. Also, make sure the columnPORT(S)is defined to80/TCP.OutputCopy
NAME              TYPE        CLUSTER-IP     EXTERNAL-IP   PORT(S)   AGE
contoso-website   ClusterIP   10.0.158.189   <none>        80/TCP    42s
With the external IP set to
<none>, the application isn't available to external clients. The service is only accessible to the internal cluster.
Create an ingress manifest
To expose your website to the world via DNS, you must create an ingress controller.
-
In Cloud Shell, create a manifest file for the Kubernetes service called
ingress.yaml.BashCopy
touch ingress.yaml Open the integrated editor in Cloud Shell by entering
code .-
Open the
ingress.yamlfile, and add the following code section of YAML.YAMLCopy
#ingress.yaml
apiVersion: networking.k8s.io/v1
kind: Ingress
metadata:
  name: contoso-website
In this code, you added the first two keys to tell Kubernetes the
apiVersionandkindof manifest you're creating. Thenameis the name of the ingress. You'll use it to identify and query the ingress information when you usekubectl. -
Create an
annotationskey inside themetadatasection of the manifest file called to use the HTTP application routing add-on for this ingress. Set the key tokubernetes.io/ingress.classand a value ofaddon-http-application-routing.Update the
ingress.yamlfile to match the following YAML.YAMLCopy
#ingress.yaml apiVersion: networking.k8s.io/v1 kind: Ingress metadata: name: contoso-website annotations: kubernetes.io/ingress.class: addon-http-application-routing -
Set the fully qualified domain name (FQDN) of the host allowed access to the cluster.
In Cloud Shell, run the
az network dns zone listcommand to query the Azure DNS zone list.BashCopy
az aks show \ -g $RESOURCE_GROUP \ -n $CLUSTER_NAME \ -o tsv \ --query addonProfiles.httpApplicationRouting.config.HTTPApplicationRoutingZoneName -
Copy the output, and update the
ingress.yamlfile to match the following YAML. Replace the<zone-name>placeholder value with theZoneNamevalue you copied.Update the
ingress.yamlfile to match the following YAML.YAMLCopy
#ingress.yaml apiVersion: networking.k8s.io/v1 kind: Ingress metadata: name: contoso-website annotations: kubernetes.io/ingress.class: addon-http-application-routing spec: rules: - host: contoso.<zone-name> # Which host is allowed to enter the cluster -
Next up, add the back-end configuration to your ingress rule. Create a key named
httpand allow thehttpprotocol to pass through. Then, define thepathskey that will allow you to filter whether this rule applies to all paths of the website or only some of them.Update the
ingress.yamlfile to match the following YAML.YAMLCopy
#ingress.yaml
apiVersion: networking.k8s.io/v1
kind: Ingress
metadata:
  name: contoso-website
  annotations:
    kubernetes.io/ingress.class: addon-http-application-routing
spec:
  rules:
    - host: contoso.<uuid>.<region>.aksapp.io
      http:
        paths:
          - backend: # How the ingress will handle the requests
              service:
               name: contoso-website # Which service the request will be forwarded to
               port:
                 name: http # Which port in that service
            path: / # Which path is this rule referring to
            pathType: Prefix # See more at https://kubernetes.io/docs/concepts/services-networking/ingress/#path-types
Save the manifest file by pressing Ctrl-S, and close the editor by pressing Ctrl-Q.
Deploy the ingress
Now we need to deploy the service for our changes to take effect.
-
In Cloud Shell, run the
kubectl applycommand to submit the ingress manifest to your cluster.BashCopy
kubectl apply -f ./ingress.yamlThe command should output a result similar to the following example.
OutputCopy
ingress.extensions/contoso-website created -
Run the
kubectl get ingresscommand to check if the deployment was successful.BashCopy
kubectl get ingress contoso-websiteThe command should output a result similar to the following example.
OutputCopy
NAME              HOSTS                                           ADDRESS        PORTS   AGE
contoso-website   contoso.5cd29ec927f24764b052.eastus.aksapp.io   52.226.96.30   80      4m44s
Make sure the
ADDRESScolumn of the output is filled with an IP address. That's the address of your cluster.Note
There can be a delay between the creation of the ingress and the creation of the zone record. It can take up to five minutes for zone records to propagate.
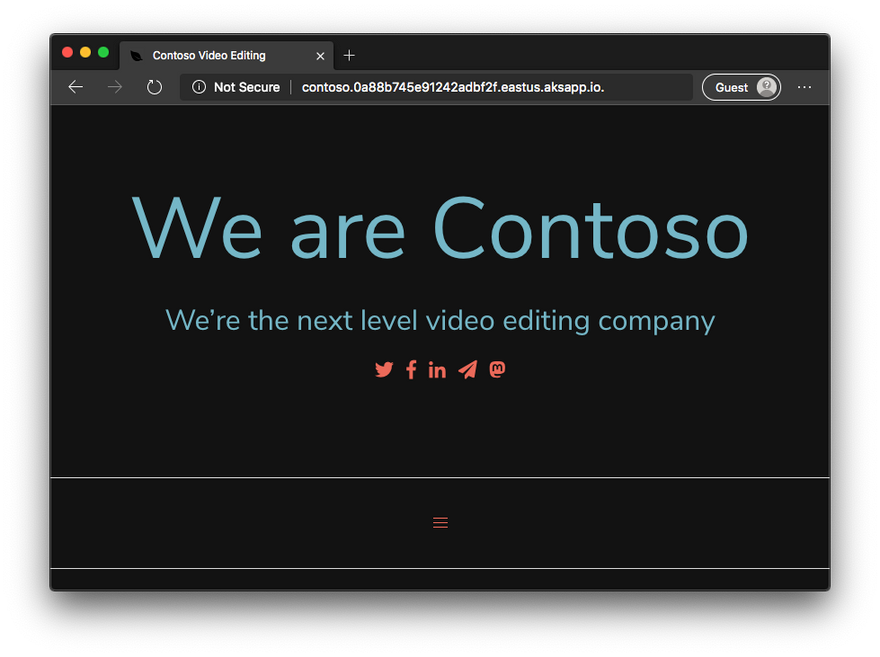
Open your browser, and go to the FQDN described in the output. You should see a website that looks like the following example screenshot.
Summary
Your company is experiencing increased demand for its video rendering service because of its international expansion. You're looking for ways to scale the product to provide a better experience for all customers. You want to understand how to deploy applications to an Azure Kubernetes Service (AKS) cluster and allow customers access to the application's services.
You created an AKS cluster and deployed your web application to the Kubernetes cluster. When you deployed the web app, you used the Kubernetes declarative paradigm to describe what you wanted to create. This way, you can keep the app's version history and make future deployments easily reproducible.
Imagine how it would be to deploy this application onto multiple virtual machines or another environment without Kubernetes. You would have to re-create your environment with each new deployment and configure more services to manage user requests between these instances. AKS simplifies the implementation of Kubernetes clusters and provides all the orchestration features you need to manage cloud-native applications.


Top comments (5)
Wow very detailed article. Thank you so much for this @roshan_thapa :)
Welcome Sir..
Hi @roshan_thapa , very good article. Can you please let me know how did you created following diagram of cluster you have used in article? I am wondering if there is a tool to visualize Kubernetes Cluster.
goglides.dev/images/SL3yonMl8xd22P...
Thanks @ali_hbajwa_675b140bae76, I used Draw.io for creating any diagram it's free.
thanks for this.