- What is Openshift Project/Namespace?
- Pre-define roles in Openshift
- Create a new Openshift Project.
- Configuring an HTPasswd identity provider
- Grant pre-define role to users
- Grant admin access by creating custom groups
- Verification
- Remove users from the admin group
What is Openshift Project/Namespace?
An OpenShift project is a logical separation of resources within a single OpenShift deployment. A project is a collection of objects that can be accessed by the users belonging to that project. A project allows an administrator to control who has access to what within a deployment.
A project can also be used to isolate resources from one another. For example, two different applications running in separate projects can share the same cluster resources but cannot access each other's data.
Pre-define roles in Openshift
OCP includes a default set of roles, which you can use to bind to users and groups.
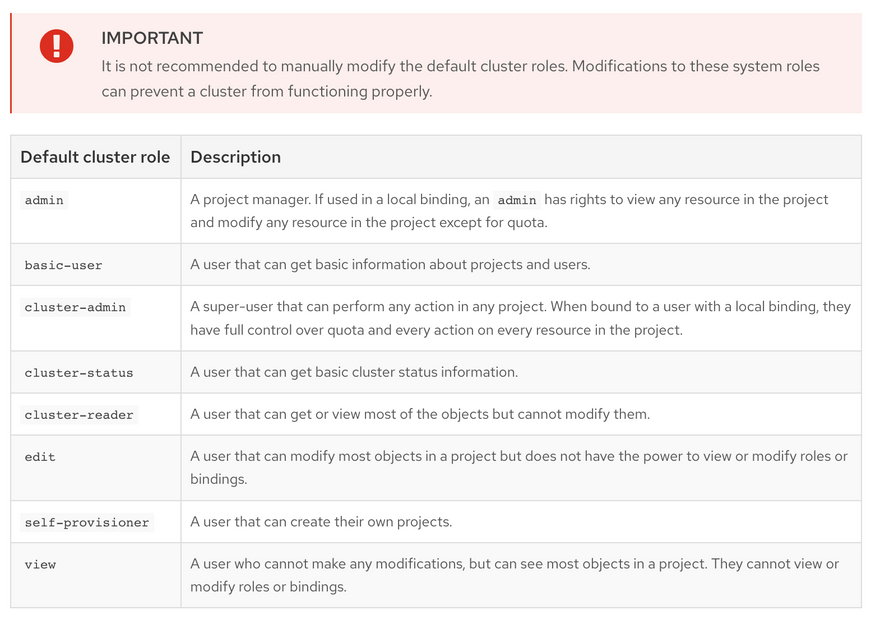
Source: Redhat
You can bind these roles cluster-wide or locally.
If you bind the cluster-admin role, cluster-wide users will have cluster-admin permission.
If you bind the cluster-admin role locally, users will only have admin access to that project.
Let's see this in action.
Create a new Openshift Project.
First, we have to create an openshift project (Namespace). Creating a new Openshift Project is very simple. Just log into the Openshift console, navigate to "Home->Projects," and click the "Create Project" button. Enter the name of your project and click on the "Create" button.
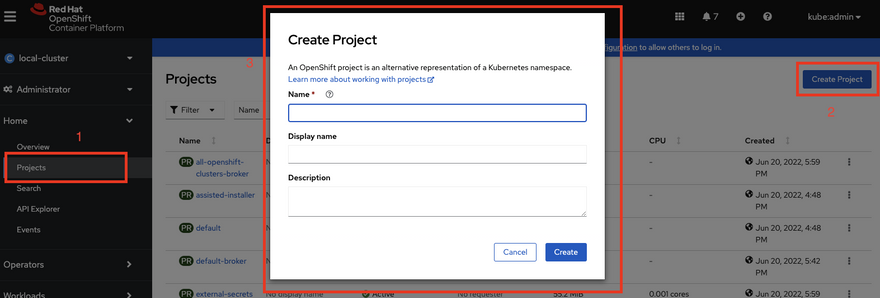
Your new project will be created, and you will be redirected to it.

You can also create a project using oc CLI as follows,
oc new-project goglides
Configuring an HTPasswd identity provider
By default, Openshift only creates only one user called kubeadmin. There are various way user can be created in an openshift cluster. The key idea is to use an identity provider rather than managing users manually.
In this blog, we are exploring the HTPasswd method to manage usernames and passwords.
The htpasswd command is required for this. Run this command on a server that already has the htpasswd command installed if your host doesn't have it, install the package yourself.
First, create an empty htpasswd file.
touch htpasswd
Now use the htpasswd command to generate the username and password as follows,
htpasswd -Bb htpasswd goglides iam@Goglides
htpasswd -Bb htpasswd tiger-team SuperCoolPassword
htpasswd -Bb htpasswd qa-team b0kka-6
Output:
Adding password for user goglides
Adding password for user tiger-team
Adding password for user qa-team
If you cat htpasswd file, you will see output something similar to this,
goglides:$2y$05$BifSIw4GquB9v0YEGlzv4eQe230rZPDSku5AgeWLBS7M9itkgsTsC
tiger-team:$2y$05$U4wIS2k7GikRNVu1t9QRZ.MiDx.pVvJyvg8HTXBxgDMBh..NVNyLC
qa-team:$2y$05$uZVmPaALXl31W.czlSo18uHxt2zHloLY47hcjaUkWjyKri5jAoSU6
Now, create a Secret in the openshift-config project. This allows OpenShift to authenticate using username and password as it reads it:
oc create secret generic htpass-secret --from-file=htpasswd=htpasswd -n openshift-config
Output:
secret/htpass-secret created
Now we have to OAuth object reference to this htpasswd file. OAuth object holds cluster-wide information about OAuth. By default, the spec on this object is empty, as you can see in the following output:
oc get oauth cluster -o yaml
Output:
apiVersion: config.openshift.io/v1
kind: OAuth
metadata:
 annotations:
 include.release.openshift.io/ibm-cloud-managed: "true"
 include.release.openshift.io/self-managed-high-availability: "true"
 include.release.openshift.io/single-node-developer: "true"
 release.openshift.io/create-only: "true"
 creationTimestamp: "2022-06-20T22:49:25Z"
 generation: 1
 name: cluster
 ownerReferences:
 - apiVersion: config.openshift.io/v1
 kind: ClusterVersion
 name: version
 uid: 4dfd503a-288e-4c3b-ae67-33ffb11b9511
 resourceVersion: "1779"
 uid: ed759d21-98a4-4c84-b598-19dd990173c8
spec: {}
Now you can create the OAuth custom resource using the references to the Secret you just created above as follows:
oc apply -f - <<EOF
apiVersion: config.openshift.io/v1
kind: OAuth
metadata:
 name: cluster
spec:
 identityProviders:
 - name: HTPasswd
  mappingMethod: claim
  type: HTPasswd
  htpasswd:
   fileData:
    name: htpass-secret
EOF
Now, if you get the yaml output again, you will see the following,
...
spec:
 identityProviders:
 - htpasswd:
  fileData:
  name: htpass-secret
 mappingMethod: claim
 name: HTPasswd
 type: HTPasswd
You can use the HTPasswd approach to authenticate users, as shown in the following screenshots.
Grant pre-define role to users
You can add pre-defined roles to users. For example, if you want to grant view access to the goglides users at namespace istio-system, you can run the following command.
oc adm policy add-role-to-user view goglides -n istio-system
Output:
clusterrole.rbac.authorization.k8s.io/view added: "goglides"
Grant admin access by creating custom groups
You can run the following command to add cluster-admin access to users,
oc adm policy add-role-to-user cluster-admin goglides -n istio-system
clusterrole.rbac.authorization.k8s.io/cluster-admin added: "goglides"
But if you do not want to assign pre-defined roles directly. You can create new groups and add users to that new groups. After that, you can give admin permission to groups.
For this, create a localadmins group as follows,
oc adm groups new localadmins
Output:
group.user.openshift.io/localadmins created
Now you can add the users to the group:
oc adm groups add-users localadmins goglides tiger-team qa-team
Finally, grant the cluster-admin role to the group:
oc adm policy add-cluster-role-to-group cluster-admin localadmins
Output:
group.user.openshift.io/localadmins added: ["goglides" "tiger-team" "qa-team"]
Verification
Try running the following command before you start logging in using htpasswd-based users.
oc get users
Initially, this command returns nothing. Now try login in using one of the users mentioned in your htpasswd file and rerun the same command. You will start seeing new users,
Output:
NAME   UID         FULL NAME IDENTITIES
goglides  49f6152e-bd16-4c27-a31b-e2d9fd8a666d    HTPasswd:goglides
tiger-team 31765f8c-e998-4489-8329-6fbf0970f6fa    HTPasswd:tiger-team
You should also have admin permission with these users.
Remove users from the admin group
Removing users from the localadmins group is pretty easy; run the following command,
oc adm groups remove-users localadmins goglides
Output:
group.user.openshift.io/localadmins removed: "goglides"


Top comments (0)