Kubernetes namespace is a logical grouping of resources in a Kubernetes cluster. It is used to provide isolation and separation of concern between different users, teams, or projects in a cluster. Kubernetes namespace is used to segregate cluster resources and provide multi-tenancy in Kubernetes. All resources created within a namespace are isolated from other resources in different namespaces. This isolation helps prevent accidental name collisions between different resources.
Kubernetes namespaces are important for two reasons:
They provide isolation and separation of concern between different users, teams, or projects in a cluster.
They can be used to control access to resources in a cluster.
Namespaces are often used to create "virtual clusters" within a physical cluster, which can be helpful for organizational purposes. For example, you could use namespaces to separate different parts of your development process (e.g., dev, test, and prod), or to separate different teams that are using the same cluster.
Kubernetes namespaces are also helpful for security purposes, as they can be used to control who has access to what resources in a cluster. For example, you could use namespaces to ensure that only certain users have access to sensitive data.
Kubernetes namespace provides a mechanism to scope resources in a cluster. It is used to group related resources such as pods, services, secrets, and so on. Each namespace has a unique name and ID. By default, Kubernetes cluster has three namespaces: default, kube-system, and kube-public. When you create a resource in Kubernetes, you can specify the namespace in which the resource will be created. If you don't specify a namespace, the resource will be created in the default namespace.
Finally, Kubernetes namespaces are important for managing resources in a cluster. For example, you can use namespaces to limit the number of pods that a user can create, or to control how CPU and memory are allocated between different namespaces.
Creating Namespaces
Namespaces don't have a performance penalty. In some cases, they can even improve performance because the Kubernetes API will have fewer objects to work with. You can create a namespace by running a single command.
kubectl create namespace test
Or by using yaml file as followsm
kind: Namespace
apiVersion: v1
metadata:
  name: test
  labels:
    name: test
kubectl apply -f test.yaml
Deleting Namespaces
You can delete a namespace by running the following command.
kubectl delete namespace test
This will delete all the resources in the namespace, including any pods and services. If you just want to delete the namespace itself, you can use the --force flag.
kubectl delete namespace test --force
Viewing Namespaces
You can view all the namespaces in a Kubernetes cluster by running the following command.
kubectl get namespaces
This will list all the namespaces in the cluster, as well as their status and other information.
Creating Resources in the Namespace
By default, all resources created in Kubernetes are created in the default namespace. To create a resource in a specific namespace, you can use the -n flag.
Let’s take a look at a simple YAML to create a Pod:
apiVersion: v1
kind: Pod
metadata:
  name: nginx
  labels:
    name: nginx
spec:
  containers:
  - name: nginx
    image: nginx
There is no mention of namespaces in this file. If you run a kubectl apply on it, the Pod will be created in the current active namespace. This will be the "default" namespace unless you change it.
There are two ways to tell Kubernetes which Namespace you want to create your resources in.
Pass -n or --namespace flag when you create the resources.
kubectl create -f pod.yaml -n test
This will create all the resources in the test.yaml file in the test namespace.
You can also use the --namespace flag to specify the namespace in which a resource should be created.
kubectl create --namespace=test -f pod.yaml
Or specify a Namespace in the YAML declaration.
apiVersion: v1
kind: Pod
metadata:
  name: nginx
  namespace: test
  labels:
    name: nginx
spec:
  containers:
  - name: nginx
    image: nginx
Viewing Resources in a Namespace
To view all the resources in a namespace, you can use the -n flag.
kubectl get pods -n test
This will list all the pods in the test namespace.
You can also use the --namespace flag to specify the namespace in which you want to list resources.
kubectl get pods --namespace=test
Managing Access to Resources in a Namespace
By default, all users have full access to all resources in all namespaces. However, you can use RBAC (Role-Based Access Control) to control who has access to what resources in a namespace. For example, you could use RBAC to allow only certain users to get pod resources in a namespace.
apiVersion: rbac.authorization.k8s.io/v1
kind: Role
metadata:
  namespace: default
  name: pod-cka-reader
rules:
- apiGroups: [""]
  resources: ["pods"]
  verbs: ["get", "watch", "list"]
and you can bind this role to a particular user or service account
apiVersion: rbac.authorization.k8s.io/v1
kind: RoleBinding
metadata:
  name: read-pods
  namespace: test
subjects:
- kind: User
  name: goglides
  apiGroup: rbac.authorization.k8s.io
roleRef:
  kind: Role
  name: pod-cka-reader
  apiGroup: rbac.authorization.k8s.io
In the above two files, we can see that we created a role pod-cka-reader with some set of permissions and then we bind this role to the user goglides. So now user goglides can get, list, and watch pods in namespace test.
Cross Namespace communication
By default, services in one namespace can talk to services in other namespaces. This can be useful if you want to have your team's service in your namespace communicate with another team's service in another namespace. To disable communication between services in different namespaces, you can use a Network Policy. For more information on Network Policies, see the Kubernetes documentation.
If you want your app to access a Kubernetes Service, you can use the built-in DNS service discovery. Just point your app at the Service's name. However, you can create a service with the same name in multiple Namespaces. Services in Kubernetes expose their endpoint using a common DNS pattern. This means that if you want to find the endpoint for a service, you can use a DNS lookup to find it. The pattern is
<Service name>.<Namespace Name>.svc.cluster.local
Normally, you only need the Service's name and DNS will automatically resolve to the full address.
For example, if you want to connect to the "database" service in the "test" namespace. If you are making this query from the same namespace, you can simply use the following to access the service.
database
However, if you need to access a Service in another Namespace just use the Service name plus the Namespace name.
database.test
or you can also use FQDN as follows,
database.test.svc.cluster.local
Namespace naming rules
There are some naming rules when you create the namespace in the Kubernetes cluster. Name must consist of lower case alphanumeric characters or '-', and must start and end with an alphanumeric character and should pass validation of regex '[a-z0-9]([-a-z0-9]*[a-z0-9])?'. Namespace name doesn't support special characters such as ., *, %, _ etc. Otherwise, it will cause an error when you create the resource in that namespace. The following examples are valid namespace names:
default
test
myapp-prod
The following examples are invalid namespace names and will cause an error:
myapp.prod
myapp*prod
myapp%2fprod
You will following error message if you try to create namespace with invalid name,
kubectl create namespace "qa*h"
Output:
The Namespace "qa*h" is invalid:

* metadata.name: Invalid value: "qa*h": a lowercase RFC 1123 label must consist of lower case alphanumeric characters or '-', and must start and end with an alphanumeric character (e.g. 'my-name', or '123-abc', regex used for validation is '[a-z0-9]([-a-z0-9]*[a-z0-9])?')

* metadata.labels: Invalid value: "qa*h": a valid label must be an empty string or consist of alphanumeric characters, '-', '_' or '.', and must start and end with an alphanumeric character (e.g. 'MyValue', or 'my_value', or '12345', regex used for validation is '(([A-Za-z0-9][-A-Za-z0-9_.]*)?[A-Za-z0-9])?')
Another limitation is the name shouldn't be more than 63 characters. You will see the following error message if characters are more than 63.
kubectl create namespace "abcdefghijklmnopqrstuvwxyz0123456789abcdefghijklmnopqrstuvwxyz12"
Output:
The Namespace "abcdefghijklmnopqrstuvwxyz0123456789abcdefghijklmnopqrstuvwxyz12" is invalid:

* metadata.name: Invalid value: "abcdefghijklmnopqrstuvwxyz0123456789abcdefghijklmnopqrstuvwxyz12": must be no more than 63 characters

* metadata.labels: Invalid value: "abcdefghijklmnopqrstuvwxyz0123456789abcdefghijklmnopqrstuvwxyz12": must be no more than 63 characters
Setting the namespace preference
Kubectl uses the last namespace set in the configuration as the default. You can override this behavior by using kubectl config set-context --current --namespace=<namespace_name>. For example, if you want to set qa as the default namespace you can use the following command,
kubectl config set-context --current --namespace=qa
This will modify the current context,
Context "minikube" modified.
You can validate this using the following command,
kubectl config view --minify | grep namespace:
Output:
namespace: qa
Use NetworkPolicy to limit the connection
A Network Policy is a specification of how certain types of traffic are allowed to flow in and out of a namespace.
- between Pods
Kubernetes Services is an easy way to expose your application's functionality to other applications running in the cluster. By default, any Service is accessible from any other Pod in the same namespace. This can be a problem if you want to limit access to certain Pods or Services. To do this, you can use Network Policies. By creating and applying a Network Policy, you can control which Pods can communicate with each other.
- between Name Spaces
Kubernetes Services provides an easy way to expose your application's functionality to other applications running in the cluster. By default, any Service is accessible from any other namespace. This can be a problem if you want to limit access to certain namespaces or Services. To do this, you can use Network Policies. By creating and applying a Network Policy, you can control which namespaces can communicate with each other.
I will cover network policies in the upcoming blog.
Not All Objects are in a Namespace
Kubernetes also has some system-level resources that are not in any namespace. Cluster level objects like Nodes, and Persistent Volumes (PV) are some examples. Each object in Kubernetes has a unique identifier that is made up of the object's name and namespace. The name is unique within the namespace, but the same name could be used in multiple namespaces. This is why it is critical to always specify both the name and the namespace when working with Kubernetes objects.
If you don't specify a namespace, then Kubernetes will assume you are referring to a cluster-scoped object. This means that the object is not in any namespace. To list all of the objects in your cluster that are not in any namespace, you can use the --all-namespaces option with any kubectl command.
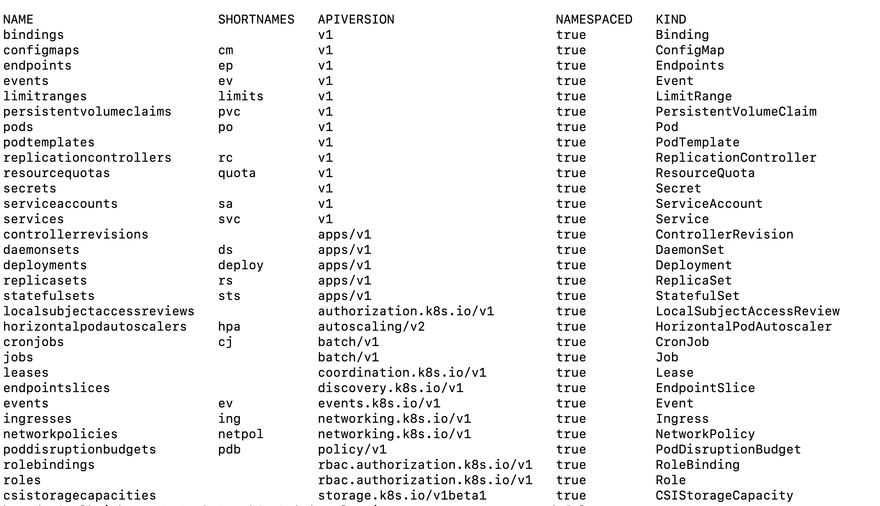
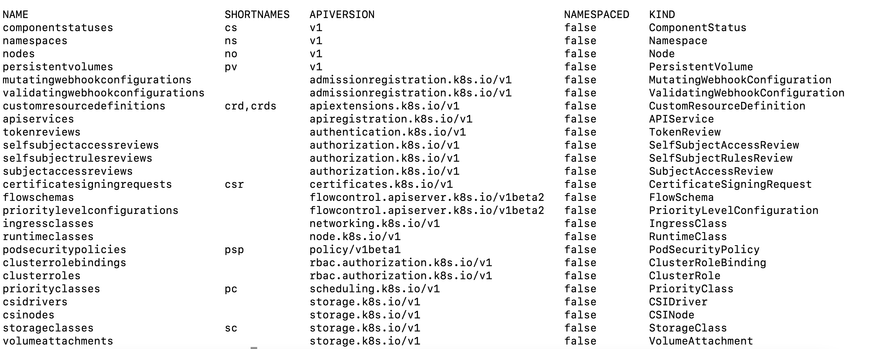
To see which Kubernetes resources are and aren't in a namespace:
# In a namespace

kubectl api-resources --namespaced=true
Output:
# Not in a namespace

kubectl api-resources --namespaced=false
Output:
Troubleshooting
Manually delete a terminating namespace
This is a very common problem and I have encountered it several times in the past. Sometimes for one reason or another, you may want to delete a namespace that is being terminated. Other times, it may just be that the namespace got stuck in the terminating state for some reason. Whatever the reason, deleting a terminating namespace is not as simple as just running kubectl delete ns . To do this, you first need to get the name of the namespace that is terminating. You can do this by running kubectl get ns and looking for the namespace in question. In my case, I want to delete the namespace "test", which is in the terminating state.
kubectl get ns
Output:
NAME          STATUS  AGE
default        Active  2d8h
kube-node-lease    Active  2d8h
kube-public      Active  2d8h
kube-system      Active  2d8h
kubernetes-dashboard  Active  2d6h
production       Active  7h3m
qa           Active  6h26m
test          Terminating   13s
Now that we have the name of the namespace, we can use kubectl to get more information about it.
kubectl get ns test -o yaml
You will see output similar to the following:
apiVersion: v1
kind: Namespace
metadata:
  creationTimestamp: 2021-03-01T15:43:57Z
  finalizers:
  - kubernetes.io/namespace-controller
  labels:
    app.kubernetes.io/managed-by: Helm
  name: test
  resourceVersion: "481945"
  selfLink: /api/v1/namespaces/test
  uid: a7fd91a3-2253-439d-b8d0-c23c5d2f3252
spec:
  finalizers:
  status: Terminating
As you can see, there is a "status" field with a value of "Terminating". We need to remove this field in order to delete the namespace. We can do this with a simple command.
kubectl patch ns test --type=merge -p '{"spec":{"finalizers": []}}'
You should now see that the "status" field has been removed from the output of kubectl get ns test -o yaml.
Now that the "status" field is gone, we can delete the namespace with the following command.
kubectl delete ns test
You should now see that the namespace has been successfully deleted.
namespace "test" deleted
If this simple patch command didn't fix the issue, let's try another approach,
Create a temporary JSON file with the following command. Replace with your namespace.
kubectl get namespace <terminating-namespace> -o json >tmp.json
Remove the kubernetes value from the spec.finalizers field in your tmp.json file and save it. Your tmp.json file should look like the following, notice spec.finalizers
{
  "apiVersion": "v1",
  "kind": "Namespace",
  "metadata": {
    "creationTimestamp": "2022-06-08T22:23:02Z",
    "deletionTimestamp": "2022-06-08T22:23:30Z",
    "labels": {
      "kubernetes.io/metadata.name": "test"
    },
    "name": "test",
    "resourceVersion": "49660",
    "uid": "a7fd91a3-2253-439d-b8d0-c23c5d2f3252"
  },

  "spec": {
    "finalizers": [    ]
  },

  "status": {
    "conditions": [
    ...
    ],
    "phase": "Terminating"
  }
}
Now open a new terminal and run the following command,
kubectl proxy
This command will start the Kubernetes API Proxy on port 8001.
Starting to serve on 127.0.0.1:8001
In your original terminal window, run the following command to update your namespace.
curl -k -H "Content-Type: application/json" -X PUT --data-binary @tmp.json http://127.0.0.1:8001/api/v1/namespaces/<terminating-namespace>/finalize
This should remove the terminating namespace. Verify the output,
kubectl get ns
Output:
NAME          STATUS  AGE
default        Active  2d8h
kube-node-lease    Active  2d8h
kube-public      Active  2d8h
kube-system      Active  2d8h
kubernetes-dashboard  Active  2d6h
production       Active  7h16m
qa           Active  6h39m
Another way you can remove stuck namespace is to identify resources still existing in the namespace as follows,
kubectl api-resources --verbs=list --namespaced -o name \
  | xargs -n 1 kubectl get --show-kind --ignore-not-found -n <namespace>
What's next?
In this article, you've learned about Kubernetes namespaces and how they can be used to isolate resources in a Kubernetes cluster. You've also learned how to create, delete, and view namespaces. You've seen how to control access to resources in a namespace using RBAC. Finally, we talk a little bit about network policy and how we can use network policy to control the traffic flow.
I hope you enjoyed this article and found it useful. In the next blog, we will discuss the Kubernetes object life cycle. We will also look deep into object types in more detail with examples. Thanks for reading!!!


Top comments (0)