
- What is NMState?
- Advantages NMState:
- Imperative vs. Declarative Approaches
- Installation of NMState
- Configuration file format
-
Update Network Configuration using
nmstatectl. - Update Network Configuration using libnmstate
- Uninstall NMState
- Conclusion
What is NMState?
Linux provides many ways to configure networking, including the popular Network Manager daemon and command-line tools such as nmcli and nmtui.This guide introduces another network configuration tool known as NMState.
Here is my understanding of NMState after reading a few articles.
NetworkManager State (NMState) is a network configuration tool that allows you to manage your networking via a declarative YAML file. It has an easy-to-use CLI and supports both IPv4 and IPv6 configurations. NMState also integrates with the Open vSwitch Database (OVSdb) for external ids management.
The declarative approach is a new way to configuration management of network devices in Linux. And it tries to idempotently maintain the system state instead of running a bunch of commands manually to achieve the same.
In this blog, I'm exploring some of the capabilities of NMState. I will install NMState using package manager from the source and run it inside a docker container. So if you are interested, keep reading.
Advantages NMState:
- Since NMState configures hosts following a declarative approach, it satisfies business demands for host networking management via a northbound declarative API, and the tool applies the configuration through a southbound provider. The declarative way has its advantages; you can see the system state as a whole (in JSON/YAML output) and have a history of system changes.
- Another advantage is that you can run this from any machine with NMState installed, and it doesn't need any root privileges on the host machine. You can use Sudo or Polkit for privilege escalation.
- Multi-provider support in the future; presently, NetworkManager is the only provider supported.
- NMState aids in enabling Infrastructure as Code and facilitates networking job automation. Because of the declarative nature of configuration, we can also use the GitOps process to manage the deployment.
- It also aids in the reduction of potential human error-related misconfigurations. NMState also supports transaction and network configuration verification.
- If you wish to administer NetworkManager with the Python programming language, you may use the
libnmstatePython library or thenmstatectlcommand-line tool directly. ## Imperative vs. Declarative Approaches In the imperative approach, you would have to specify every command manually (step-by-step process) to configure the system, which is time-consuming and prone to error.
On the other hand, Declarative allows you to define the configuration in a single file. This way, it is easier to understand the system, and any changes can be easily tracked.
For example, if you want to configure networking on a Linux host with the imperative approach, you need to use various NetworkManager utilities or commands such as nmcli, nmtui, or nm-connection-editor. This is what it would look like:
nmcli con add type ethernet con-name my-eno2np1 ifname eno2np1
nmcli con modify my-eno2np1 ipv4.addresses 192.168.4.100/24
nmcli con modify my-eno2np1 ipv4.gateway 192.168.4.1
nmcli con modify my-eno2np1 ipv4.dns "192.168.7.213 8.8.8.8"
nmcli con modify my-eno2np1 ipv4.method manual
nmcli con up my-eno2np1
As you can see, this is quite a bit of work just to configure basic networking. With NMState and declarative configuration, it can be done with one file:
interfaces:
  - name: eno2np1
    type: ethernet
    state: up
    ipv4:
      method: manual
      address:
      - ip: 192.168.4.100
        prefix-length: 24
      enabled: true
      dhcp: false
routes:
  config:
  - destination: 0.0.0.0/0
    metric: 150
    next-hop-address: 192.168.4.1
    next-hop-interface: eno2np1
    table-id: 254
dns-resolver:
  config:
    search: []
    server:
    - 192.168.7.213
    - 8.8.8.8
Now, if you want to apply this configuration, save the above content to some file, say mynetworkconfig.yaml, and simply run nmstatectl apply mynetworkconfig.yaml.
As you can see, the configuration is much simpler and easier to understand. You can also version control this file with Git to define your network as code.
I believe that the declarative approach offered by NMState is a much better way to configure networking on Linux hosts. It is simpler, easier to understand, and less error-prone.
Installation of NMState
Install NMState using dnf package manager in Fedora/RHEL/CentOS
NMState is available in the Fedora repositories and you can install this with the DNF package manager.
First update database with dnf using the following command.
sudo dnf makecache --refresh
Output should look like this
Updating Subscription Management repositories.
Extra Packages for Enterprise Linux 8 - x86_64                                                                                     38 kB/s |  18 kB     00:00
Extra Packages for Enterprise Linux Modular 8 - x86_64                                                                             80 kB/s |  18 kB     00:00
Red Hat Enterprise Linux 8 for x86_64 - AppStream (RPMs)                                                                          6.7 kB/s | 4.5 kB     00:00
Red Hat Virtualization Manager 4.4 for RHEL 8 x86_64 (RPMs)                                                                        16 kB/s | 4.0 kB     00:00
Fast Datapath for RHEL 8 x86_64 (RPMs)                                                                                            8.8 kB/s | 4.0 kB     00:00
Red Hat CodeReady Linux Builder for RHEL 8 x86_64 (RPMs)                                                                           24 kB/s | 4.5 kB     00:00
Red Hat Enterprise Linux 8 for x86_64 - BaseOS (RPMs)                                                                              11 kB/s | 4.1 kB     00:00
JBoss Enterprise Application Platform 7.4 (RHEL 8) (RPMs)                                                                          17 kB/s | 4.1 kB     00:00
Red Hat OpenStack Platform 16.2 Cinderlib for RHEL 8 x86_64 (RPMs)                                                                 18 kB/s | 4.0 kB     00:00
Red Hat Ceph Storage Tools 4 for RHEL 8 x86_64 (RPMs)                                                                              19 kB/s | 3.8 kB     00:00
Metadata cache created.
Now we can install nmstate using dnf by running the following command:
sudo dnf install nmstate
And that's it! Let's check the version as follows
nmstatectl --version
1.0.2
Install NMState using yum package manager in Fedora/RHEL/CentOS
First update yum database with yum using the following command.
sudo yum makecache --refresh
After that we can install nmstate using yum by running the following command:
sudo yum -y install nmstate
Install NMState using Source code
Alternatively, you can install the latest development version from the Git repository. First, clone the repository and check out the main branch.
git clone https://github.com/nmstate/nmstate
cd nmstate
Now, you can install NMState with the following command:
sudo python3 setup.py build
sudo python3 setup.py install
If you want to upgrade to the latest development version, simply run the git pull command inside the nmstate directory and then re-run the sudo python3 setup.py install command.
git pull
sudo python3 setup.py install
Now that NMState is installed, let's take a look at how to use it.
Install NMState using container/docker/podman
You can also run NMState using the container. First let's build the container image,
cat <<EOF > Dockerfile
FROM quay.io/centos/centos:stream9
RUN dnf makecache --refresh
RUN dnf -y install nmstate
ENTRYPOINT ["/usr/bin/nmstatectl"]
EOF
Save the above text to a file called Dockerfile and create the Docker image as follows:
docker build . -t nmstatectl
Then, for regular activities, establish a Linux alias.
alias nmstatectl="podman run -it --privileged=true --net host --volume /var/run/dbus:/var/run/dbus nmstatectl:latest"
Now you should be able to run nmstatectl command as usual.
nmstatecli version
1.0.2
Check a networking interface's current configuration, such as the eno1np0 configuration:
nmstatectl show eno1np0
---
dns-resolver:
  config:
    search: []
    server:
    - 192.168.7.213
    - 75.75.75.75
  running:
    search: []
    server:
    - 192.168.7.213
    - 75.75.75.75
route-rules:
  config: []
routes:
  config:
  - destination: 0.0.0.0/0
    metric: 102
    next-hop-address: 192.168.4.1
    next-hop-interface: eno1np0
    table-id: 254
  - destination: 192.168.4.1/32
    metric: 102
    next-hop-address: 0.0.0.0
    next-hop-interface: eno1np0
    table-id: 254
interfaces:
- name: eno1np0
  type: ethernet
  state: up
  ethernet:
    auto-negotiation: true
    duplex: full
    speed: 1000
    sr-iov:
      total-vfs: 0
      vfs: []
  ipv4:
    enabled: true
    address:
    - ip: 192.168.7.213
      prefix-length: 24
    dhcp: false
  ipv6:
    enabled: true
    address:
    - ip: fe80::b27b:25ff:fee2:1a74
      prefix-length: 64
    autoconf: false
    dhcp: false
  lldp:
    enabled: false
  mac-address: B0:7B:25:E2:1A:74
  mtu: 1400
Configuration file format
The nmstate package uses yaml/json to store the configuration files. The following sections describe the different parts of a nmstate configuration file (in yaml)
dns-resolver:
We're simply defining nameserver settings for this interface in this section. You might use something like this as an example.
dns-resolver:
  config:
   search:
   - goglides.com
   - goglides.io
   server:
   - 8.8.8.8
   - 2001:4860:4860::8888
route-rules:
It specifies the networking interface's routing rules. Some of the route-rules are as follows:
route-rules:
  config:
   ip_to: 192.0.2.0/24
   priority: 1000
   route_table: 50
routes:
There are both dynamic and static routes in this category.
routes:
  config:
  - destination: 198.51.100.0/24
   metric: 150
   next-hop-address: 192.0.2.1
   next-hop-interface: eth1
   table-id: 254
interfaces
An interface is a network interface that is either hardware or software.The interfaces section contains the configuration for each network interface on the system. The structure of this section is as follows:
interfaces:
  - name: INTERFACE_NAME
    type: TYPE
    state: STATE
    OPTIONS...
INTERFACE_NAME is the name of the network interface. This can be an Ethernet device (such as eth0), a WiFi device (wlan0), or a bond (bond0).
TYPE is the type of interface. This can be ethernet, wifi, or bond.
STATE is the state of the interface. This can be up or down.
OPTIONS are optional settings for the interface. These will be specific to the type of interface. For example, the options for an Ethernet interface will be different from the options for a WiFi interface.
Interface Options
The following sections describe the different options that can be set for each type of interface.
- Ethernet Interfaces: Ethernet interfaces have the following options:
- name: INTERFACE_NAME
  type: ethernet
  state: STATE
  mac_address: MAC_ADDRESS
  mtu: MTU
  dhcp4: true|false
  dhcp6: true|false
INTERFACE_NAME is the name of the Ethernet interface. This should be an Ethernet device (such as eth0).
STATE is the state of the interface. This can be up or down.
MAC_ADDRESS is the MAC address of the interface. This should be a valid MAC address.
MTU is the maximum transmission unit of the interface. This should be a valid MTU value.
DHCP4 and DHCP6 are boolean values that indicate whether or not DHCP should be used for IPv4 and IPv6 addresses, respectively.
- WiFi Interfaces: WiFi interfaces have the following options:
- name: INTERFACE_NAME
  type: wifi
  state: STATE
  mac_address: MAC_ADDRESS
  mtu: MTU
  ssid: SSID
  mode: Infrastructure|Ad-hoc
  security: WEP-PSK|WPA-PSK|WPA2-PSK|open
  password: PASSWORD
INTERFACE_NAME is the name of the WiFi interface. This should be a WiFi device (wlan0).
STATE is the state of the interface. This can be up or down.
MAC_ADDRESS is the MAC address of the interface. This should be a valid MAC address.
MTU is the maximum transmission unit of the interface. This should be a valid MTU value.
SSID is the SSID of the WiFi network. This should be a valid SSID.
MODE is the mode of the WiFi interface. This can be Infrastructure or Ad-hoc.
SECURITY is the security type of the WiFi interface. This can be WEP-PSK, WPA-PSK, WPA2-PSK, or open.
PASSWORD is the password for the WiFi network. This should be a valid password.
- Bond Interfaces: Bond interfaces have the following options:
- name: INTERFACE_NAME
  type: bond
  state: STATE
  mac_address: MAC_ADDRESS
  mtu: MTU
  mode: balance-rr|active-backup|balance-xor|broadcast|802.3ad|balance-tlb|balance-alb
  slaves:
    - INTERFACE1
    - INTERFACE2
  options:
    OPTION1: VALUE1
    OPTION2: VALUE2
INTERFACE_NAME is the name of the bond interface. This should be a bond (bond0).
STATE is the state of the interface. This can be up or down.
MAC_ADDRESS is the MAC address of the interface. This should be a valid MAC address.
MTU is the maximum transmission unit of the interface. This should be a valid MTU value.
MODE is the mode of the bond interface. This can be balance-rr, active-backup, balance-xor, broadcast, 802.3ad, balance-tlb, or balance-alb.
SLAVES is a list of interfaces that are part of the bond. These should be valid interface names.
OPTIONS are optional settings for the bond interface. These will be specific to the mode of the interface.
Update Network Configuration using nmstatectl.
The nmstatectl utility can be used to both show and modify the configuration of a system's networking interfaces.
The syntax for nmstatectl is:
nmstatectl {OPTIONS} COMMAND
{OPTIONS}: options that can be passed in order to modify the default behavior of the command
COMMAND: the actual nmstatectl command to be executed
The most common commands used with nmstatectl are showing and set.
- To show the current configuration of a system's networking interfaces, use the following command:
nmstatectl show
- To modify the configuration of a system's networking interfaces, use the following command:
nmstatectl apply CONFIG_FILE
CONFIG_FILE is the path to the configuration file that contains the desired configuration state.
Creating a Configuration File
As mentioned before, configuration files are stored in YAML/JSON format. The file must be valid YAML/JSON, or the nmstatectl command will return an error. An example of YAML format can be found above, and a sample JSON configuration file is shown below:
{
    "dns-resolver": {
        "config": {
            "search": [],
            "server": [
                "192.168.7.213",
                "75.75.75.75"
            ]
        },
        "running": {
            "search": [],
            "server": [
                "192.168.7.213",
                "75.75.75.75"
            ]
        }
    },
    "route-rules": {
        "config": []
    },
    "routes": {
        "config": [
            {
                "destination": "0.0.0.0/0",
                "metric": 102,
                "next-hop-address": "192.168.4.1",
                "next-hop-interface": "eno1np0",
                "table-id": 254
            },
            {
                "destination": "192.168.4.1/32",
                "metric": 102,
                "next-hop-address": "0.0.0.0",
                "next-hop-interface": "eno1np0",
                "table-id": 254
            }
        ]
    },
    "interfaces": [
        {
            "name": "eno1np0",
            "type": "ethernet",
            "state": "up",
            "ethernet": {
                "auto-negotiation": true,
                "duplex": "full",
                "speed": 1000,
                "sr-iov": {
                    "total-vfs": 0,
                    "vfs": []
                }
            },
            "ipv4": {
                "enabled": true,
                "address": [
                    {
                        "ip": "192.168.7.213",
                        "prefix-length": 24
                    }
                ],
                "dhcp": false
            },
            "ipv6": {
                "enabled": true,
                "address": [
                    {
                        "ip": "fe80::b27b:25ff:fee2:1a74",
                        "prefix-length": 64
                    }
                ],
                "autoconf": false,
                "dhcp": false
            },
            "lldp": {
                "enabled": false
            },
            "mac-address": "B0:7B:25:E2:1A:74",
            "mtu": 1400
        }
    ]
}
Modify the configuration
There are 2 ways you can modify network configuration using nmstatectl.
Interactive: Editing the interface configuration through
nmstatectledit with the required arguments. This command invokes the text editor defined by the environment variable EDITOR so that you can edit the network state in yaml format. After finishing the edition, NMState will apply the new network configuration. This method is recommended only for testing purposes or when making minimal changes. For all other cases, use a configuration file.File-Based: You can use a declarative file/configuration file (both yaml and json format supported) to apply the desired configuration state to your network interfaces using the
nmstatectl applycommand. You can also store this json/yaml file in Git like version control system to define your network insfrastructure as a code and use custom operator/controller to apply those configuration.
Apply a configuration using interactive way
We can use nmstatectl edit command to change the network configuration on the fly.
Let's say we want to adjust the MTU (Maximum Transmission Unit) of the eno1np0 network interface using interactive mode. This is set to 1500 by default, as displayed.
ifconfig
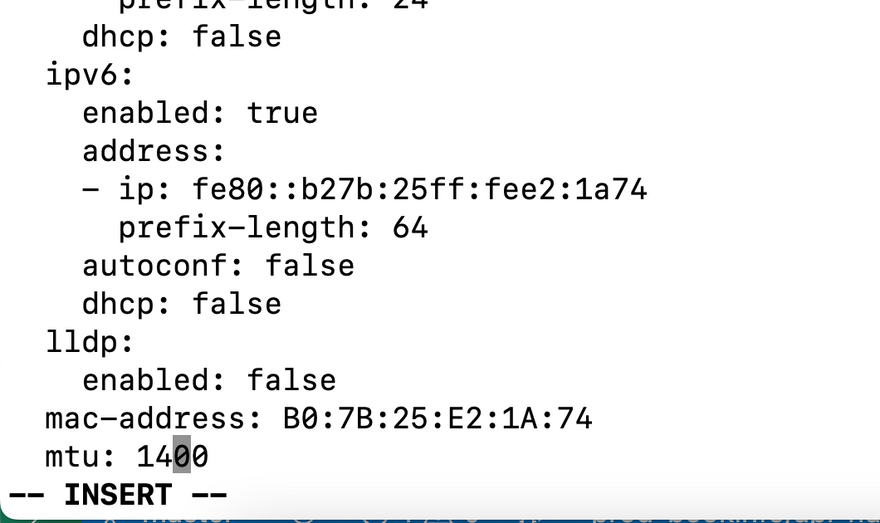
Let's use nmstatectl edit command as follows to change it to 1400.
sudo nmstatectl edit eno1np0
This will launch a text editor, in this example, vim. Next, identify the mtu parameter by scrolling all the way down. As if we were editing a file in vim, we'll update the value to 1400. After that, we'll save the modifications.

You will see output like this,
...
...
2022-04-12 14:05:52,796 root         DEBUG    Async action: Retrieve applied config: bridge virbr0 finished
Unhandled AF_SPEC_BRIDGE_INFO: 0 [2, 0]
Unhandled AF_SPEC_BRIDGE_INFO: 1 [0, 0]
Unhandled AF_SPEC_BRIDGE_INFO: 0 [2, 0]
Unhandled AF_SPEC_BRIDGE_INFO: 1 [0, 0]
2022-04-12 14:05:52,813 root         DEBUG    Async action: Destroy checkpoint /org/freedesktop/NetworkManager/Checkpoint/23 started
2022-04-12 14:05:52,815 root         DEBUG    Checkpoint /org/freedesktop/NetworkManager/Checkpoint/23 destroyed
2022-04-12 14:05:52,815 root         DEBUG    Async action: Destroy checkpoint /org/freedesktop/NetworkManager/Checkpoint/23 finished
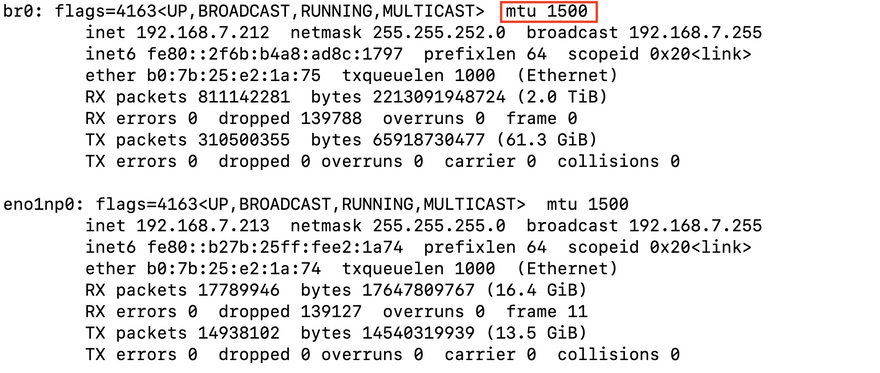
Now lets us confirmed ifconfig again to make sure changes are made.
# ifconfig
br0: flags=4163<UP,BROADCAST,RUNNING,MULTICAST>  mtu 1500
        inet 192.168.7.212  netmask 255.255.252.0  broadcast 192.168.7.255
        inet6 fe80::2f6b:b4a8:ad8c:1797  prefixlen 64  scopeid 0x20<link>
        ether b0:7b:25:e2:1a:75  txqueuelen 1000  (Ethernet)
        RX packets 811144704  bytes 2213093075579 (2.0 TiB)
        RX errors 0  dropped 139825  overruns 0  frame 0
        TX packets 310502299  bytes 65919126789 (61.3 GiB)
        TX errors 0  dropped 0 overruns 0  carrier 0  collisions 0
eno1np0: flags=4163<UP,BROADCAST,RUNNING,MULTICAST>  mtu 1400
        inet 192.168.7.213  netmask 255.255.255.0  broadcast 192.168.7.255
        inet6 fe80::b27b:25ff:fee2:1a74  prefixlen 64  scopeid 0x20<link>
        ether b0:7b:25:e2:1a:74  txqueuelen 1000  (Ethernet)
        RX packets 17792452  bytes 17648202422 (16.4 GiB)
        RX errors 0  dropped 139164  overruns 0  frame 11
        TX packets 14940051  bytes 14540553517 (13.5 GiB)
        TX errors 0  dropped 0 overruns 0  carrier 0  collisions 0
From the terminal output you can see we have successfully changed the MTU to 1400 from the default 1500 value.
Apply a configuration using file based approach
Once you have created a valid configuration file, you can apply it into NMState using the nmstatectl utility.
To apply a configuration file, use the following command:
nmstatectl apply CONFIG_FILE
CONFIG_FILE is the path to the configuration file that contains the desired configuration state.
Temporary configuration, Rollback and Persisting a Configuration
The nmstatectl utility can be used to create a checkpoint which later could be used for rollback or commit.
For example you can use following command to apply network configuration
nmstatectl apply CONFIG_FILE --no-commit
This will create a checkpoint, example:
...
Checkpoint: NetworkManager|/org/freedesktop/NetworkManager/Checkpoint/11
Now you can rollback to this checkpoint. If checkpoint path is not applied nmstatectl will take the latest checkpoint
nmstatectl rollback
If you have multiple checkpoint you can pass the checkpoint path
nmstatectl rollback <checkpoint_path>
Or if you want to persist the current configuration so that it is applied automatically at system boot you can do so by using commit.
To latest checkpoint if not defined as argument
nmstatectl commit
Or to specific checkpoint
nmstatectl commit <checkpoint_path>
NMState has an intriguing feature that allows you to configure a desired networking state temporarily. If you're happy with the setup, you may commit it thereafter. Otherwise, after the timeout ends, it will revert (default is 60 sec). If you want to override the default vaule you can pass timeout options as follows,
nmstatectl apply CONFIG_FILE --no-commit --timeout 10
nmstatectl apply CONFIG_FILE --no-commit --timeout 120
Testing a Configuration File using non persistent
If you do not want to make persistent changes to your network configuration you can do it so by passing --memory-only parameter in your nmstatectl apply command.
To test a configuration file, use the following command:
nmstatectl apply CONFIG_FILE --memory-only
CONFIG_FILE is the path to the configuration file that contains the desired configuration state. The changes made are removed as soon as you reboot the system.
Generate Network configuration files
This tool can also generate configuration files for your network based on the state files you provide. The output will be in the form of a dictionary, with the plugin name as the key and a tuple as the value. The tuple will contain the name of the configuration file and its contents.
For example
nmstatectl gc eno1np0.yaml
Will produce following output
---
NetworkManager:
- - eno1np0.nmconnection
  - '[connection]
    id=eno1np0
    uuid=c96c9019-e3c2-4219-9098-45cc4100850a
    type=ethernet
    interface-name=eno1np0
    lldp=0
    permissions=
    [ethernet]
    auto-negotiate=true
    cloned-mac-address=B0:7B:25:E2:1A:74
    duplex=full
    mac-address-blacklist=
    mtu=1400
    speed=1000
    [sriov]
    [ipv4]
    address1=192.168.7.213/24
    dhcp-client-id=mac
    dns=192.168.7.213;75.75.75.75;
    dns-priority=40
    dns-search=
    method=manual
    route1=0.0.0.0/0,192.168.4.1,102
    route1_options=table=254
    route2=192.168.4.1/32,0.0.0.0,102
    route2_options=table=254
    [ipv6]
    addr-gen-mode=eui64
    dhcp-duid=ll
    dhcp-iaid=mac
    dns-search=
    method=link-local
    [proxy]
    '
Update Network Configuration using libnmstate
The nmstate package provides the libnmstate Python library to manage NetworkManager on RHEL.The libnmstate library can be used in a Python application to load, apply, and save configuration files.
Importing the Library
To use the libnmstate library in a Python application, it must first be imported. This can be done with the following code:
import libnmstate
Once you import the library, you will have access to nmstate functions as shown below,

Using configuration file
The following example shows how to use the libnmstate library to load and apply a configuration file directly. Make sure you are using the JSON format for this particular example.
Save the following content in the eno1np0.py file.
import libnmstate
import json

with open('eno1np0.json') as f:
   data = json.load(f)

libnmstate.apply(data)
Now execute as follows,
python eno1np0.py
Get information on the current network state
import libnmstate

network_state = libnmstate.show()
eno1np0_state = next(ifstate for ifstate in network_state['interfaces'] if ifstate['name'] == 'eno1np0')

print(eno1np0_state['mtu'])
print(eno1np0_state['mac-address'])
print(eno1np0_state['ipv4']['address'])
Save the content to eno1np0-show.py and run as follows.
python eno1np0-show.py
You will see output something similar to this,
1500
B0:7B:25:E2:1A:74
[{'ip': '192.168.7.213', 'prefix-length': 24}]
Modify network configuration
It's easy to modify the current state using libnmstate; take a look on the following example,
import libnmstate

network_state = libnmstate.show()
eno1np0_state = next(ifstate for ifstate in network_state['interfaces'] if ifstate['name'] == 'eno1np0')

eno1np0_state['mtu'] = 1400
libnmstate.apply(network_state)
Save the content to eno1np0-modify.py and run as follows.
python eno1np0-modify.py
Now verify the output using nmstatectl
nmstatectl show eno1np0 | grep mtu
You will output
mtu: 1400
Uninstall NMState
To uninstall only the nmstate package, use the following command:
sudo dnf remove nmstate
Conclusion
NMState is a tool that helps to configure networking in a host. This is done by defining the desired networking configuration state either interactively or with a json/yaml file descriptively. This provides a convenient way to alter your network settings without using the NetworkManager command-line kind of tool. With this type of tool, you can also automate networking tasks, integrate with your CI/CD process in your GitOps workflow, and reduce the chances of human error. NMState is especially useful for those who are looking to improve their DevOps workflows. By automating networking tasks, NMState can help to speed up deployments and ensure that networking configurations are consistent across environments.


Top comments (0)