
Developing data science applications often requires rapid testing and iteration. If you're using Red Hat OpenShift AI (RHOAI), you can set up a temporary testing environment that allows you to bypass the complexities of containerization during the initial development phase. This guide outlines a simple workaround to test your applications directly from your local machine or using DNS.
Create a Simple Web Application
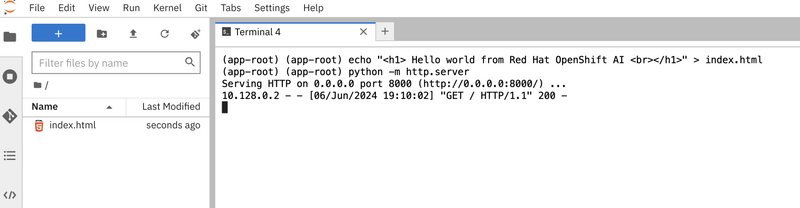
Let's start by creating a basic web application within your RHOAI environment. Use the terminal in your RHOAI workbench to create an HTML file named index.html. This file will contain a greeting message that acknowledges the RHOAI environment:
echo "<h1>Hello world from Red Hat OpenShift AI<br/></h1>" > index.html
Now run a simple HTTP server to serve your page by executing:
python -m http.server
You should see an output similar to this.
Create a Kubernetes Service
Next create a Kubernetes Service, to manage access to your application:
kind: Service
apiVersion: v1
metadata:
  name: <workbench-name>-custom-app
spec:
  ports:
    - protocol: TCP
      port: 80
      targetPort: 8000
  type: ClusterIP
  selector:
    statefulset: <workbench-name>
Establish an OpenShift Route
To make your service accessible outside the internal network, set up an OpenShift route:
kind: Route
apiVersion: route.openshift.io/v1
metadata:
  name: <workbench-name>-custom-app
spec:
  to:
    kind: Service
    name: <workbench-name>-custom-app
  port:
    targetPort: 8000
  wildcardPolicy: None
Configure a Network Policy
Ensure your application is reachable by defining a network policy that allows traffic on port 8000:
kind: NetworkPolicy
apiVersion: networking.k8s.io/v1
metadata:
  name: <workbench-name>-custom-app
spec:
  podSelector:
    matchLabels:
      notebook-name: <workbench-name>
  ingress:
    - ports:
        - protocol: TCP
          port: 8000
  policyTypes:
    - Ingress
Applying YAML Configuration in OpenShift
The following note provides instructions on how to apply a YAML configuration file in the OpenShift Developer Console. Ensure that the developer user has access to this operation.
- Navigate to the Developer section in the OpenShift Console.
- Click on the +Add button.
- Select the Import YAML option.
- Paste your YAML configuration into the editor.
- Ensure to replace with the appropriate name throughout the YAML file.
The screenshot below demonstrates this process:

Now you can access the application using the browser as shown in following screenshots,
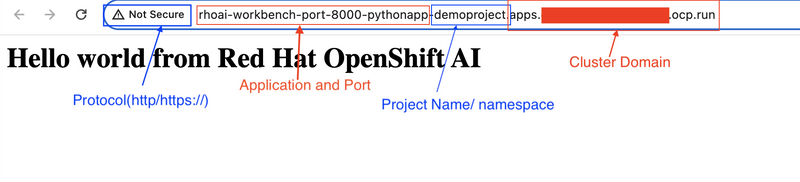
The default pattern for an OpenShift route typically follows a structured format that includes several components to ensure that the route is unique and accessible within the hosted environment. For the example you provided, the pattern can be broken down as follows:
- http:// - This is the protocol used for the HTTP connection.
- *rhoai-workbench-port-8000-pythonapp *- This part usually includes the name of the application or service, which in this case is indicative of the specific workbench and port used, along with the name of the application.
- -demoproject - This often represents the name of the project or namespace within OpenShift where the application is deployed.
- *.apps.cloudc.xtoph.dfw.ocp.run/ *- This suffix represents the cluster's domain, which typically includes subdomains or identifiers for the specific OpenShift cluster and its geographical or organizational placement.
- This format is designed to automatically provide a unique and direct URL to each deployed service, facilitating access without manual DNS configuration.
Development Considerations on RHOAI
When developing on RHOAI, this setup allows you to quickly test changes without the need for full deployment cycles. However, remember that this method is suitable for development and testing phases only. For production deployments:
- Containerize Your Application: Build a container image using a Containerfile.
- Deploy Using Kubernetes Objects: Use deployment objects to manage and scale your application effectively.
Bonus: Run a Simple Flask Server
Sometimes, the application server itself can block traffic, so ensure that this issue isn't affecting your setup. In this demonstration, I am using a simple Flask-based application to illustrate the process.
- Ensure you have Python and Flask installed. If not, you can install Flask using pip:
pip install flask
- Create a new Python file, e.g.,
app.py, and add the following code:
from flask import Flask
import socket

app = Flask(__name__)

@app.route('/')
def hello_world():
    ip = socket.gethostbyname(socket.gethostname())
    return f"Hello world from Red Hat OpenShift AI, I am running inside {ip}"

if __name__ == '__main__':
    app.run(host='0.0.0.0', port=8000)
Here this app.run(host='0.0.0.0', port=8000) starts the Flask development server, making it accessible on all network interfaces (external access) at port 8000. This is useful for testing and development purposes, especially when you want to access the application from other devices or environments.
- Run your Flask application using the following command:
python app.py
Your Flask server will start and be accessible at http://<your-openshift-route>:8000. The application will dynamically fetch and display the server's IP address.


Top comments (0)