What is a service object?
Anyone who doesn’t know about Kubernetes Service Object, directly from official page, Service is an abstraction which defines a logical set of Pods and a policy by which to access them. Technically speaking it’s a proxy component running inside a Kubernetes cluster, which route the traffics to specific pods based on label selector.
A Kubernetes service object is an abstract way to expose an application running on a set of Pods as a network service. When created, each Service object is associated with a set of Pods (identified by the selector) and a port on each of the contained pods. The service proxy provides network routing to the selected pods.
What are the benefits of using a service object?
By creating a service, you can specify the type of traffic that should be routed to your application, as well as the port that your application is running on. In addition, you can also set up load balancing and session persistence rules. As a result, using a Kubernetes service object can help to simplify the process of managing and deploying your applications. In addition, it can also help to improve the performance of your applications by ensuring that traffic is routed efficiently.
How do you create a service object?
A service is defined by creating a service descriptor file. This file uses YAML syntax to identify the desired state of the Service object. In this file, you must specify the kind and apiVersion fields to indicate that this resource is a Service definition, followed by the metadata for the Service including a name and optionally labels and annotations. The spec section contains the configuration of the Service itself: what type of Service, which Pods are contained in it (identified by selector), and what ports are exposed on each Pod (identified by port). Finally, you may optionally specify any clusterIP, externalName, loadBalancerIP, or externalTrafficPolicy values. You can create Services using kubectl create service or equivalent client tools such as oc create service. After you have created your new Services, kube-proxy will configure the underlying infrastructure to route traffic to your pods.
Examples
Let’s create a sample hello-world application using the following manifest and try all 3 services types.
hello-world.yaml
apiVersion: extensions/v1beta1
kind: Deployment
metadata:
  name: hello-world
  labels:
    app: hello-world
spec:
  replicas: 1
  template:
    metadata:
      labels:
        app: hello-world
    spec:
      containers:
      - image: gcr.io/google-samples/hello-app:1.0
        imagePullPolicy: IfNotPresent
        name: hello-world
        ports:
        - containerPort: 8080
          protocol: TCP
Apply the manifest using kubectl apply -f hello-world.yaml and validate as follows.
kubectl describe -f hello-world.yaml

Output:
Name: hello-world
Namespace: default
CreationTimestamp: Tue, 10 Mar 2020 12:52:03 -0600
Labels: app=hello-world
Annotations: deployment.kubernetes.io/revision: 1
                        kubectl.kubernetes.io/last-applied-configuration:
                          {"apiVersion":"extensions/v1beta1","kind":"Deployment","metadata":{"annotations":{},"labels":{"app":"hello-world"},"name":"hello-world","n...
Selector: app=hello-world
Replicas: 1 desired | 1 updated | 1 total | 1 available | 0 unavailable
StrategyType: RollingUpdate
MinReadySeconds: 0
RollingUpdateStrategy: 1 max unavailable, 1 max surge
Pod Template:
  Labels: app=hello-world
  Containers:
   hello-world:
    Image: gcr.io/google-samples/hello-app:1.0
    Port: 8080/TCP
    Host Port: 0/TCP
    Environment: <none>
    Mounts: <none>
  Volumes: <none>
Conditions:
  Type Status Reason
  ---- ------ ------
  Available True MinimumReplicasAvailable
OldReplicaSets: <none>
NewReplicaSet: hello-world-5b55d8d85b (1/1 replicas created)
Events:
  Type Reason Age From Message
  ---- ------ ---- ---- -------
  Normal ScalingReplicaSet 5m18s deployment-controller Scaled up replica set hello-world-5b55d8d85b to 1
“Hello World” application is up and running.
ClusterIP
A ClusterIP is a default service type which exposes spec.clusterIp:spec.ports[*].port
- Exposes the service on a cluster internal IP and accessible from spec.clusterIp port.
- If a spec.ports[*].targetPort is set it will route from the port to the targetPort.
- You can only access the service while inside the cluster, meaning only container to container communication is possible.
Let’s create a ClusterIP Service type that matches the above deployment.
clusterip-service.yaml
apiVersion: v1
kind: Service
metadata:
  name: clusterip-helloworld
spec:
  selector:
    app: hello-world
  ports:
    - protocol: TCP
      port: 80
      targetPort: 8080
Apply the manifest using kubectl apply -f clusterip-service.yaml and validate as follows.
kubectl get svc clusterip-helloworld -o json

Output:
{
  "apiVersion": "v1",
  "kind": "Service",
  "metadata": {
    "annotations": {
      "kubectl.kubernetes.io/last-applied-configuration": "{\"apiVersion\":\"v1\",\"kind\":\"Service\",\"metadata\":{\"annotations\":{},\"name\":\"clusterip-helloworld\",\"namespace\":\"default\"},\"spec\":{\"ports\":[{\"port\":80,\"protocol\":\"TCP\",\"targetPort\":8080}],\"selector\":{\"app\":\"hello-world\"}}}\n"
    },
    "creationTimestamp": "2020-03-10T18:54:31Z",
    "name": "clusterip-helloworld",
    "namespace": "default",
    "resourceVersion": "1026527",
    "selfLink": "/api/v1/namespaces/default/services/clusterip-helloworld",
    "uid": "9f83d2e9-c3b1-4492-8ffe-12dd84b23dcc"
  },
  "spec": {
    "clusterIP": "10.104.64.157",
    "ports": [
      {
        "port": 80,
        "protocol": "TCP",
        "targetPort": 8080
      }
    ],
    "selector": {
      "app": "hello-world"
    },
    "sessionAffinity": "None",
    "type": "ClusterIP"
  },
  "status": {
    "loadBalancer": {}
  }
}
As per the output Endpoints: 10.1.0.188:8080 which means service object matches one pod with label app=hello-world. We can test the service object by connecting to the same pods as follows,
kubectl get pods

Output:
NAME READY STATUS RESTARTS AGE
hello-world-5b55d8d85b-h8r7s 1/1 Running 0 10m
exec into pod
kubectl exec -it hello-world-5b55d8d85b-h8r7s sh

## No curl command present inside hello-world so I am using wget,

/ # wget [http://clusterip-helloworld](http://clusterip-helloworld)
Connecting to clusterip-helloworld (10.104.64.157:80)
index.html 100% | ***************************************************************** | 68 0:00:00 ETA

/ # cat index.html
Hello, world!
Version: 1.0.0
Hostname: hello-world-5b55d8d85b-h8r7s
This means we can connect to the application using ClusterIP service object.
NodePort
A NodePort exposes the following:
<NodeIP>:spec.ports[*].nodePort
spec.clusterIp:spec.ports[*].port
- This means it exposes the service on each Node’s IP at a static port (the NodePort).
- You’ll be able to contact the NodePort service, from outside the cluster, by requesting
<NodeIP>:<NodePort>. - When you access service like this, it will route the request to spec.clusterIp:spec.ports[*].port, which will in turn route it to your spec.ports[*].targetPort, if set.
- This also means you can access the service the same way as ClusterIP, meaning you can access the application using ClusterIP inside the cluster, but you can’t access service :spec.ports[*].nodePort from outside.
Let’s create a NodePort Service type that matches the above deployment.
nodeport-service.yaml
apiVersion: v1
kind: Service
metadata:
  name: nodeport-helloworld
spec:
  selector:
    app: hello-world
  ports:
    - protocol: TCP
      port: 80
      targetPort: 8080
  type: NodePort
Apply the manifest file using kubectl apply -f nodeport-service.yaml and validate as follows,
kubectl get svc nodeport-helloworld -o json
{
  "apiVersion": "v1",
  "kind": "Service",
  "metadata": {
    "annotations": {
      "kubectl.kubernetes.io/last-applied-configuration": "{\"apiVersion\":\"v1\",\"kind\":\"Service\",\"metadata\":{\"annotations\":{},\"name\":\"nodeport-helloworld\",\"namespace\":\"default\"},\"spec\":{\"ports\":[{\"port\":80,\"protocol\":\"TCP\",\"targetPort\":8080}],\"selector\":{\"app\":\"hello-world\"},\"type\":\"NodePort\"}}\n"
    },
    "creationTimestamp": "2020-03-10T20:16:49Z",
    "name": "nodeport-helloworld",
    "namespace": "default",
    "resourceVersion": "1032459",
    "selfLink": "/api/v1/namespaces/default/services/nodeport-helloworld",
    "uid": "2473d7ab-afcf-4f59-9431-2bc45edbb86c"
  },
  "spec": {
    "clusterIP": "10.100.54.48",
    "externalTrafficPolicy": "Cluster",
    "ports": [
      {
        "nodePort": 31666,
        "port": 80,
        "protocol": "TCP",
        "targetPort": 8080
      }
    ],
    "selector": {
      "app": "hello-world"
    },
    "sessionAffinity": "None",
    "type": "NodePort"
  },
  "status": {
    "loadBalancer": {
      "ingress": [
        {
          "hostname": "localhost"
        }
      ]
    }
  }
}
As per above output you should able to browse application outside kubernetes cluster as follows,
# Find NodePort
$ kubectl get svc nodeport-helloworld -o custom-columns=nodePort:.spec.ports[].nodePort
nodePort
31666

# Find any NodeIP
kubectl get node -o wide

Output:
NAME STATUS ROLES AGE VERSION INTERNAL-IP EXTERNAL-IP OS-IMAGE KERNEL-VERSION CONTAINER-RUNTIME
docker-desktop Ready master 47d v1.15.5 192.168.65.3 <none> Docker Desktop 4.19.76-linuxkit docker://19.3.5

# Use NodeIp and NodePort
$ curl 192.168.65.3:31666
Output:
Hello, world!
Version: 1.0.0
Hostname: hello-world-5b55d8d85b-h8r7s
And inside cluster (exec to any pod first, kubectl exec -it hello-world-5b55d8d85b-h8r7s sh) as follows,
$ kubectl get svc nodeport-helloworld -o custom-columns=clusterIP:.spec.clusterIP,port:.spec.ports[].port

Output:
clusterIP port
10.100.54.48 80

/ # wget 10.100.54.48
Connecting to 10.100.54.48 (10.100.54.48:80)
index.html 100% | *********************************************************************** | 68 0:00:00 ETA

/ # cat index.html
Hello, world!
Version: 1.0.0
Hostname: hello-world-5b55d8d85b-h8r7s
LoadBalancer
A LoadBalancer exposes the service externally using a cloud provider’s load balancer. It exposes the following:
spec.loadBalancerIp:spec.ports[*].port
<NodeIP>:spec.ports[*].nodePort
spec.clusterIp:spec.ports[*].port
- This means you can access service externally using your loadbalancer ip.
- This also means you’ll be able to contact the LoadBalancer service, from outside the cluster, by requesting
<NodeIP>:<NodePort>. - This also means you can access the service same way as ClusterIP.
Let’s create a LoadBalancer Service type that matches the above deployment.
loadbalancer-service.yaml
apiVersion: v1
kind: Service
metadata:
  name: loadbalancer-helloworld
spec:
  selector:
    app: hello-world
  ports:
    - protocol: TCP
      port: 80
      targetPort: 8080
  type: LoadBalancer
Apply the manifest file using kubectl apply -f loadbalancer-service.yaml.
Now identify all endpoints for each type,
- LoadBalancer type
$ kubectl get svc loadbalancer-helloworld -o custom-columns=HOSTNAME:.status.loadBalancer.ingress[].hostname,PORT:.spec.ports[].port

Output:
HOSTNAME PORT
localhost 80

$ curl localhost

Output:
Hello, world!
Version: 1.0.0
Hostname: hello-world-5b55d8d85b-h8r7s
- NodePort Type
# Find NodePort
$ kubectl get svc loadbalancer-helloworld -o custom-columns=nodePort:.spec.ports[].nodePort --no-headers

Output:
31238

# Find any NodeIP
$ kubectl get node -o wide

Output:
NAME STATUS ROLES AGE VERSION INTERNAL-IP EXTERNAL-IP OS-IMAGE KERNEL-VERSION CONTAINER-RUNTIME
docker-desktop Ready master 47d v1.15.5 192.168.65.3 <none> Docker Desktop 4.19.76-linuxkit docker://19.3.5

# curl 192.168.65.3:31238
Hello, world!
Version: 1.0.0
Hostname: hello-world-5b55d8d85b-h8r7s
- Service Type
# Find Service IP
kubectl get svc loadbalancer-helloworld -o custom-columns=clusterIP:.spec.clusterIP,port:.spec.ports[].port

Output:
clusterIP port
10.108.228.116 80

# Exec into container
kubectl exec -it hello-world-5b55d8d85b-h8r7s sh

# wget
/ # wget 10.108.228.116
Connecting to 10.108.228.116 (10.108.228.116:80)
index.html 100% | ************************************************************************* | 68 0:00:00 ETA

/ # cat index.html
Hello, world!
Version: 1.0.0
Hostname: hello-world-5b55d8d85b-h8r7s
Conclusion
Based on the above example,
- If you create LoadBalancer service type it automatically creates NodePort and ClusterIP types service object also.
- If you create NodePort service type it automatically creates ClusterIP types service object also.
This means ClusterIP exposure < NodePort exposure < LoadBalancer exposure
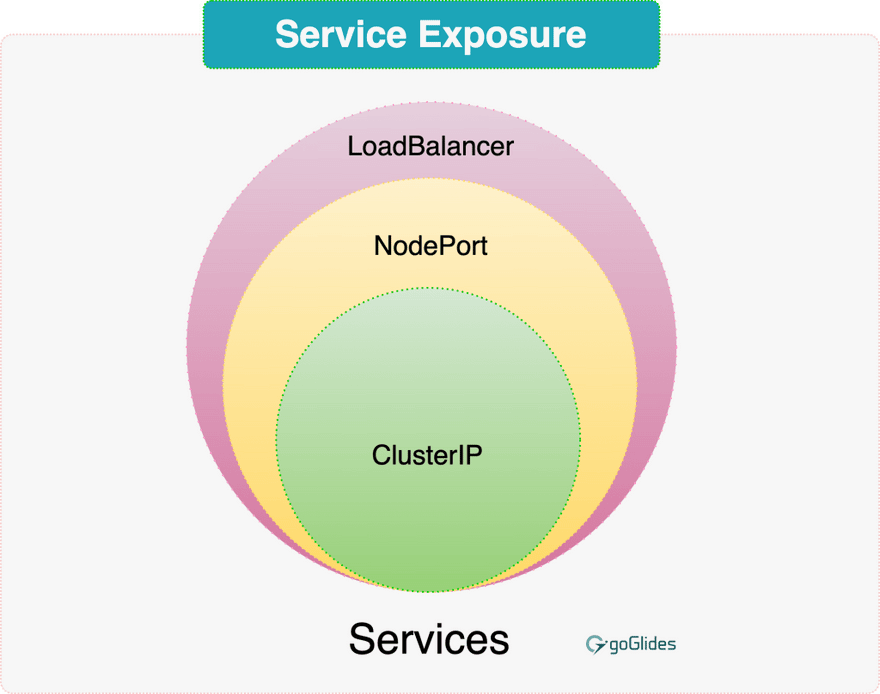
- If you want to expose something externally, you have to create LoadBalancer or NodePort type service objects, otherwise you can simply use ClusterIP service type.
- You can have multiple service types for the same application, we created all 3 service types in the above example.
kubectl get svc -o wide | grep hello-world

Output:
clusterip-helloworld ClusterIP 10.104.64.157 <none> 80/TCP 156m app=hello-world
loadbalancer-helloworld LoadBalancer 10.108.228.116 localhost 80:31238/TCP 54m app=hello-world
nodeport-helloworld NodePort 10.100.54.48 <none> 80:31666/TCP 73m app=hello-world
References:
- https://stackoverflow.com/questions/41509439/whats-the-difference-between-clusterip-nodeport-and-loadbalancer-service-types
- https://kubernetes.io/docs/concepts/services-networking/service/


Top comments (0)