
This is yet another selfish guide! I’m writing this to help my future self with having MudBlazor with Blazor interactive SSR working within a new project. Of course, the positive side effect is that you get to benefit from this guide too! Maybe it wasn’t so selfish after all, right?!
This guide will focus on getting MudBlazor with Blazor interactive SSR set up and configured in a new Blazor project in dotnet 8. This is hopefully applicable for future versions of dotnet, as long as this doesn’t change behavior dramatically. Following this guide will ideally prevent you from running into all sorts of fun Blazor render mode issues.
What is MudBlazor?
Like with all user-interface tech stacks, it’s very common to have reusable control libraries. One such control library is MudBlazor. In their own words:
MudBlazor is an ambitious Material Design component framework for Blazor with an emphasis on ease of use and clear structure. It is perfect for .NET developers who want to rapidly build web applications without having to struggle with CSS and Javascript. MudBlazor, being written entirely in C#, empowers you to adapt, fix or extend the framework. There are plenty of examples in the documentation, which makes understanding and learning MudBlazor very easy.
Originally, I went looking for MudBlazor because I wanted to develop more of a customized list view in my application. However, the default controls didn’t seem like they did a great job for what I wanted. I’ve spent well over a decade building user interface applications in WinForms and WPF, so I’m no stranger to control libraries. But that’s exactly why I figured I shouldn’t need to roll my own — someone else has got this covered!

Dev Leader Weekly | Substack
My weekly newsletter that simplifies software engineering for you, along with C# code examples. Join thousands of software engineers from companies like Microsoft and Amazon who are already reading! Click to read Dev Leader Weekly, a Substack publication with thousands of subscribers.
 weekly.devleader.ca
What Are Blazor Render Modes?
Blazor Web Apps use different render modes to control where and how components are rendered. The modes include:
Static Server: Renders components on the server without interactivity.
Interactive Server: Also renders on the server but allows interactivity using Blazor Server.
Interactive WebAssembly: Renders interactively on the client-side using Blazor WebAssembly.
Interactive Auto: Starts with server-side rendering and shifts to client-side on subsequent interactions after the Blazor bundle is downloaded.
These render modes are set using the @rendermode directive in the component’s code. More details on configuring and applying these modes can be found on the Microsoft documentation page.
This article is not focusing on which render mode is better or worse, nor will I be doing an in-depth analysis. I wanted to provide this context so that you can see we’ll be using Interactive Server render mode to get Blazor server-side rendering (SSR) with our app.
With that said, the distinction between client-side and server-side rendering is important for performance and interactivity:
Client-side rendering (WebAssembly mode): Components are executed and rendered directly in the user’s browser using WebAssembly. This mode offers a richer, more interactive experience as it doesn’t require a round-trip to the server for UI updates. However, it involves a larger initial download and more resource consumption on the client side.
Server-side rendering (Server mode): Components are executed and rendered on the server. The rendered UI is delivered as static HTML to the client’s browser, and interactivity is maintained through a SignalR connection that manages event handling and UI updates. This mode minimizes client-side resources since the client doesn’t execute the component logic, but it relies heavily on the network connection to the server, which can impact responsiveness and user experience.
Each mode has its use case depending on the application’s needs for performance, scalability, and complexity. The focus of this article is on a server rendering mode not because I claim it’s superior, but because it’s what I needed for my own development purposes.
How to Get MudBlazor with Blazor Interactive SSR Working
The following sections will give you the step-by-step actions required to get MudBlazor with Blazor interactive SSR working. You can follow along with this MudBlazor video tutorial as well:
New Blazor Project Setup
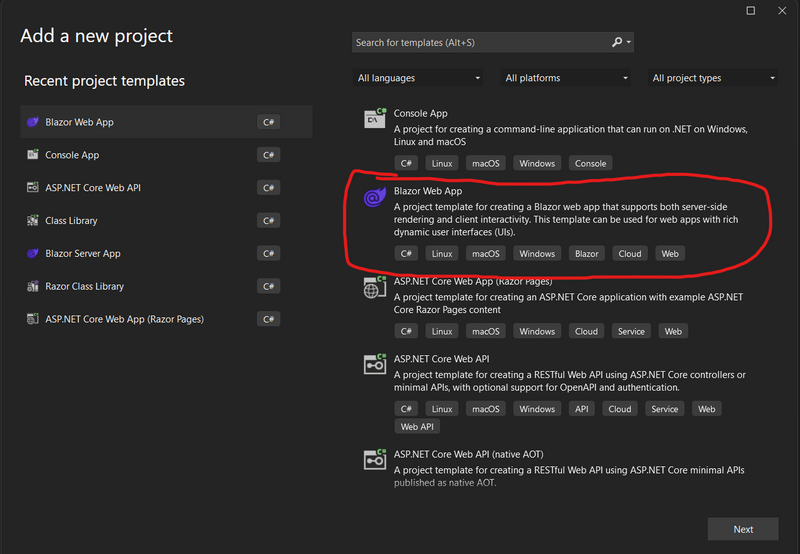
The first thing that we need to do is create our project in Visual Studio. To do that, we’re going to select the “Blazor Web App” project template from Visual Studio.
Next, we’ll want to ensure we select the correct render mode. We want it to be “Server” as we see in the screenshot below.
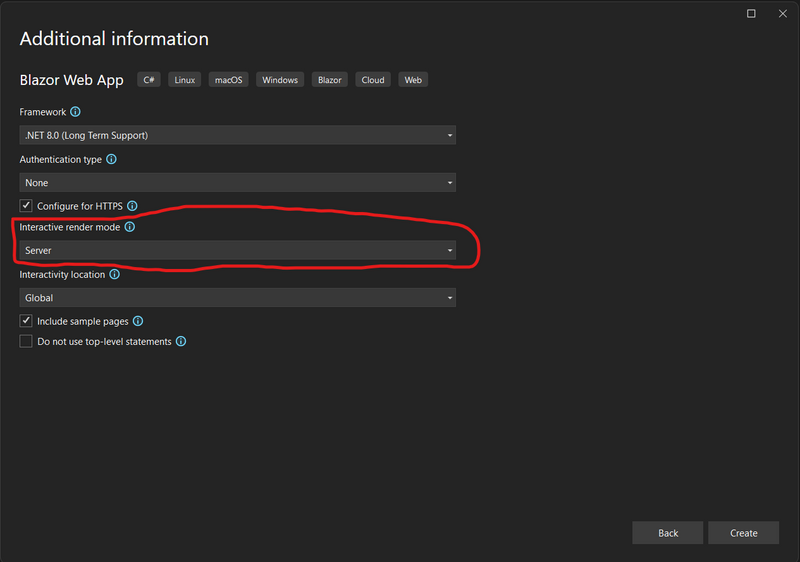
The other options are of course up to you. If indeed you need another render mode, then the rest of this guide is not for you as we’re strictly focused on server-side render (SSR) mode. Remember, the reason that I wrote this is that I thought I had to use the dual mode for supporting MudBlazor because the instructions I received didn’t seem to line up exactly.
Configuring Mud Blazor with Blazor Interactive SSR
Now that we have our project setup, it’s time to get going with setting up MudBlazor. I should note that they DO have instructions that you can follow on their GitHub — so if you’re getting stuck with my guide, go read theirs. However, I followed theirs the first time and still ran into some fun hiccups because I didn’t know what project to create. Not the fault of MudBlazor nor the fault of Blazor; Just Nick’s fault.
Step one will be getting the nuget package installed:
dotnet add package MudBlazor
And once installed, we only have a couple of spots to go update! Starting off, to make the MudBlazor accessible in our razor files by default, we can add the following to _Imports.razor:
@using MudBlazor
Slightly separate guidance from what they list on their GitHub, but we can place the following code in the <head> block of App.razor
<link href="https://fonts.googleapis.com/css?family=Roboto:300,400,500,700&display=swap" rel="stylesheet" />
<link href="_content/MudBlazor/MudBlazor.min.css" rel="stylesheet" />
<MudThemeProvider/>
<MudDialogProvider/>
<MudSnackbarProvider/>
Next, we add the following to the <body> block of the same file:
<script src="_content/MudBlazor/MudBlazor.min.js"></script>
And finally, we need these two lines into program.cs to enable dependency injection for MudBlazor:
using MudBlazor.Services;
builder.Services.AddMudServices();
Using MudBlazor with Blazor Interactive SSR
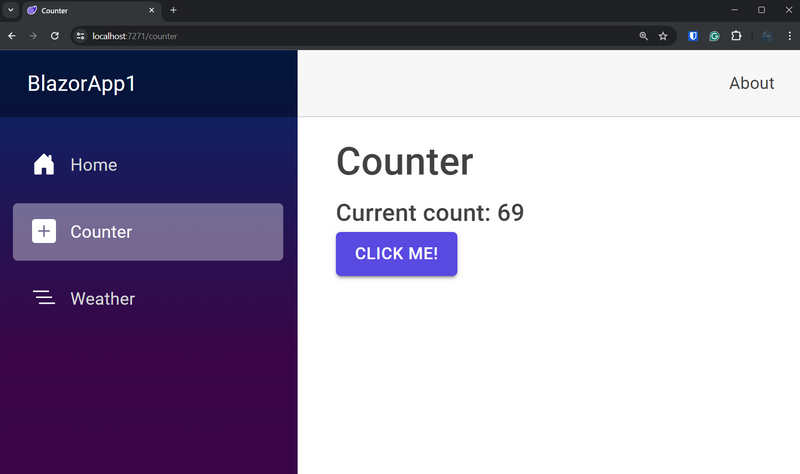
Now that we’re all configured, we can use MudBlazor! I started off with the sample application to prove this all out, so I figured I’d change the default “counter” page to use MudBlazor controls.
Here’s the change to that code that I made:
@page "/counter"

<PageTitle>Counter</PageTitle>

<h1>Counter</h1>

<MudText Typo="Typo.h6">
    Current count: @currentCount
</MudText>
<MudButton
    Variant="Variant.Filled"
    Color="Color.Primary"
    OnClick="ButtonOnClick">
    Click Me!
</MudButton>

@code
{
    private int currentCount = 0;

    void ButtonOnClick()
    {
        currentCount++;
    }
}
And if you want to see it in action:
Wrapping Up MudBlazor with Blazor Interactive SSR
This was just a simple guide to get you up and running using MudBlazor with Blazor interactive SSR! If you start off with the Blazor server-side rendering project instead of the dual mode where it’s auto server and webassembly, you’ll have a much better time. However, maybe you know what you’re doing significantly better than me and you’re ready to jump into the dual render-mode support — but I certainly was not!
If you found this useful and you’re looking for more learning opportunities, consider subscribing to my free weekly software engineering newsletter and check out my free videos on YouTube! Meet other like-minded software engineers and join my Discord community!
Dev Leader Weekly | Substack
My weekly newsletter that simplifies software engineering for you, along with C# code examples. Join thousands of software engineers from companies like Microsoft and Amazon who are already reading! Click to read Dev Leader Weekly, a Substack publication with thousands of subscribers.
weekly.devleader.ca
Want More Dev Leader Content?
- Follow along on this platform if you haven’t already!
- Subscribe to my free weekly software engineering and dotnet-focused newsletter. I include exclusive articles and early access to videos: SUBSCRIBE FOR FREE
- Looking for courses? Check out my offerings: VIEW COURSES
- E-Books & other resources: VIEW RESOURCES
- Watch hundreds of full-length videos on my YouTube channel: VISIT CHANNEL
- Visit my website for hundreds of articles on various software engineering topics (including code snippets): VISIT WEBSITE
- Check out the repository with many code examples from my articles and videos on GitHub: VIEW REPOSITORY


Top comments (1)