Introduction:
In this tutorial, I will walk you through setting up HackMD with GitHub authentication using Podman, PostgreSQL, Nginx, and Certbot.
HackMD is a powerful real-time, multi-platform collaborative markdown note editor, perfect for teams to work together on documentation, notes, data collection, and more. We'll be using Red Hat's PostgreSQL image for the database and configuring SSL with Certbot for secure communication.
Setting up PostgreSQL with Red Hat Image
First, we'll set up the PostgreSQL database using the Red Hat PostgreSQL image.
- Login to Red Hat's container registry:
podman login registry.redhat.io -u <username>
- Pull the PostgreSQL image:
podman pull registry.redhat.io/rhel8/postgresql-10@sha256:b377e15891995aa9c778ddc38f44c9635d04771cf77ac90fcd38a5a684326d82
- Stop and remove any existing PostgreSQL container (if there is any, I am using this name, so for multiple run I am running this command, you can skip this)
podman stop hackmd_postgres
podman rm hackmd_postgres
- Create a directory to store PostgreSQL data and assign permissions. We use SELinux to enhance the security, the chcon command is used to change the SELinux context of a file or a directory:
#For data persistence I am creating this folder, there are different way you can achieve this
sudo mkdir -p /root/hackmd/postgres
sudo chcon -Rt container_file_t /root/hackmd/postgres
Create a new Pod for your PostgreSQL and HackMD services:
podman pod create --name hackmd_pod -p 8000:3000
Run the PostgreSQL container in the Pod:
podman run -d --pod hackmd_pod --name hackmd_postgres \
    --restart always \
    -e POSTGRESQL_USER=hackmd \
    -e POSTGRESQL_PASSWORD=SupSecret \
    -e POSTGRESQL_DATABASE=hackmd \
    -v /root/hackmd/postgres:/var/lib/pgsql/data \
    registry.redhat.io/rhel8/postgresql-10@sha256:b377e15891995aa9c778ddc38f44c9635d04771cf77ac90fcd38a5a684326d82
Setting up GitHub OAuth for HackMD
Before setting up the HackMD application, we need to configure GitHub OAuth.
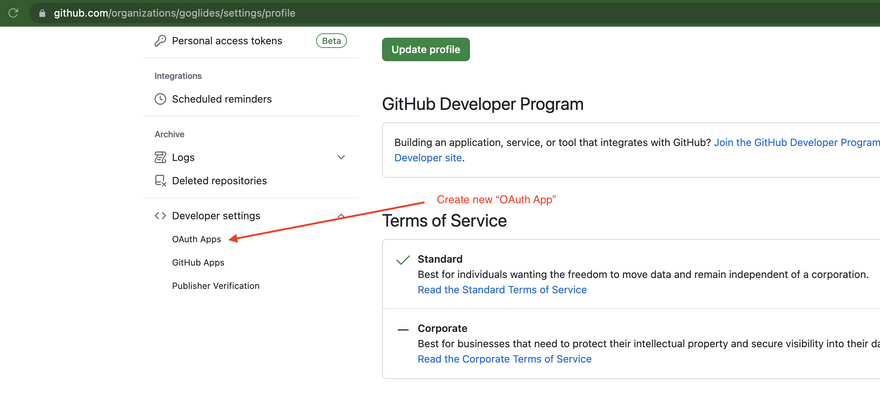
- Navigate to the settings of your GitHub account and select "OAuth Apps" under "Developer settings".
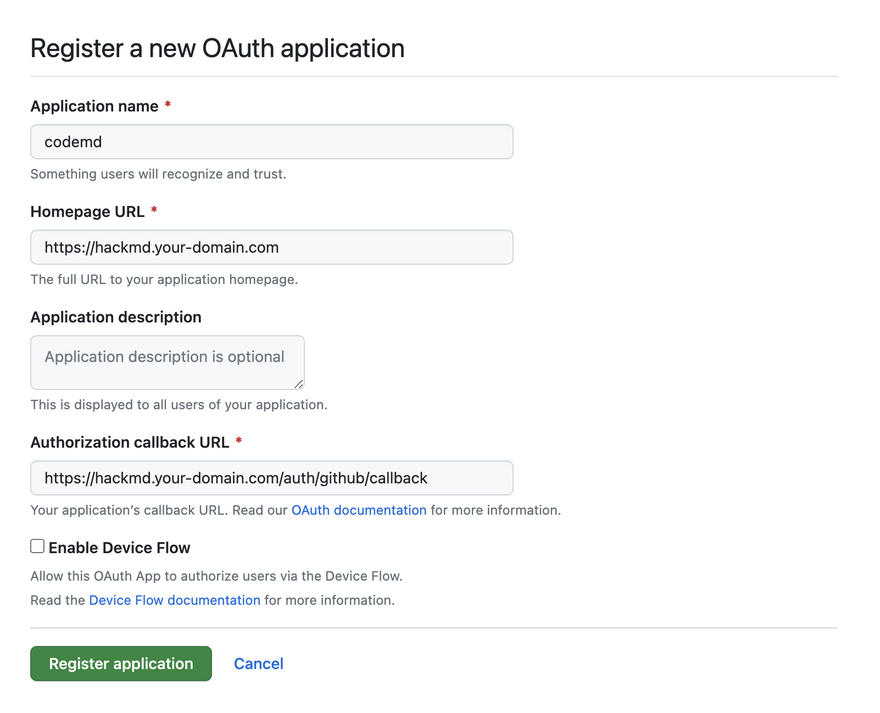
- Click on "New OAuth App". Provide the necessary details.
- Set the "Authorization callback URL" as
https://hackmd.your-domain.com/auth/github/callback. Replacehackmd.your-domain.comwith your actual domain name.
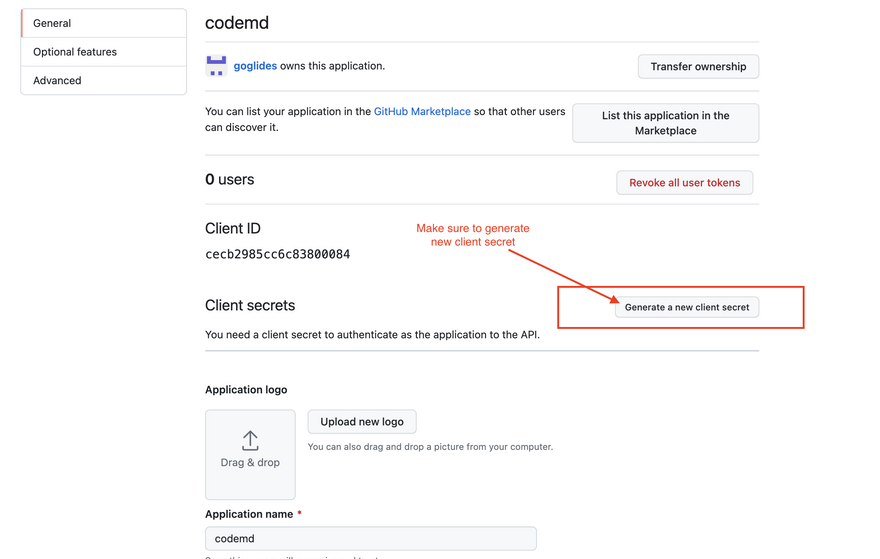
After creating the app, GitHub provides you with a Client ID and a Client Secret. Note them down.
Setting up HackMD with GitHub OAuth
- Stop and remove any existing HackMD container (optional, skip this if not required)
podman stop hackmd
podman rm hackmd
Run the HackMD container in the Pod:
podman run -d --pod hackmd_pod --name hackmd \
    --restart always \
    -e CMD_DB_URL=postgres://hackmd:SupSecret@localhost/hackmd \
    -e CMD_GITHUB_CLIENTID=<your-github-client-id> \
    -e CMD_GITHUB_CLIENTSECRET=<your-github-client-secret> \
    -e CMD_ALLOW_EMAIL_REGISTER=false \
    -e CMD_GITHUB_ALLOW_AUTO_REGISTER=true \
    -e CMD_GITHUB_CALLBACK_URL='https://hackmd.your-domain.com/auth/github/callback' \
    -e CMD_DOMAIN='hackmd.your-domain.com' \
    -e CMD_PROTOCOL_USESSL=true \
    -e CMD_URL_ADDPORT=false \
    -v /root/hackmd/app/public/uploads:/home/hackmd/app/public/uploads \
    docker.io/hackmdio/hackmd:2.4.2-cjk
Replace <your-github-client-id> and <your-github-client-secret> with the actual values you got from GitHub.
Setting up Nginx
- Install Nginx:
sudo yum install nginx -y
- Start and enable Nginx:
sudo systemctl start nginx
sudo systemctl enable nginx
- Configure Nginx to reverse proxy to your HackMD service. Edit the Nginx configuration file for your domain:
sudo vim /etc/nginx/conf.d/hackmd.your-domain.com.conf
- Add the following content to the file:
server {
    listen 80;
    server_name hackmd.your-domain.com;

    location / {
        proxy_pass http://localhost:8000;
        proxy_set_header Host $host;
        proxy_set_header X-Real-IP $remote_addr;
        proxy_set_header X-Forwarded-For $proxy_add_x_forwarded_for;
        proxy_set_header X-Forwarded-Proto $scheme;
    }
}
Replace hackmd.your-domain.com with your actual domain name. Save and close the file.
- Test the Nginx configuration:
sudo nginx -t
If the test is successful, reload Nginx to apply the changes:
sudo systemctl reload nginx
Configuring SSL with Certbot
Let's Encrypt is a free, automated, and open certificate authority brought to you by the nonprofit Internet Security Research Group (ISRG). Certbot is a client that makes getting and renewing these certificates very easy.
- Install Certbot:
sudo yum install certbot python3-certbot-nginx -y
- Obtain and Install a certificate:
sudo certbot --nginx -d hackmd.your-domain.com
Certbot will interactively ask a few questions and obtain the certificate for you. This will also update your nginx config, make sure final config looks similar to this,
server {
    server_name hackmd.your-domain.com;
    location / {
        proxy_pass http://localhost:8000;
        proxy_set_header Host $host;
        proxy_set_header X-Real-IP $remote_addr;
        proxy_set_header X-Forwarded-For $proxy_add_x_forwarded_for;
        proxy_set_header X-Forwarded-Proto $scheme;
    }

    listen 443 ssl; # managed by Certbot
    ssl_certificate /etc/letsencrypt/live/hackmd.your-domain.com/fullchain.pem; # managed by Certbot
    ssl_certificate_key /etc/letsencrypt/live/hackmd.your-domain.com/privkey.pem; # managed by Certbot
    include /etc/letsencrypt/options-ssl-nginx.conf; # managed by Certbot
    ssl_dhparam /etc/letsencrypt/ssl-dhparams.pem; # managed by Certbot

}

server {
    if ($host = hackmd.your-domain.com) {
        return 301 https://$host$request_uri;
    } # managed by Certbot


    listen 80;
    server_name hackmd.your-domain.com;
    return 404; # managed by Certbot


}
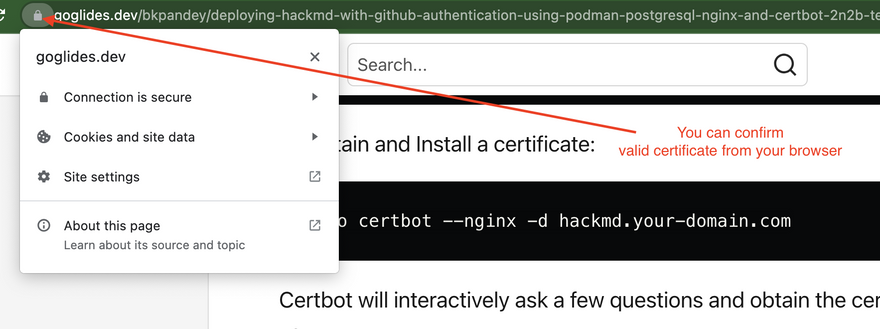
- Verify SSL is working by navigating to https://hackmd.your-domain.com.
Setting Up a Cron Job for Certificate Renewal
Let's Encrypt certificates are only valid for 90 days. Certbot includes a script to renew the certificates automatically before they expire. You can test the renewal script with a dry run like so:
sudo certbot renew --dry-run
You should see output something similar to this,
Saving debug log to /var/log/letsencrypt/letsencrypt.log

- - - - - - - - - - - - - - - - - - - - - - - - - - - - - - - - - - - - - - - -
Processing /etc/letsencrypt/renewal/domain2.io.conf
- - - - - - - - - - - - - - - - - - - - - - - - - - - - - - - - - - - - - - - -
Account registered.
Simulating renewal of an existing certificate for hackmd.your-domain.com and domain2.io

- - - - - - - - - - - - - - - - - - - - - - - - - - - - - - - - - - - - - - - -
Processing /etc/letsencrypt/renewal/hackmd.your-domain.com.conf
- - - - - - - - - - - - - - - - - - - - - - - - - - - - - - - - - - - - - - - -
Simulating renewal of an existing certificate for hackmd.your-domain.com

- - - - - - - - - - - - - - - - - - - - - - - - - - - - - - - - - - - - - - - -
Congratulations, all simulated renewals succeeded:
  /etc/letsencrypt/live/domain1.io/fullchain.pem (success)
  /etc/letsencrypt/live/hackmd.your-domain.com/fullchain.pem (success)
- - - - - - - - - - - - - - - - - - - - - - - - - - - - - - - - - - - - - - - -
If that appears to be working correctly, you can arrange for automatic renewal by adding a cron job or systemd timer. Here, we'll add a cron job to renew the certificate twice a day (at 12:30am and 12:30pm):
Open the crontab editor:
sudo crontab -e
Add the following lines to the file:
30 0,12 * * * /usr/bin/certbot renew --quiet --post-hook "systemctl reload nginx"
Save and close the file. The cron job will now run twice a day and automatically renew any certificate that's due to expire in less than thirty days. If a renewal is successful, the systemctl reload nginx command is executed due to the --post-hook flag, effectively making the renewed certificates immediately active in your nginx server.


Top comments (0)