
- What is containers?
- What is a Container Image?
- Manage custom container images?
- Podman image command
- Interacting with Container
- Debugging containers
- Cleanup
Introduction of containers using podman
What is containers?
Containers is a form of virtualization that enables applications to be packaged, deployed, run, and managed in isolated environments.
- Container technology helps organizations reduce costs associated with managing multiple instances of the same application by allowing them to package the application into one consistent unit across multiple environments.
- Containers also enable faster deployment, as applications are pre-packaged and can be deployed easily on multiple servers.
- Container technology facilitates improved scalability and flexibility for IT teams. With containers, teams can quickly scale up or down new services in response to changes in demand.
Container technology isolates the application code, dependencies, and system libraries into separate containers, which are then managed independently from the underlying operating system. Each container is lightweight, standalone, and can run anywhere without any additional configuration or setup. This enables applications to be quickly moved across multiple environments and makes them easier to deploy. The containers also provide greater security by isolating the application from the underlying operating system and other applications on the same server. Finally, container technology simplifies scalability, as teams can easily add more resources or remove existing ones as needed.
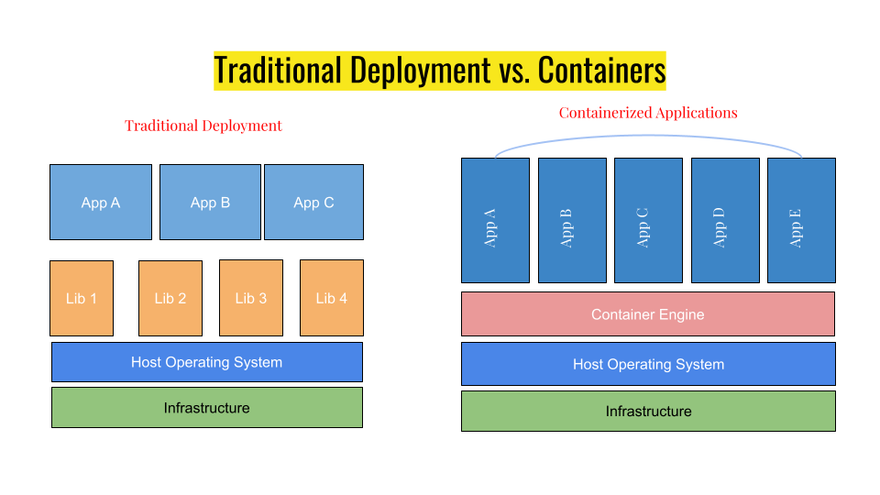
Traditional deployment vs Containers
Pictures speak thousands of words; take a look at the following diagrams, which explains the difference between containers and traditional deployment.
Traditional deployment methods, including physical and virtual servers, have been around for decades. They require installing an operating system and all the necessary software applications to be managed manually or through scripting. It's a time-consuming process that can take time to maintain, especially when dealing with multiple applications across multiple environments.
Containers provide an alternative approach to traditional deployment methods. Containers are lightweight, self-contained packages of software code that can be easily deployed on any server or cloud environment without requiring manual installation and configuration. With containers, applications can be quickly spun up and run in isolated environments with no manual setup required. This helps speed up development cycles while making managing and scaling applications across multiple domains easier.
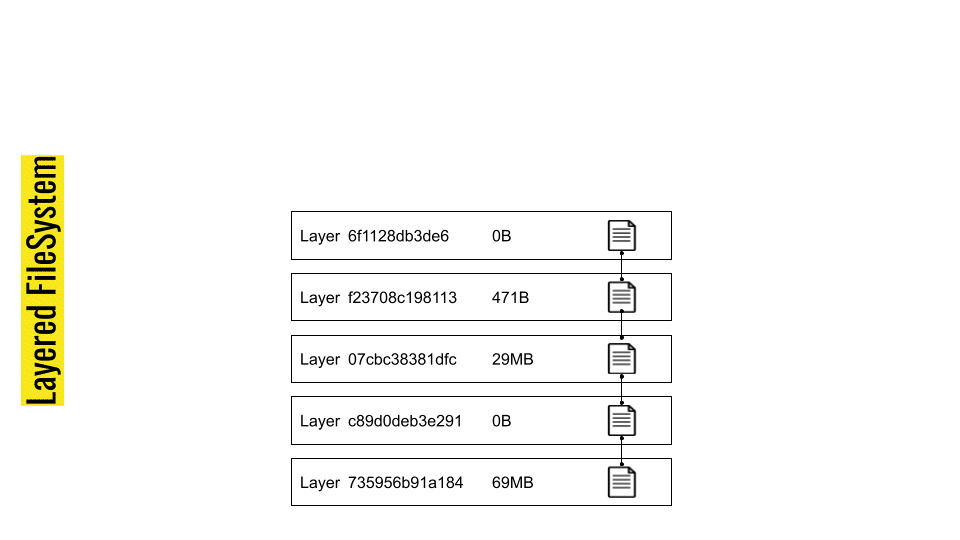
Overview of the Container Layered File System
Have you ever wondered how Container Technology works? How can it contain an entire application running on a virtual machine or in the cloud? It all starts with the container-layered file system. This file system comprises a set of read-only layers managed via a Union File System (UnionFs) such as AUFS, btrfs, vfs, and devicemapper. When we start a new container, container technology creates a read-write layer on top of these image layers. This read-write layer allows the container to run as a standard Linux file system. As changes occur inside the container, they create working copies in this read-write layer—but when the container is stopped or deleted, that same read-write layer is lost. Let's take a closer look at how this all works.
The Benefits of Using Layers
The main benefit of using layers is that they make it easier to keep track of changes over time. If you have an application that frequently updates its codebase or configuration files, you can use layers to maintain separate versions of each change without managing multiple containers. Layers also save disk space by allowing multiple containers to share standard files and directories without storing them separately for each instance. This makes creating and managing more complex applications much more efficient and cost-effective.
Container-layered file systems also provide security benefits due to their isolated nature. Each container runs in its isolated environment, and any changes made within one container do not affect other containers unless explicitly shared between them—which helps ensure data integrity, especially when dealing with confidential information such as passwords or customer data. Finally, because each application has its distinct layer structure, it can be easily moved between different environments or machines without requiring extensive rework or rewriting code—making deploying applications across various platforms much more straightforward than before!
Using UnionFs For Security and Performance
Underneath all this technology lies UnionFs—a type of filesystem used by Container Technology to allow multiple images (or containers) to be mounted onto one host system without conflicting with one another's resources. UnionFs works by combining several separate filesystems into one logical "union" filesystem that can efficiently store both static data (like images) and dynamic data (like user sessions). UnionFs provides built-in security features such as access control lists (ACLs), which help protect your application from malicious attacks by limiting access only to authorized users. And finally, because UnionFs doesn't need to write out every single change that occurs within a given image/container on disk every time it happens—it improves overall performance significantly compared with traditional methods of storing data within an operating system!
The Container Layered File System makes Container Technology so effective at providing an isolated environment for running applications in the cloud or on virtual machines—allowing developers to deploy their applications quickly and securely across different platforms with minimal effort required in terms of reworking code or rewriting configuration files! By leveraging the power of UnionFs underneath it all, Container Technology provides unparalleled performance while maintaining robust security measures like ACLs that help protect your applications from malicious threats and unauthorized users! So if you're looking for an efficient way to manage large-scale applications both now and in the future—you should consider exploring Docker's Container Layered File System further!
What is a Container Image?
Now that we understand containers and how they work, let's discuss container images. A container image is a file that contains all the necessary information needed to run an application inside of a container, including code, configuration files, system libraries, and even environment variables. Think of it as a snapshot of an application's state at a given time. This snapshot can then be used to easily create and deploy exact copies of the application in other environments without needing to manually re-install or configure each instance. Container images can also be updated and shared with others—making it an excellent way for developers to distribute their applications and updates across different systems quickly.
Container images are commonly created from Dockerfiles, text files that specify which base image a container should be built from, and any extra files or dependencies needed to run the application.
Create custom container images
What is a Containerfile/ Dockerfile?
A Containerfile is a text file that has instructions for building an image. The Containerfile is usually named either "Containerfile" or "Dockerfile." The instructions in the Containerfile tell how to make the image. Here are common directives.
- # comments are preceded by a # and ignored by the parser
- FROM directive specifies which base image you want to use as a starting point for your image. This can be any publicly available container image on the container registry or your private registry. Specifying multiple FROM directives is also possible if you want to create an intermediate layer between two images.
- LABEL directive adds meta-data about the image, such as version number and author name.
- MAINTAINER directive allows you to specify the maintainer of the image.
- RUN directive is used to execute any commands required for building the image.
- EXPOSE directive indicates which ports are exposed by the container when it runs.
- ENV directive allows you to set environment variables inside the container.
- ADD directive is used to copy files from the host machine into the image. The ADD instruction also allows you to specify a resource using a web address.
- COPY directive is similar to ADD, but it's more commonly used because it allows you to copy files from the host machine into the image.
- USER directive allows you to run commands as a specific user.
- ENTRYPOINT directive specifies the command that should be executed when the container is started.
- CMD directive specifies the default parameters that should be passed to the entrypoint command when the container is started. It's possible to override these parameters when the container is started.
These are some basic directives you can use in your Containerfile to build images. There are many more directives available that can be used to create more complex and powerful images.
podman commit
The podman commit command can create an image containing all the changes made within a container. This command can also be used to customize the image by tagging it with a specific label, setting author and message fields, and making changes to instructions. To use this command, simply type podman commit <container_name> hit enter. You can use this command multiple times in order to add more layers of customization or make additional changes to your current image.
Syntax:
podman commit [OPTIONS] CONTAINER [REPOSITORY[:PORT]/]IMAGE_NAME[:TAG]
Examples:
podman commit nginx
podman commit -q --pause=false nginx nginx nginx-new-tag-01
podman commit -q --message "hello podman commit" nginx nginx:new-tag-02
podman commit -q --author "Balkrishna Pandey" nginx nginx-new-tag-03
- Lets test this,
podman run -d -p 8080:80 --name nginx nginx
podman exec -it nginx bash
echo "hello podman commit" > /usr/share/nginx/html/index.html
exit
podman commit nginx nginx-commit:0.1
- Now run nginx application using new image tag
podman run  -d -p 8090:80 nginx-commit:0.1
curl localhost:8090

Output:
hello podman commit
Hello world python?
We have enough theory, to begin with, a containerization process in action. To begin, let's make sure we have a working podman environment setup on our machine. After that we will create a Containerfile/Dockerfile and build a container image with a basic python application. Inside Containerfile, we'll specify the base image from which our container will be built and add any additional dependencies required to run our application.
I have created another blog post on creating python web applications from scratch, which you can find here. Let me grab some snippets from the same blog post. Create a file called app.py in your project's root directory and type the following code into it:
from flask import Flask
app = Flask(__name__)
@app.route("/")
def index():
    return "Hello, Class EX-180!"
The next step is creating a requirements.txt file.
flask
Next, you'll create a file called Dockerfile in your project's root directory. This file contains instructions for how to build your application's container image.
FROM python:3.8-slim-buster
WORKDIR /app
COPY requirements.txt requirements.txt
RUN pip3 install -r requirements.txt
COPY . .
CMD [ "python3", "-m" , "flask", "run", "--host=0.0.0.0"]
Next, you'll use the Dockerfile build a container image for your application.
podman build . -t flask-app:v0.1
Now that you have built a container image for your application, you can run it as a container. In the terminal, type the following command:
podman run -d -p 5000:5000 flask-app:v0.1
Now that your application is running as a container, you can test it to ensure it's working as expected.
First make sure process is running,
podman ps
You should see an output similar to this,
f1fd7c36bd44 flask-app "python3 -m flask ru…" 3 seconds ago Up 3 seconds 0.0.0.0:5000->5000/tcp epic_albattani
To test your application, open a web browser and navigate to http://localhost:5000/. If everything is working correctly, you should see the following output:
Hello, Class EX-180!
Manage custom container images?
Repository vs Registry vs Tags
It is important to be able to distinguish between a registry, a repository, and a tag when you are getting into container development.
- A registry is a service that hosts and distributes images,
- While a repository simply holds related images in one place, such as different versions of the same application or service.
- To differentiate between these various versions, tags, which are alphanumeric identifiers, can be attached to the images.
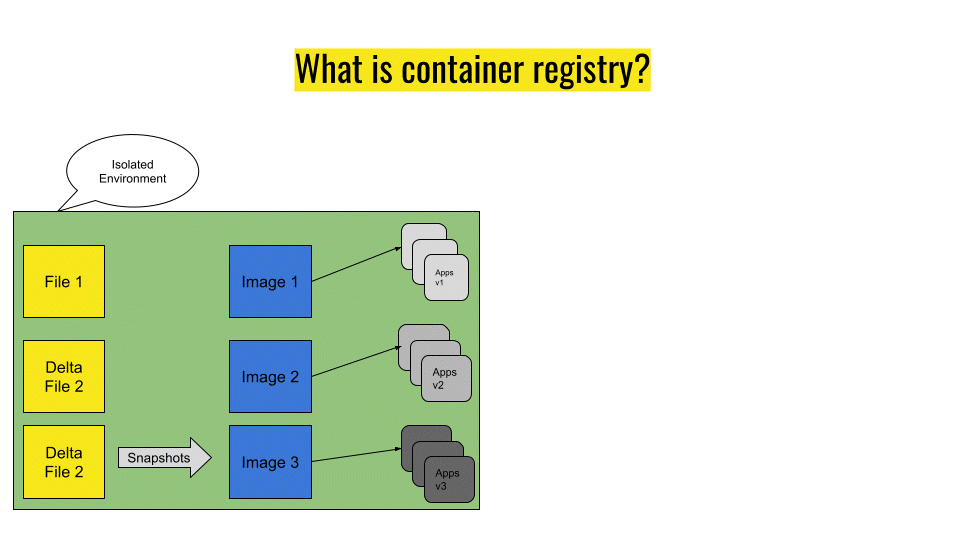
What is a Container Registry?
A container registry is an online service that stores versioned images of your containerized applications. It also allows you to store, organize, distribute and manage these images in a secure environment. A container registry provides an easy way to track the changes made to each application's appearance and offers quick access when needed to those same images and versions stored within the registry. Additionally, the security features allow users to control who can access their images and which versions are visible at any given time.
Public Registry/ Private Registry
Registries can be either public or private. Public registries are open for anyone to upload and download images, such as the Docker Hub and Quay.io, while Private registries require authentication before allowing access. To log in to a registry with Podman, the podman login command is used. This command requires the registry URL, username and password to access the registry. After logging in, you can then push or pull images from that registry.
How Does Container Registry Work?
When using a container registry, developers can upload their code into the repository using Docker Hub, Quay, or other services. It can then be stored in the registry so that other users can access it from anywhere with an internet connection. The uploaded code will be saved in its repository under its unique name; this enables other users to quickly identify which application an image belongs to when searching for it in the registry. Additionally, any changes are made to the application's code or image during development. In that case, another version of that same image can be easily created and uploaded into the same repository for others to access.
Benefits of Using a Container Registry
Using a container registry has several benefits, including

- Increased reliability concerning applications being deployed consistently across multiple environments;
- Improved security via user-based authentication controls on who can access specific versions of applications;
- Improved efficiency due to faster build times as images are pre-built instead of having to build them every time they are needed;
- Increased scalability as new versions of applications can easily be added without overwriting existing ones;
- And cost savings as users don't have to constantly rebuild their images every time they need them due to them already being stored in the registry.
Interacting with registry
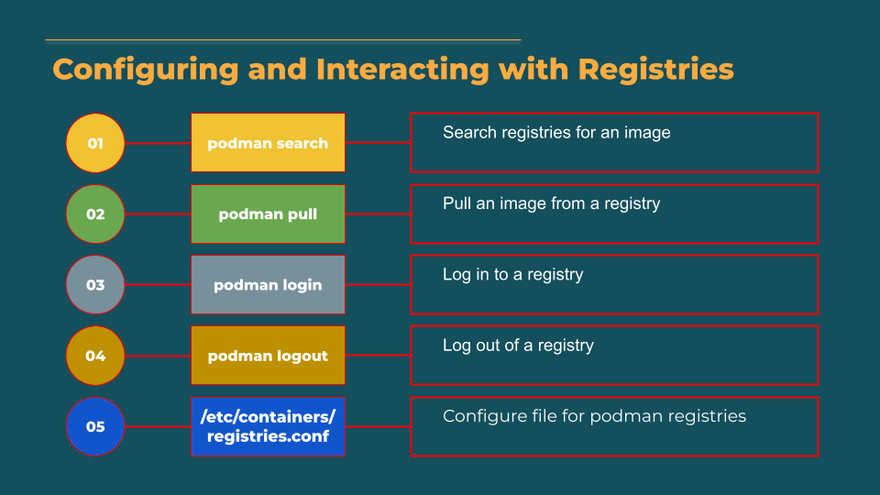
podman search
# Search nginx image across all container registry
podman search nginx

# Search nginx image accross all container registry but output only top 3
podman search nginx --limit 3

# Search nginx images in redhat registry and display top 3
podman search registry.access.redhat.com/nginx --limit 3

# Search nginx image in docker.io and list all tags
podman search docker.io/library/nginx --list-tags

# Search only official nginx images and list top 3
podman search --filter=is-official --limit 3 nginx

# Search nginx, limit 2 and display in tabular format name only, also skip tls verification
podman search --format "table {{.Name}}" nginx --tls-verify  --limit 2

# Search nginx, limit 3 and display in tabular format registry and name only
podman search --format "table {{.Index}} {{.Name}}" registry.access.redhat.com/nginx --limit 3
podman pull
podman pull --help
podman pull nginx
podman pull nginx:1.11.1
podman pull nginx --all-tags
podman login/logout
Here are some variation of login command:
# Login to provided registry
podman login registry.redhat.io

# Login to provided resgirty and write more detailed information to stdout
podman login registry.redhat.io -v

# Login o registry with username and password in cli (insecure mostly useful for automated processes)
podman login registry.redhat.io --username <username> --password <password>

# Login to registry and skip tls verification
podman login registry.redhat.io --username <username> --password <password> --tls-verify=false

# Login to registry using supplied auth file, default location of this file is $HOME/.config/containers/auth.json
podman login registry.redhat.io --authfile=./auth.json

# Logout from existing session
podman logout registry.redhat.io
Configuration file for podman registry
To customize your registries for the podman command, you must update the /etc/containers/registries.conf file.
Interacting with insecure registry, customize
/etc/containers/registries.conf
[[registry]]
location = "localhost:5000"
insecure = true
Setup the Local Registry
The following steps will walk you through setting up your own local registry using Podman:
- Make sure that you have Podman installed on your system by running. If it’s not installed yet, follow instructions for installing it on your platform (e.g., Linux or macOS).
podman version
- Create the directory where the registry will be stored with the command
mkdir -p /var/lib/registry
Note: for MacBook connect to VM first using
podman machine sshand create this folder inside VM. You may also need to change the permission of folder if you are running podman without sudo userchown -R core:core /var/lib/registry.
- Run Podman with the command
podman run --privileged -d --name registry -p 5000:5000 -v /var/lib/registry:/var/lib/registry --restart=always registry:2
You can also use following instead of using local volume mount,
podman volume create registry
podman run --privileged -d --name registry -p 5000:5000 -v registry:/var/lib/registry --restart=always registry:2
- Edit the registries configuration file, by changing
registries = []toregistries = ['localhost:5000']
Or add following lines to the same file.
[[registry]]
location = "localhost:5000"
insecure = true
vim /etc/containers/registries.conf
- Test out your new local registry by running following commands:
podman pull alpine
podman pull alpine:3

podman tag alpine localhost:5000/alpine
podman tag alpine:3 localhost:5000/alpine:3

podman push localhost:5000/alpine
podman push localhost:5000/alpine:3
- Verify that everything worked correctly by running
podman pull localhost:5000/alpine
curl -Ls http://localhost:5000/v2/_catalog | python3 -m json.tool
Output:
{
    "repositories": [
        "alpine"
    ]
}
Verify tags,
curl -Ls http://localhost:5000/v2/alpine/tags/list | python3 -m json.tool
Output:
{
    "name": "alpine",
    "tags": [
        "latest",
        "3"
    ]
}
- You're all set! Now you can start pushing and pulling images from your new local registry!
Podman image command
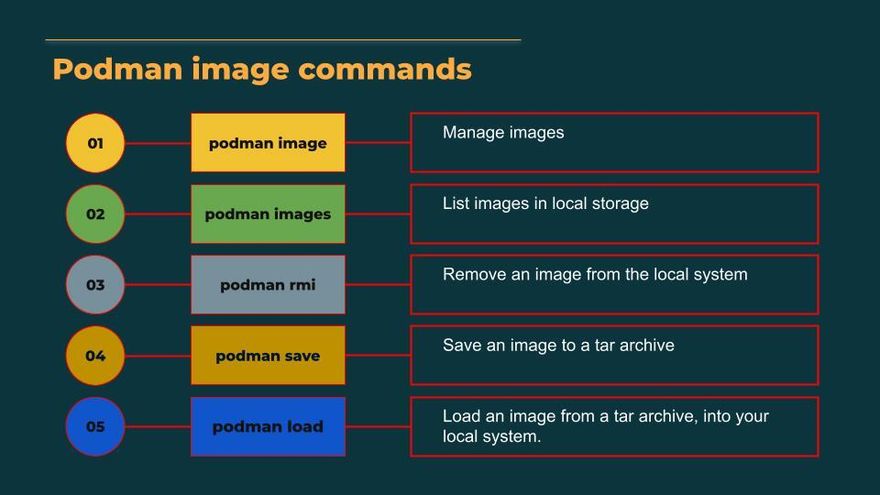
podman image
podman image --help

# List images in local storage
podman image list

# Show history of a specified image
podman image history localhost/flask-app:v0.1
# Inspect changes to the image's file systems
podman image diff localhost/flask-app:v0.1

Output:
C /app
A /app/Dockerfile
A /app/app.py
C /app/requirements.txt
# Remove unused images
podman image prune

Output:
WARNING! This command removes all dangling images.
Are you sure you want to continue? [y/N] y
# Display the configuration of an image
podman image inspect localhost/flask-app:v0.1
Image local operations; Save and Load
We can use podman save command to create tar file:
podman save --help
Let's use a same image we created for our hello-world python application.
podman images | grep flask-app

Output:
localhost/flask-app         v0.1             c65ba788425a  2 days ago   134 MB
podman save -o flask-app-v0.1.tar localhost/flask-app:v0.1
This will create a tar file with name flask-app-v0.1.tar
ls -lh flask-app-v0.1.tar

Output:
-rw-r--r--  1 bpandey  staff   128M Dec 20 16:27 flask-app-v0.1.tar
We can send this tar file to load our container image in a different location without using the container registry. This process is usually prevalent in disconnected/air-gapped installations.
To load this tar file, you can use the following command. Let's delete the existing image first;
podman rmi localhost/flask-app:v0.1
podman images | grep flask-app
And to load this image, run this command:
podman load -i flask-app-v0.1.tar
Image tags
An image tag is a name assigned to an image. The tag can be used to identify a specific version of an image and helps provide reproducible environments. Tags are usually separated by colons and can be used to specify versions, such as 1.0:latest. The podman pull command will download the latest version of the requested tagged image if no specific tag is provided, or it will download the specified tagged version if selected.
We can use podman tag command which adds one or more additional names to locally-stored image.
podman tag <SOURCE_IMAGE> TARGET_NAME [TARGET_NAME...]

podman tag c65ba788425a localhost/flask-app:v0.1-newtag
podman tag localhost/flask-app:v0.1 localhost/flask-app:v0.1-newtag1
podman tag localhost/flask-app:v0.1 localhost/flask-app:v0.1-newtag2 localhost/flask-app:v0.1-newtag3
Lets check the final output:
podman images localhost/flask-app

REPOSITORY           TAG           IMAGE ID      CREATED     SIZE
localhost/flask-app  v0.1          c65ba788425a  2 days ago  134 MB
localhost/flask-app  v0.1-newtag1  c65ba788425a  2 days ago  134 MB
localhost/flask-app  v0.1-newtag2  c65ba788425a  2 days ago  134 MB
localhost/flask-app  v0.1-newtag   c65ba788425a  2 days ago  134 MB
localhost/flask-app  v0.1-newtag3  c65ba788425a  2 days ago  134 MB
Interacting with Container
podman ps
- list all running containers
podman ps
- list all containers including stopped containers
podman ps -a
# Display the total file sizes and sort by id
podman ps -a --size --sort id
# Do not truncate the output
podman ps --size --sort id --no-trunc
- Pretty-print containers to JSON or using a Go template
podman ps -a --format "{{.ID}} {{.Image}} {{.Labels}} {{.Mounts}}"
podman run
Podman run a command in a new container from the given image, optionally overriding the default entrypoint. This is an interactive command, similar to running a shell in an interactive container instance.
To run a command in a container, use the podman pull command to download an image from Docker Hub or other registry, followed by the podman login command to authenticate with that registry.
podman login <registry>
podman pull <registry>/<image_name>:<tag>
podman run entrypoint override
Once authenticated, you can use the podman run command to start a container from the downloaded image and optionally specify an entrypoint for running the desired command.
podman run --entrypoint "/bin/sh" <registry>/<image_name>:<tag> -c "<command>"
The above command will start a container from the specified registry and image tag, override the default entrypoint with /bin/sh and run the given command inside the container. This allows you to execute arbitrary commands in an isolated environment without having to manage a separate container instance.
For example:
podman pull docker.io/library/nginx:1.10
podman run -it --entrypoint "/bin/bash" docker.io/library/nginx:1.10
podman run --entrypoint "/bin/bash" docker.io/library/nginx:1.10 -c ls
podman run nginx ls -alF /etc
podman run to deploy application
- Run application in foreground
podman run nginx
- Run application detach mode (background process)
podman run -d nginx
- Run application mount container port 80 to external port 8080
podman run -d -p 8080:80 nginx
- Podman assign random port if you are not specifying the port
# Run command twice for testing
podman run -d -p 80 nginx
podman run -d -p 80 nginx
podman ps | grep nginx
Output:
ea9860ced6ca  docker.io/library/nginx:latest  nginx -g daemon o...  2 days ago  Up 2 days ago  0.0.0.0:43927->80/tcp   peaceful_elion
6b61a99396c6  docker.io/library/nginx:latest  nginx -g daemon o...  2 days ago  Up 2 days ago  0.0.0.0:36677->80/tcp   inspiring_nightingale
You can see the ports in output above or you can also run podman port command,
podman port peaceful_elion

Output:
80/tcp -> 0.0.0.0:43927

podman port inspiring_nightingale

Output:
80/tcp -> 0.0.0.0:36677
You should able to access both nginx application as follows,
curl localhost:43927
curl localhost:36677
- You can now access nginx from your terminal
curl localhost:8080
- Fun container with friendly container name
podman run -d  --name nginx -p 8080:80 nginx
podman ps | grep nginx

Output:

5ae43ff75abd  docker.io/library/nginx:latest  nginx -g daemon o...  8 seconds ago   Up 8 seconds ago   0.0.0.0:8080->80/tcp    nginx
podman run: environment variable
Podman can add environment variables to containers when they start using the -e flag with the run subcommand.
podman run --name nginx -e USERNAME=goglides -e PASSWORD=password nginx printenv USERNAME PASSWORD

Output:
goglides
password
Persist data: Bind-Mounting Host Path
The -v and --volume options allow users to mount a directory from their local system into the container. This means that users can access files on their local system while working inside the container. The syntax for this command is as follows:
podman run -d -v <host dir>:<container dir> <image>
Users should always specify an absolute path for both host directories and container directories when using this command so that Podman knows exactly where it should mount the content. It is also important to note that SELinux contexts may need to be adjusted when using this approach so that Podman can properly access files within the volume being mounted. Here I am using :Z option to adjust SELinux profile.
podman run -d --name mysql -v /var/home/core/mysql:/var/lib/mysql:Z -p 3307:3306 -e MYSQL_ROOT_PASSWORD=secure -e MYSQL_USER=user mysql
Persist data: Using Podman Volume Command
An alternative way of managing volumes in Podman containers is by utilizing podman volume. This command creates a storage device that is managed by Podman and can then be attached at runtime when working with containers. This approach provides several advantages over bind-mounting options such as better integration between containers, more control over data stored within volumes, and most importantly, automatically taking care of SELinux contexts whenever new content is added or removed from containers. To create a volume with podman volume use the following syntax:
podman volume create <volume name>
Once created, users can then attach this volume at runtime using either the --volume option or --volumes-from option (for example, --volumes-from=my_volume).
podman volume create mysql
podman run -d --name mysql -v mysql:/var/lib/mysql  -p 3307:3306 -e MYSQL_ROOT_PASSWORD=secure -e MYSQL_PASSWORD=secure -e MYSQL_USER=user -e MYSQL_ROOT_HOST=127.0.0.1 mysql
Now you should able to connect to mysql from your localhost as follows,
mysql -uuser -psecure -h 127.0.0.1 -P3307
mysql> show databases;

Output:
+--------------------+
| Database           |
+--------------------+
| information_schema |
| performance_schema |
+--------------------+
2 rows in set (0.01 sec)
podman unshare: volumes with rootless podman
What is Rootless Podman?
Rootless Podman allows users to run containers without requiring root privileges. Podman uses the user namespace feature to map the user’s uid and primary gid into a range of subuids and subgids to create a separate namespace where they appear as UID 0 and GID 0, respectively. This means that any ranges matching those users and groups will also be mapped with the help of newuidmap(1) and newgidmap(1).
Rootless podman unshare lets you run a command in the same user namespace as your containers. This can be useful for troubleshooting unprivileged operations or manually clearing storage. Additionally, it allows you to use podman unshare chown to grant the container user ID permissions to write to your directory.
- Lets create a working directory and use
podman unshareto runs command in a modified user namespace.
mkdir /home/redhat/mysql
podman unshare chown -R 27:27 /home/redhat/mysql
- Now we can use
semanage fcontextcommand to label this path. This command accept regular expression as follows,
sudo semanage fcontext -a -t container_file_t '/home/redhat/mysql(/.*)?'
- Restore files default SELinux security contexts as follows,
sudo restorecon -Rv /home/redhat/mysql

Output:
Relabeled /home/redhat/mysql from unconfined_u:object_r:user_home_t:s0 to unconfined_u:object_r:container_file_t:s0
ls -ldZ /home/redhat/mysql

Output:
drwxr-xr-x. 2 100026 100026 unconfined_u:object_r:container_file_t:s0 6 Dec 22 10:02 /home/redhat/mysql
- Verify that the SELinux context type for the directory is container_file_t
sudo semanage fcontext -l |grep /home/redhat/mysql

Output:
/home/redhat/mysql(/.*)?                           all files          system_u:object_r:container_file_t:s0
Now we can use the /home/redhat/mysql host directory for MySQL server database files. This is where we expect to find the database files inside a MySQL container image named mysql.
podman run -d --name mysql -v /home/redhat/mysql:/var/lib/mysql -p 3306:3306 -e MYSQL_ROOT_PASSWORD=secure -e MYSQL_PASSWORD=secure -e MYSQL_USER=user -e MYSQL_ROOT_HOST=127.0.0.1 mysql
- Verify if the mount is working or not, lets create table first.
podman exec -it mysql  bash
mysql  -uroot -psecure

mysql> show databases;
mysql> create database demo;
mysql> use demo;
mysql> create table ex180 (name varchar(255), address varchar(255));
mysql> show tables;
Now delete the mysql container,
podman stop mysql
podman rm mysql

# Verify everything is cleaned-up properly
podman ps | grep mysql
Now lets recreate the database with same mount point /home/redhat/mysql
podman run -d --name mysql -v /home/redhat/mysql:/var/lib/mysql -p 3306:3306 -e MYSQL_ROOT_PASSWORD=secure -e MYSQL_PASSWORD=secure -e MYSQL_USER=user -e MYSQL_ROOT_HOST=127.0.0.1 mysql
You should see the database demo and table ex180.
$ podman exec -it mysql mysql  -uroot -psecure

mysql: [Warning] Using a password on the command line interface can be insecure.
Welcome to the MySQL monitor.  Commands end with ; or \g.
Your MySQL connection id is 8
Server version: 8.0.31 MySQL Community Server - GPL

Copyright (c) 2000, 2022, Oracle and/or its affiliates.

Oracle is a registered trademark of Oracle Corporation and/or its
affiliates. Other names may be trademarks of their respective
owners.

Type 'help;' or '\h' for help. Type '\c' to clear the current input statement.


mysql> show databases;
+--------------------+
| Database           |
+--------------------+
| demo               |
| information_schema |
| mysql              |
| performance_schema |
| sys                |
+--------------------+
5 rows in set (0.00 sec)

mysql> use demo;
Reading table information for completion of table and column names
You can turn off this feature to get a quicker startup with -A

Database changed
mysql> show tables;
+----------------+
| Tables_in_demo |
+----------------+
| ex180          |
+----------------+
1 row in set (0.00 sec)

mysql> desc ex180;
+---------+--------------+------+-----+---------+-------+
| Field   | Type         | Null | Key | Default | Extra |
+---------+--------------+------+-----+---------+-------+
| name    | varchar(255) | YES  |     | NULL    |       |
| address | varchar(255) | YES  |     | NULL    |       |
+---------+--------------+------+-----+---------+-------+
2 rows in set (0.00 sec)
podman start
- start the latest container podman is aware of
podman start --latest
- start and attach
podman start -i --attach nginx
podman stop
- Stop nginx container, you can also use container IDs
podman stop nginx
podman stop 43cee7688eb0
- Stop the latest container podman is aware of
podman stop --latest
- Seconds to wait for stop before killing the container (default 10)
podman stop --time 2 nginx
podman generate
generate systemd
- Generate systemd units for a pod or container. The generated units can later be controlled via systemctl(1).
podman generate systemd flask-app

podman generate systemd --files --new --name flask-app

Output:
WARN[0000] The generated units should be placed on your remote system
/Users/bpandey/container-flask-app.service
And here is the content of the file, cat /Users/bpandey/container-flask-app.service
# container-flask-app.service
# autogenerated by Podman 4.3.1
# Mon Dec 19 07:21:07 UTC 2022

[Unit]
Description=Podman container-flask-app.service
Documentation=man:podman-generate-systemd(1)
Wants=network-online.target
After=network-online.target
RequiresMountsFor=%t/containers

[Service]
Environment=PODMAN_SYSTEMD_UNIT=%n
Restart=on-failure
TimeoutStopSec=70
ExecStartPre=/bin/rm \
    -f %t/%n.ctr-id
ExecStart=/usr/bin/podman run \
    --cidfile=%t/%n.ctr-id \
    --cgroups=no-conmon \
    --rm \
    --sdnotify=conmon \
    --replace \
    -d \
    --name flask-app \
    -p 5001:5000 flask-app:v0.1
ExecStop=/usr/bin/podman stop \
    --ignore -t 10 \
    --cidfile=%t/%n.ctr-id
ExecStopPost=/usr/bin/podman rm \
    -f \
    --ignore -t 10 \
    --cidfile=%t/%n.ctr-id
Type=notify
NotifyAccess=all

[Install]
WantedBy=default.target
- Now we can use systemctl to enable the service
systemctl --user enable --now ./container-flask-app.service

Output:
Created symlink /var/home/core/.config/systemd/user/container-flask-app.service → /var/home/core/container-flask-app.service.
Created symlink /var/home/core/.config/systemd/user/default.target.wants/container-flask-app.service → /var/home/core/container-flask-app.service.
- Make sure to reload the domain
systemctl --user daemon-reload
- Check the status
systemctl --user status container-flask-app
Output:
● container-flask-app.service - Podman container-flask-app.service
     Loaded: loaded (/var/home/core/.config/systemd/user/container-flask-app.service; enabled; preset: disabled)
     Active: active (running) since Mon 2022-12-19 07:56:41 UTC; 54s ago
       Docs: man:podman-generate-systemd(1)
   Main PID: 14858 (conmon)
      Tasks: 13 (limit: 2265)
     Memory: 3.8M
        CPU: 464ms
     CGroup: /user.slice/user-1000.slice/[email protected]/app.slice/container-flask-app.service
             ├─14845 rootlessport
             ├─14850 rootlessport-child
             └─14858 /usr/bin/conmon --api-version 1 -c f461bfdc6345158be3ed3af1a1d387b61c20365a5b3114250778db574a15c330 -u f461bfdc6345>

Dec 19 07:56:41 localhost.localdomain podman[14726]: 2022-12-19 07:56:41.583345026 +0000 UTC m=+0.499888940 container init f461bfdc63451>
Dec 19 07:56:41 localhost.localdomain systemd[894]: Started container-flask-app.service - Podman container-flask-app.service.
Dec 19 07:56:41 localhost.localdomain podman[14726]: 2022-12-19 07:56:41.601982691 +0000 UTC m=+0.518525521 container start f461bfdc6345>
Dec 19 07:56:41 localhost.localdomain podman[14726]: f461bfdc6345158be3ed3af1a1d387b61c20365a5b3114250778db574a15c330
Dec 19 07:56:41 localhost.localdomain flask-app[14858]:  * Debug mode: off
Dec 19 07:56:41 localhost.localdomain flask-app[14858]: WARNING: This is a development server. Do not use it in a production deployment.>
Dec 19 07:56:41 localhost.localdomain flask-app[14858]:  * Running on all addresses (0.0.0.0)
Dec 19 07:56:41 localhost.localdomain flask-app[14858]:  * Running on http://127.0.0.1:5000
Dec 19 07:56:41 localhost.localdomain flask-app[14858]:  * Running on http://10.88.0.7:5000
Dec 19 07:56:41 localhost.localdomain flask-app[14858]: Press CTRL+C to quit
- Everything looks good, Now you can run all systemctl commands as the user (include the --user flag).
systemctl --user status container-flask-app
systemctl --user start container-flask-app
systemctl --user restart container-flask-app
systemctl --user stop container-flask-app
- If you want to automatically run this service when machine starts make sure to enable user lingering. In my case its already enabled.
loginctl show-user core | grep -i linger

Output:
Linger=yes
- If its not enabled you can use following command to enable it.
loginctl enable-linger

# Verify
loginctl show-user core | grep -i linger
generate kube files
- Command generates Kubernetes Pod, Service or PersistenVolumeClaim YAML (v1 specification) from Podman containers, pods or volumes.
# Just generate pod config
podman generate  kube flask-app

# Generate pod and services both
podman generate kube flask-app -s
Output:
# Save the output of this file and use kubectl create -f to import
# it into Kubernetes.
#
# Created with podman-4.3.1
apiVersion: v1
kind: Service
metadata:
  creationTimestamp: "2022-12-19T07:16:46Z"
  labels:
    app: flask-app-pod
  name: flask-app-pod
spec:
  ports:
  - name: "5000"
    nodePort: 32001
    port: 5000
    targetPort: 5000
  selector:
    app: flask-app-pod
  type: NodePort
---
apiVersion: v1
kind: Pod
metadata:
  annotations:
    io.kubernetes.cri-o.TTY/flask-app: "false"
    io.podman.annotations.autoremove/flask-app: "FALSE"
    io.podman.annotations.init/flask-app: "FALSE"
    io.podman.annotations.privileged/flask-app: "FALSE"
    io.podman.annotations.publish-all/flask-app: "FALSE"
  creationTimestamp: "2022-12-19T07:16:46Z"
  labels:
    app: flask-app-pod
  name: flask-app-pod
spec:
  automountServiceAccountToken: false
  containers:
  - image: localhost/flask-app:v0.1
    name: flask-app
    ports:
    - containerPort: 5000
      hostPort: 5001
    securityContext:
      capabilities:
        drop:
        - CAP_MKNOD
        - CAP_NET_RAW
        - CAP_AUDIT_WRITE
  enableServiceLinks: false
podman cp
The Podman cp command allows you to copy files/folders between a container and the local filesystem. The source path (SRC_PATH) is the file or directory on the local filesystem that you want to copy, while the destination path (DEST_PATH) is where you want it copied in the container. The great thing about Podman is that it works with running and stopped containers, so you don't need to worry about getting your containers up and running before copying files.
podman cp [options] [CONTAINER:]SRC_PATH [CONTAINER:]DEST_PATH
Example:
touch index.html
echo "hello world" > index.html
podman cp index.html flask-app:/app/.
podman exec flask-app ls /app
Output:
Dockerfile
__pycache__
app.py
index.html
requirements.txt
Debugging containers
podman exec
podman run -d --name flask-app -p 5001:5000 flask-app:v0.1
podman exec -it flask-app bash
root@783ef2ed9a36:/app# ls

Output:
Dockerfile  __pycache__  app.py  requirements.txt
- Run cat command to display content of a file
podman exec flask-app cat app.py

Output:
from flask import Flask
app = Flask(__name__)
@app.route("/")
def index():
    return "Hello, Class EX-180!"
- Run command to update content of a file
podman exec flask-app sed -rie "s/EX-180/EX-1900/g" app.py
podman exec flask-app cat app.py

Output:
from flask import Flask
app = Flask(__name__)
@app.route("/")
def index():
    return "Hello, Class EX-1900!"
podman logs
- Retrieve logs from one or more container. > Note: logs does not support multiple containers when run remotely.
podman logs flask-app

Output:
 * Debug mode: off
WARNING: This is a development server. Do not use it in a production deployment. Use a production WSGI server instead.
 * Running on all addresses (0.0.0.0)
 * Running on http://127.0.0.1:5000
 * Running on http://10.88.0.5:5000
Press CTRL+C to quit
10.88.0.5 - - [18/Dec/2022 22:52:29] "GET / HTTP/1.1" 200 -
10.88.0.5 - - [18/Dec/2022 22:56:19] "GET / HTTP/1.1" 200 -
- Output the specified number of LINES at the end of the logs. Defaults to -1, which prints all lines.
podman logs --tail 2 flask-app

Output:
10.88.0.5 - - [18/Dec/2022 22:52:29] "GET / HTTP/1.1" 200 -
10.88.0.5 - - [18/Dec/2022 22:56:19] "GET / HTTP/1.1" 200 -
- Follow log output since TIMESTAMP, until TIMESTAMP, The default follow is false. TIMESTAMP can be a Unix timestamp, date formatted timestamp, or Go duration string relative to the client machine’s time.
podman logs --follow=true --since 2022-01-01 flask-app
podman logs --follow=true --since 100h1m flask-app
podman logs --since 100h1m --until 2022-12-21 flask-app
- Output the timestamps in the log
podman logs -t flask-app
podman inspect
Podman inspect displays the low-level information on an objects (container, image, network, pod, volume).
podman inspect
podman container inspect
podman image inspect
podman network inspect
podman pod inspect
podman volume inspect
podman inspect flask-app
podman inspect --format "imageId: {{.Id}} NetworkMode: {{.HostConfig.NetworkMode}}" flask-app

Outout
imageId: 783ef2ed9a36cdf68fb4b3c3bbe334c5cc25362310cb0bc4f4db5c66eab0ec55 NetworkMode: bridge
- You can also pass type in inspect command. Type can be "image", "container", "pod", "network", "volume", or "all". Default is all.
You can test this behaviour using following commands.
podman tag localhost/flask-app:v0.1 flask-app
podman volume create flask-app
podman network create flask-app
podman pod create --name flask-app

podman inspect flask-app --type image
podman inspect flask-app --type container
podman inspect flask-app --type pod
podman inspect flask-app --type network
podman inspect flask-app --type volume
podman inspect flask-app # --type all
podman events
This command will show you a list of events. By default, it will show you new events as they occur. You can also use the --since and --until options to see events that happened in the past. Some examples of events command,
podman events
podman events --since 1h3m
podman events --since 1h3m --until 30m
podman events --filter event=create
Cleanup
podman rmi nginx
podman rm nginx
podman stop
podman image prune
podman container cleanup nginx
podman container cleanup nginx mysql 69da2311
The -a option stands for "all" in Podman commands. This means that when you specify this option in a podman command, it will apply the action (e.g., rm or stop) to all available containers or images on your system. For example, if you use the command podman rm -a it will remove all of the existing containers on your system. Similarly, if you use podman stop -a it will stop all of the running containers on your system.


Top comments (0)