By the end of this tutorial, you'll know how to run a Python web application using containers. I will cover the following in this tutorial,
- What is Flask, and how to use Flask to create a web application in Python?
- What is a container, and how can we containerize Python-based web application?
Introduction to Python
Python is a programming language with many characteristics, such as an intuitive syntax and robust data structures, which can lead to efficient code. It's no wonder that this language has been gaining popularity lately.
What is a web application?
A web application is an application that is accessed by users over a network such as the Internet or an intranet. Web applications are popular because they can be accessed from anywhere worldwide and are designed to work on various devices, including computers, laptops, smartphones, and tablets.
What is Flask?
Flask is a web application framework written in Python. It is a micro-framework that provides only the essential components of a web application, such as a request and response object, routing, sessions, and template rendering.
Flask is easy to get started with and makes it possible to build a web application in a short amount of time. In this tutorial, you'll learn how to deploy a Flask application using a docker container.
What is a container?
A container is a standard unit of software that packages up code and all its dependencies, so the application runs quickly and reliably from one computing environment to another. A Docker container image is a lightweight, standalone, executable package of software that includes everything needed to run an application: code, runtime, system tools, system libraries, and settings.
Docker containers are similar to virtual machines but are much more portable and efficient. Unlike virtual machines, which can be large and take a long time, docker containers are small and start up quickly.
How can we containerize Python-based web applications?
In this tutorial, you'll learn how to containerize a Flask web application using Docker. You'll build a simple web app with a home page and a few other pages and deploy your app in a docker container.
Prerequisites
To complete this tutorial, you will need:
- Python 3.6 or later
- Pip
- Flask
- Docker
Step 1: Set up your development environment
Install the necessary dependencies in your development environment. You can install it from the Python website if you don't have Python 3.6 or later installed.
Next, install pip and Flask. Pip is a package manager for Python that allows you to install and manage Python packages. Flask is a micro-web framework written in Python.
Open the terminal and type the following commands to install pip and Flask:
python -m venv env
source env/bin/activate
pip install flask
You have now created a virtual environment for your project and installed Flask.
Step 2: Create a Flask app
In this step, you'll create a basic Flask app that will serve as the foundation for your containerized application.
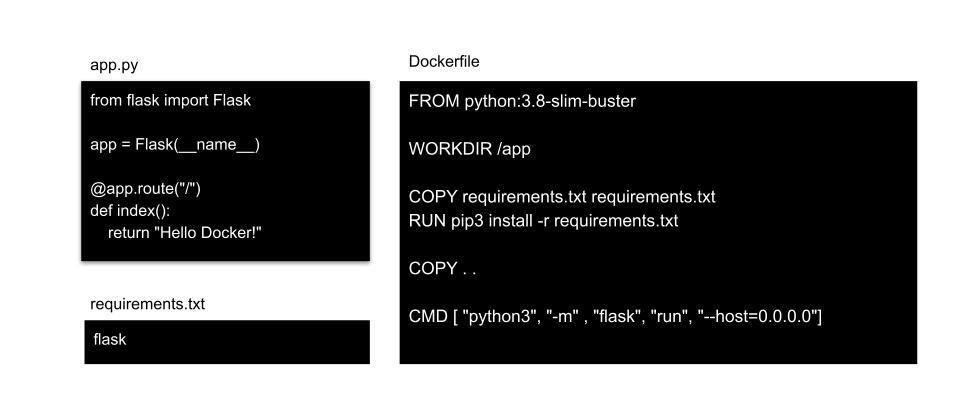
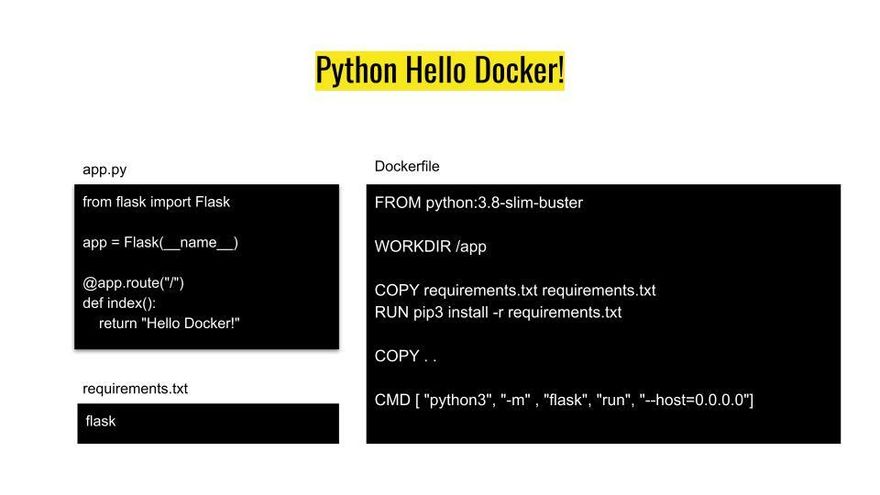
Create a file called app.py in your project's root directory and type the following code into it:
from flask import Flask
app = Flask(__name__)
@app.route("/")
def index():
    return "Hello, Docker!"
This code creates a basic Flask app that responds to requests to the "/" route with the string "Hello Docker!".

Step 3: Create a requirements.txt file
The next step is creating a requirements.txt file, which lists all the dependencies required for your application. This file is used by pip to install all of the necessary packages when your application is deployed.
In your project's root directory, create a file called requirements.txt and type the following into it:
flask
This file tells pip to install the Flask package when the application is deployed.
Step 4: Create a Dockerfile
Next, you'll create a file called Dockerfile in your project's root directory. This file contains instructions for how to build your application's docker image.
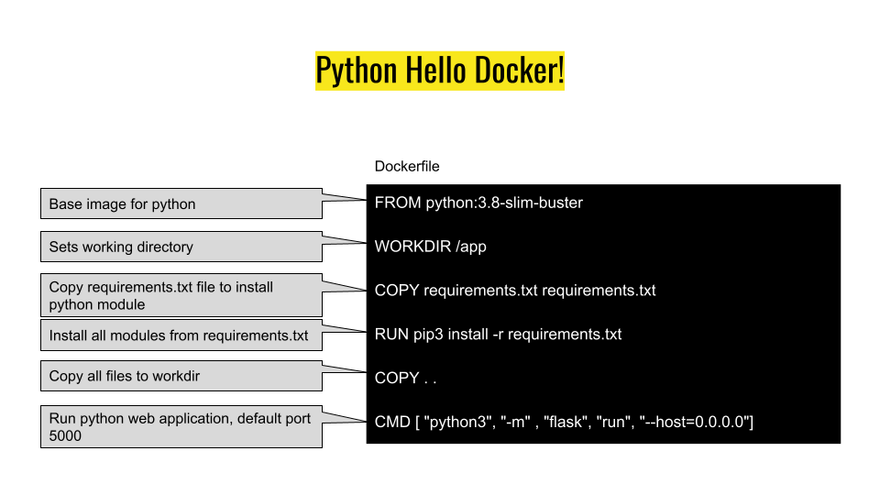
A docker image is a template used to create a docker container. A container is a runtime instance of an image—what the image becomes in memory when executed. Images are used to store and ship applications.
In your project's root directory, create a file called Dockerfile and type the following into it:
FROM python:3.8-slim-buster

WORKDIR /app

COPY requirements.txt requirements.txt
RUN pip3 install -r requirements.txt

COPY . .

CMD [ "python3", "-m" , "flask", "run", "--host=0.0.0.0"]
This file contains the following instructions:
- FROM python:3.8-slim-buster: Use the slim variant of the official Python 3 image as the base image for your application. The slim variant is smaller and contains only the packages necessary to run Python.
- WORKDIR /app: Set the working directory for subsequent instructions in the Dockerfile.
- COPY requirements.txt requirements.txt: Copy the contents of your project's requirements.txt file into the image.
- RUN pip3 install -r requirements.txt: Install all of the necessary packages listed in your requirements.txt file.
- COPY . .: Copy the contents of your project into the image.
- CMD ["python3", "-m" , "flask", "run", "--host=0.0.0.0"]: Specify the command to run when the image is executed as a container. This command will start a Flask development server accessible on port 5000 of your Docker host.
Step 5: Build your docker image
In this step, you'll use the Dockerfile you created in the previous step to build a docker image for your application.
Open the terminal and navigate to your project's root directory. Then, type the following command:
docker build -t flask-app.
This command will use the Dockerfile in your project's root directory to build a flask-app image.
Step 6: Run your docker image as a container
Now that you have built a docker image for your application, you can run it as a container.
In the terminal, type the following command:
docker run -d -p 5000:5000 flask-app
This command will run your flask-app image as a container accessible on port 5000 of your Docker host. The -d flag specifies that the container should run in detached mode, which means it will run in the background.
To verify that your container is running, type the following command:
docker ps
You should see an output similar to the following:
f1fd7c36bd44 flask-app "python3 -m flask ru…" 3 seconds ago Up 3 seconds 0.0.0.0:5000->5000/tcp epic_albattani
Step 7: Test your application
Now that your application is running in a docker container, you can test it to ensure it's working as expected.
To test your application, open a web browser and navigate to http://localhost:5000/. If everything is working correctly, you should see the following output:
Hello, Docker!
Cleanup
To stop the container, type the following command:
docker stop nostalgic_booth
Conclusion
In this article, you've learned how to deploy a Python web application using a docker container. Packaging your application in a container makes it easy to deploy and run it on any server.


Top comments (0)