Create a kustomization.yaml
Add a Secret generator
A Secret is an object that stores a piece of sensitive data like a password or key. Since 1.14, kubectl supports the management of Kubernetes objects using a kustomization file. You can create a Secret by generators in kustomization.yaml.
Add a Secret generator in kustomization.yaml from the following command. You will need to replace YOUR_PASSWORD with the password you want to use.
cat <<EOF >./kustomization.yaml
secretGenerator:
- name: mysql-pass
  literals:
  - password=YOUR_PASSWORD
EOF
Add resource configs for MySQL and WordPress
The following manifest describes a single-instance MySQL Deployment. The MySQL container mounts the PersistentVolume at /var/lib/mysql. The MYSQL_ROOT_PASSWORD environment variable sets the database password from the Secret.
The following manifest describes a single-instance WordPress Deployment. The WordPress container mounts the
PersistentVolume at /var/www/html for website data files. The WORDPRESS_DB_HOST environment variable sets
the name of the MySQL Service defined above, and WordPress will access the database by Service. The
WORDPRESS_DB_PASSWORD environment variable sets the database password from the Secret kustomize generated.
-
create MySQL deployment configuration file
mysql-deployment.yaml.
apiVersion: v1 kind: Service metadata: name: wordpress-mysql labels: app: wordpress spec: ports: - port: 3306 selector: app: wordpress tier: mysql clusterIP: None --- apiVersion: v1 kind: PersistentVolumeClaim metadata: name: mysql-pv-claim labels: app: wordpress spec: accessModes: - ReadWriteOnce resources: requests: storage: 20Gi --- apiVersion: apps/v1 # for versions before 1.9.0 use apps/v1beta2 kind: Deployment metadata: name: wordpress-mysql labels: app: wordpress spec: selector: matchLabels: app: wordpress tier: mysql strategy: type: Recreate template: metadata: labels: app: wordpress tier: mysql spec: containers: - image: mysql:5.6 name: mysql env: - name: MYSQL_ROOT_PASSWORD valueFrom: secretKeyRef: name: mysql-pass key: password ports: - containerPort: 3306 name: mysql volumeMounts: - name: mysql-persistent-storage mountPath: /var/lib/mysql volumes: - name: mysql-persistent-storage persistentVolumeClaim: claimName: mysql-pv-claim -
create WordPress configuration file
wordpress-deployment.yaml.
apiVersion: v1
kind: Service
metadata:
name: wordpress
labels:
app: wordpress
spec:
ports:
- port: 80
selector:
app: wordpress
tier: frontend
type: LoadBalancer
---
apiVersion: v1
kind: PersistentVolumeClaim
metadata:
name: wp-pv-claim
labels:
app: wordpress
spec:
accessModes:
- ReadWriteOnce
resources:
requests:
  storage: 20Gi
---
apiVersion: apps/v1 # for versions before 1.9.0 use apps/v1beta2
kind: Deployment
metadata:
name: wordpress
labels:
app: wordpress
spec:
selector:
matchLabels:
  app: wordpress
  tier: frontend
strategy:
type: Recreate
template:
metadata:
  labels:
    app: wordpress
    tier: frontend
spec:
  containers:
  - image: wordpress:4.8-apache
    name: wordpress
    env:
    - name: WORDPRESS_DB_HOST
      value: wordpress-mysql
    - name: WORDPRESS_DB_PASSWORD
      valueFrom:
        secretKeyRef:
          name: mysql-pass
          key: password
    ports:
    - containerPort: 80
      name: wordpress
    volumeMounts:
    - name: wordpress-persistent-storage
      mountPath: /var/www/html
  volumes:
  - name: wordpress-persistent-storage
    persistentVolumeClaim:
      claimName: wp-pv-claim
Add them to
kustomization.yamlfile.
cat <<EOF >>./kustomization.yaml
resources:
  - mysql-deployment.yaml
  - wordpress-deployment.yaml
EOF
Apply and Verify
The kustomization.yaml contains all the resources for deploying a WordPress site and a
MySQL database. You can apply the directory by
kubectl apply -k ./
Now you can verify that all objects exist.
-
Verify that the Secret exists by running the following command:
kubectl get secretsThe response should be like this:
NAME TYPE DATA AGE mysql-pass-c57bb4t7mf Opaque 1 9s -
Verify that a PersistentVolume got dynamically provisioned.
kubectl get pvcIt can take up to a few minutes for the PVs to be provisioned and bound.
The response should be like this:
NAME STATUS VOLUME CAPACITY ACCESS MODES STORAGECLASS AGE mysql-pv-claim Bound pvc-8cbd7b2e-4044-11e9-b2bb-42010a800002 20Gi RWO standard 77s wp-pv-claim Bound pvc-8cd0df54-4044-11e9-b2bb-42010a800002 20Gi RWO standard 77s -
Verify that the Pod is running by running the following command:
kubectl get podsIt can take up to a few minutes for the Pod's Status to be
RUNNING.The response should be like this:
NAME READY STATUS RESTARTS AGE wordpress-mysql-1894417608-x5dzt 1/1 Running 0 40s -
Verify that the Service is running by running the following command:
kubectl get services wordpressThe response should be like this:
  NAME        TYPE            CLUSTER-IP   EXTERNAL-IP   PORT(S)        AGE
  wordpress   LoadBalancer    10.0.0.89    <pending>     80:32406/TCP   4m
Minikube can only expose Services through
NodePort. The EXTERNAL-IP is always pending. -
Run the following command to get the IP Address for the WordPress Service:
minikube service wordpress --urlThe response should be like this:
http://1.2.3.4:32406 Copy the IP address, and load the page in your browser to view your site.
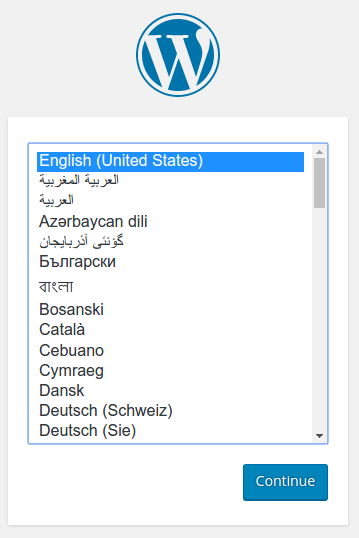
You should see the WordPress set up page similar to the following screenshot.
Do not leave your WordPress installation on this page. If another user finds it, they can set up a website on your instance and use it to serve malicious content.
-
Run the following command to delete your Secret, Deployments, Services and PersistentVolumeClaims:
kubectl delete -k ./
If you face any problem source code here


Top comments (0)