What is Docker?
Docker is an open-source tool, it is a tool that helps in developing, building, deploying, and executing software in isolation. How does it do this you ask? It does so by containerizing the complete software in short.
What is a Container?
So once again, containers are software that wraps up the code, the dependencies and the environment that is required to run the code in a single package. These containers are used for development, deployment, testing, and management of software.
To get a better understanding of containers, let’s study it in comparison to VM. I’m sure you guys already know what VM is.
Containers vs VM
I’ll be using these criteria to compare a Container and a VM:
- Operating Systems
- Architecture
- Isolation
- Efficiency
- Portability
- Scalability
- Deployment
Operating system:
- Containers contain only the bare minimum parts of the Operating system required to run the software. Updates are easy and simple to do.
- VMs contain the complete Operating system that is normally used on systems for general purpose. Updates are time consuming and tough.
Architecture:
Containers occupy a part of the host system’s kernel and acquire resources using it.
VMs are completely isolated from the host system and acquire resources through something called the hypervisor.
Isolation:
- Container’s isolation isn’t as complete as of a VM but is adequate.
- VM provides complete isolation from the concerning host system and is also more secure.
Efficiency:
- Containers are way more efficient as they only utilise the most necessary parts of the Operating system. They act like any other software on the host system.
- VM are less efficient as they have to manage full-blown guest operating system. VM’s have to access host resource through a hypervisor.
Portability:
- Containers are self-contained environments that can easily be used on different Operating systems.
- VMs aren’t that easily ported with the same settings from one operating system to another.
Scalability:
- Containers are very easy to scale, they can be easily added and removed based on requirements due to their lightweight.
- VMs aren’t very easily scalable as they are heavy in nature.
Deployment:
- Containers can be deployed easily using the Docker CLI or making use of Cloud services provided by aws or azure.
- VMs can be deployed by using the PowerShell by using the VMM or using cloud services such as aws or azure.
Why do we need Containers?
Now that we understand what containers are, let’s see why we need containers.
It allows us to maintain a consistent development environment. I have already talked about this when we were discussing the issues we faced before containers were a thing.
It allows us to deploy software as micro-services. I will get into what micro-services in another blog. But right now, understand that software these days are not deployed as single files, but rather a set of smaller files, this is known as micro-services. And Docker helps us launch software in multiple containers as micro-services.
Again, what is Docker?
With that entire context, this definition should make more sense: Docker is an open-source tool. It is a tool that helps in developing, building, deploying and executing software in isolation.
It is developed and maintained by Docker Inc. which first introduced the product in 2013. It also has a very large community that contributes to Docker and discusses new ideas.
Docker Environment
So Docker environment is basically all the things that make Docker. They are:
- Docker Engine
- Docker Objects
- Docker Registry
- Docker Compose
- Docker Swarm
Docker Engine:
Docker engine is as the name suggests its technology that allows for the creation and management of all the Docker Processes. It has three major parts to it:
- Docker CLI (Command Line Interface) – This is what we use to give commands to Docker. E.g. docker pull or docker run.
- Docker API – This is what communicates the requests the users make to the Docker daemon.
- Docker Daemon – This is what actually does all the process, i.e. creating and managing all of the Docker processes and objects.
So, for example, if I wrote a command $sudo docker run Ubuntu, it will be using the docker CLI. This request will be communicated to the Docker daemon using the docker API. The docker daemon will process the request and then act accordingly.
Docker Objects:
There are many objects in docker you can create and make use of, let’s see them:
- Docker Images – These are basically blueprints for containers. They contain all of the information required to create a container like the OS, Working directory, Env variables, etc.
- Docker Containers – We already know about this.
- Docker Volumes – Containers don’t store anything permanently after they’re stopped, Docker Volumes allow for persistent storage of Data. They can be easily & safely attached and removed from the different container and they are also portable from system to another. Volumes are like Hard drives
- Docker Networks – A Docker network is basically a connection between one or more containers. One of the more powerful things about the Docker containers is that they can be easily connected to one other and even other software, this makes it very easy to isolate and manage the containers
- Docker Swarm Nodes & Services – We haven’t learned about docker swarm yet, so it will be hard to understand this object, so we will save it for when we learn about docker swarm.
Docker Registry:
To create containers we first need to run images, to create images we need to build text files called dockerfile. You can run multiple containers from a single image.
Since images are so important, they need to stored and distributed. To do this, we need a dedicated storage location and this is where Docker registries come in. Docker registries are dedicated storage locations of docker images. These images can be distributed easily from here to anywhere it is required.
The Docker images can also be versioned inside of a Docker Registry just like source code can be versioned.
You have many options for a Docker Registry. One of the most popular ones is DockerHub, which is again maintained by the docker inc. You can upload your docker images to it without paying, but they will be public, so if you want to make them private you will have to pay for a premium subscription to docker.
There are some alternatives but they are rarely entirely free, there is a limit and once you cross that limit you will have to pay. Some alternatives are: ECR ( Elastic Container Registry), Jfrog Artifactory, Azure Container Registry, Red Hat Quay, Google Container Registry, Zookeeper, Harbor etc.
You can always host your own images if you have the infrastructure and resources to do so and some organisations do this.
Docker Compose:
Docker-compose is a tool within docker that is used to launch and define multiple containers at the same time. Normally when you run a container using the docker run command you can only run one container at a time. So when you need to launch a whole bunch of services together you first define it within a docker-compose.yml file and then launch it using the docker-compose command.
It’s a very useful tool for testing, production, development and as well as staging purpose.
Docker Swarm:
Docker swarm is a little bit more advanced topic I won’t cover it entirely but I will give you guys an idea of what it is. Docker swarm by definition is a group of either physical or virtual machines that are running the Docker application and that has been configured to join together in a cluster. So when we want to manage a bunch of docker containers together we group them as clusters and then manage them.
Docker swarm officially is an orchestration tool that is used to group, deploy, and update multiple containers. People usually make use of it when they need to deploy an application with multiple containers.
There are two types of nodes on a Docker swarm:
- Manager Nodes – Used to manage a cluster of other nodes.
- Worker Nodes – Used to perform all the tasks.
Docker Architecture
Let’s explore the architecture of docker, since we know about all of its components we will understand the architecture much better.
Docker has three main parts, Docker CLI – allows us to communicate our requests to Docker, Docker Host – performs all the processing and creation of objects, Docker Registry – a dedicated storage place for Docker images. And of course, not mentioned in the diagram here, but there is Docker API which handles all the communications.
Let’s consider three commands here:
- $ docker build
- $ docker pull
- $ docker run
And now let’s study what happens when each of these commands is executed.
$ docker build
This command is used to give the order to build an image. So when we run the command Docker build through the Docker CLI, the request is communicated to the Docker daemon which processes this request, i.e. looks at the instructions and then creates an image according to those requests.
Let’s say that the image to be created is of Ubuntu. So we will tell Docker about the creation of the image using the command: $ sudo docker build dockerfile –t ubuntu . , Once the daemon gets to know about the request it will start building the image based on dockerfile you have written.
$ docker pull
This command is used to give the order to pull an image from the Docker registry. So when we run this command the request will be communicated to the docker registry through the Docker daemon and once the image is identified it will be stored in the host system, ready for access.
Let’s say we want to pull an apache web server image for hosting our server, for that we will use the command: $ sudo docker pull apache2 , Once the daemon gets the request it will look for the same image in the Docker registry and is it finds it will download the image and store it locally.
$ docker run
This command is used to run any image and create a container out of it. So when we run this command the request will be communicated to the docker daemon which will then select the image mentioned in the request and create a container out of it.
Let’s say we want to create a container based on the ubuntu image we had created earlier. For this we will use the command:
$ sudo docker run ubuntu
, Once the daemon gets this request it will refer to the image named ubuntu and then create a container out of this image.
So this is in short how Docker functions as a tool to create containers.
Most common CLIs for Docker:
-
docker --version: shows the installed Docker version. -
docker pull [image]: downloads a Docker image from Docker Hub or another registry. For example,docker pull ubuntuwill download the latest Ubuntu image. -
docker push [options][image]: upload an image to a registry. -
docker build [options][path]: build the image from Dockerfile, for example:docker build -t my-node-app:v1.0 . -
docker images: lists all locally available Docker images. -
docker ps: shows all running containers. Adding the-aflag (docker ps -a) displays all containers, including the stopped ones. -
docker run [options][image][command]: creates and starts a container based on the specified image. For example,docker run -it ubuntu /bin/bashwill run an interactive Ubuntu container. -
docker stop [container]: stops a running container. You can use the container ID or name. -
docker start [container]: starts a stopped container. -
docker rm [container]: removes one or more containers. Use the-fflag to force the removal of a running container. -
docker rmi [image]: removes one or more images. You can also use the image ID or name. -
docker exec -it [container][command]: allows you to execute a command inside a running container. For example,docker exec -it my_container bashwill start a bash session inside the "my_container" container. -
docker logs [container]: shows the logs of a specific container. -
docker restart [options][container]: restart one or more containers. -
docker inspect [options][container]: return low-level information on Docker objects -
docker cp [options] CONTAINER:SRC DEST | SRC CONTAINER:DEST: copy files/folders between a container and the local filesystem.
Most Common Dockerfile keywords:
Dockerfiles are used to create Docker container images. They consist of a series of commands that specify how the image should be built. Here are some of the key instructions and keywords commonly used in Dockerfiles:
-
FROM: Specifies the base image from which you are building. -
LABEL: Adds metadata to an image, like the author's name and contact details. -
RUN: Executes commands within the shell. It’s used to install packages, update the system, or set up the environment within the image. -
COPY: Copies files and directories from the host machine to the container. -
WORKDIR: Sets the working directory for any RUN, CMD, ENTRYPOINT, and COPY instructions in the Dockerfile. -
CMD: Provides default commands for the container to execute. CMD is used in the final image and can be overridden by command-line arguments when the container starts. -
ENTRYPOINT: Similar to CMD, but defines the executable that will run when the container starts. It can also be overridden during runtime. -
EXPOSE: Informs Docker that the container listens on specific network ports at runtime. -
ENV: Sets environment variables inside the container. -
ARG: Defines build-time variables that are accessible only during the build process and not saved in the final image. -
VOLUME: Creates a mount point for externally mounted volumes or other containers. -
USER: Sets the user or UID the container should run as when it starts. -
HEALTHCHECK: Defines a command to check the container’s health. -
STOPSIGNAL: Sets the system call signal that will be sent to the container to exit.
Example for real dockerfile.
Below is an example of a Dockerfile for a simple Django project that includes various Dockerfile keys:
# Use an official Python runtime as a parent image
FROM python:3.8

# Set environment variables
ENV PYTHONUNBUFFERED 1
ENV DJANGO_SETTINGS_MODULE=myproject.settings

# Set working directory within the container
WORKDIR /app

# Copy the current directory contents into the container at /app
COPY . /app

# Install any needed packages specified in requirements.txt
RUN pip install -r requirements.txt

# Expose port 8000 to allow external connections
EXPOSE 8000

# Run Django's development server when the container launches
CMD ["python", "manage.py", "runserver", "0.0.0.0:8000"]
there is another example of a Dockerfile for a simple nodejs project that includes various Dockerfile keys:
# Use an official Node.js runtime as the base image
FROM node:14

# Set environment variables
ENV NODE_ENV=production
ENV PORT=3000

# Create a work directory for the application
WORKDIR /app

# Copy package.json and package-lock.json to the work directory
COPY package*.json ./

# Install project dependencies
RUN npm install

# Copy the rest of the application code to the work directory
COPY . .

# Expose a port for the application to listen on
EXPOSE 3000

# Set the default command to start the application
CMD [ "npm", "start" ]
Docker Explained: Dockerfile
Dockerfile
A Dockerfile is a text document that contains all the commands a user could call on the command line to assemble an image. Think of it as a shellscript. It gathered multiple commands into a single document to fulfill a single task.
build command is used to create an image from the Dockerfile.
$ docker build
You can name your image as well.
$ docker build -t my-image
If your Dockerfile is placed in another path,
$ docker build -f /path/to/a/Dockerfile .
Let's first look at a Dockerfile and discuss those commands.
We are going to take the official MySQL Dockerfile as an example.
FROM debian:stretch-slim

# add our user and group first to make sure their IDs get assigned consistently, regardless of whatever dependencies get added

RUN groupadd -r mysql && useradd -r -g mysql mysql

RUN apt-get update && apt-get install -y --no-install-recommends gnupg dirmngr && rm -rf /var/lib/apt/lists/*

RUN mkdir /docker-entrypoint-initdb.d

ENV MYSQL_MAJOR 8.0

ENV MYSQL_VERSION 8.0.15-1debian9

VOLUME /var/lib/mysql

# Config files

COPY config/ /etc/mysql/

COPY docker-entrypoint.sh /usr/local/bin/

RUN ln -s usr/local/bin/docker-entrypoint.sh /entrypoint.sh # backwards compat

ENTRYPOINT ["docker-entrypoint.sh"]

EXPOSE 3306 33060

CMD ["mysqld"]
Here's what's being done here:
Select the operating system.
Create a user for MySQL.
Update packages and install software.
Configure the environment.
These are the steps we will use to install MySql in our Linux machine. Now it's bundled inside the dockerfile to anyone to get and create images.
Let's try to understand the purposes of these commands.
Dockerfile Commands
FROM- specifies the base(parent) image. Alpine version is the minimal docker image based on Alpine Linux which is only 5mb in size.RUN- runs a Linux command. Used to install packages into container, create folders, etcENV- sets environment variable. We can have multiple variables in a single dockerfile.COPY- copies files and directories to the container.EXPOSE- expose portsENTRYPOINT- provides command and arguments for an executing container.CMD- provides a command and arguments for an executing container. There can be only one CMD.VOLUME- create a directory mount point to access and store persistent data.WORKDIR- sets the working directory for the instructions that follow.LABEL- provides metada like maintainer.ADD- Copies files and directories to the container. Can unpack compressed files.ARG- Define build-time variable.
There are a few commands which are little confusing. Let's have a look at them.
COPY vs. ADD
Both commands serve a similar purpose, to copy files into the image.
COPY- let you copy files and directories from the host.ADD- does the same. Additionally it lets you use URL location and unzip files into image.
Docker documentation recommends to use COPY command.
ENTRYPOINT vs. CMD
CMD- allows you to set a default command which will be executed only when you run a container without specifying a command. If a Docker container runs with a command, the default command will be ignored.ENTRYPOINT- allows you to configure a container that will run as an executable. ENTRYPOINT command and parameters are not ignored when Docker container runs with command line parameters.
VOLUME
You declare VOLUME in your Dockerfile to denote where your container will write application data. When you run your container using -v you can specify its mounting point.
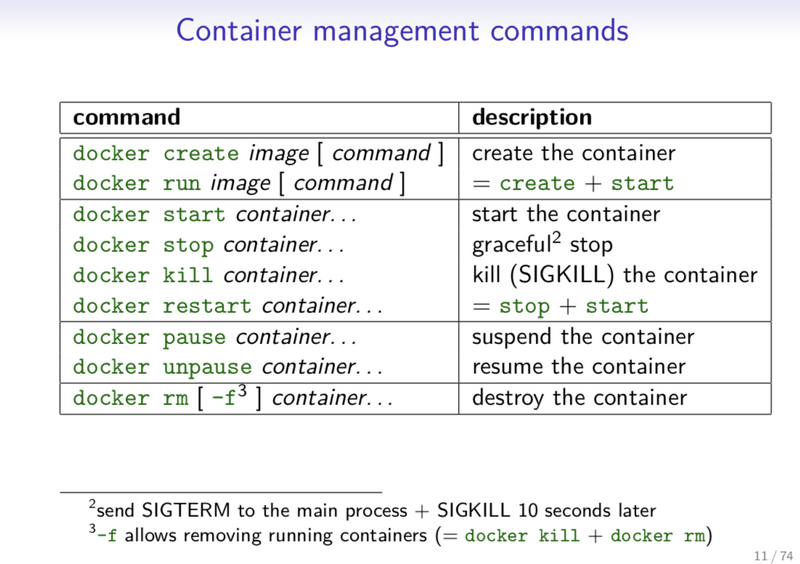
Container Management CLIs
Here’s the list of the Docker commands that manages Docker images and containers flawlessly:
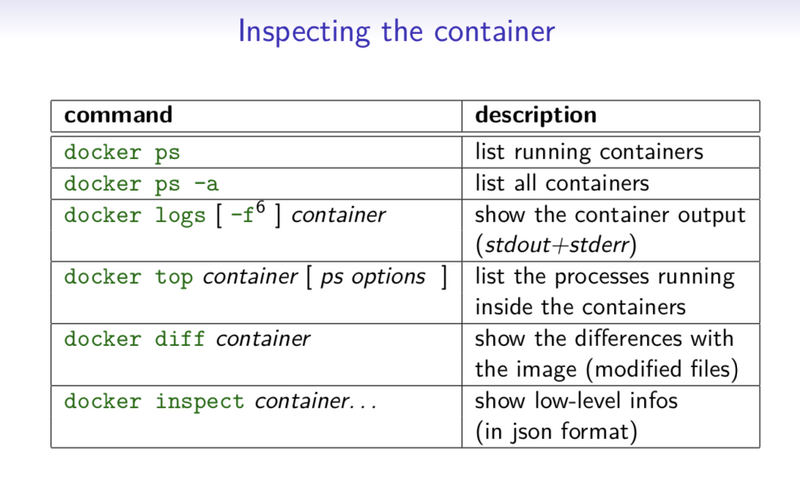
Inspecting The Container
Here’s the list of the basic Docker commands that helps you inspect the containers seamlessly:
Interacting with Container
Do you want to know how to access the containers? Check out these fundamental commands:
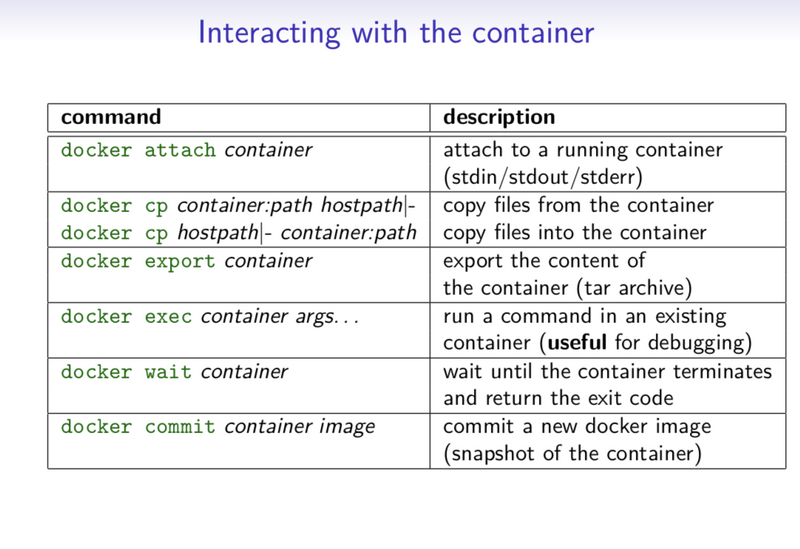
Image Management Commands
Here’s the list of Docker commands that helps you manage the Docker Images:
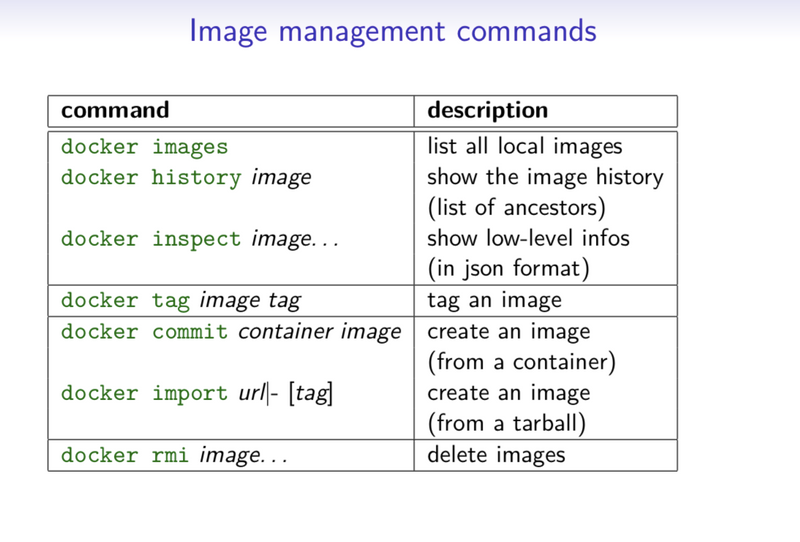
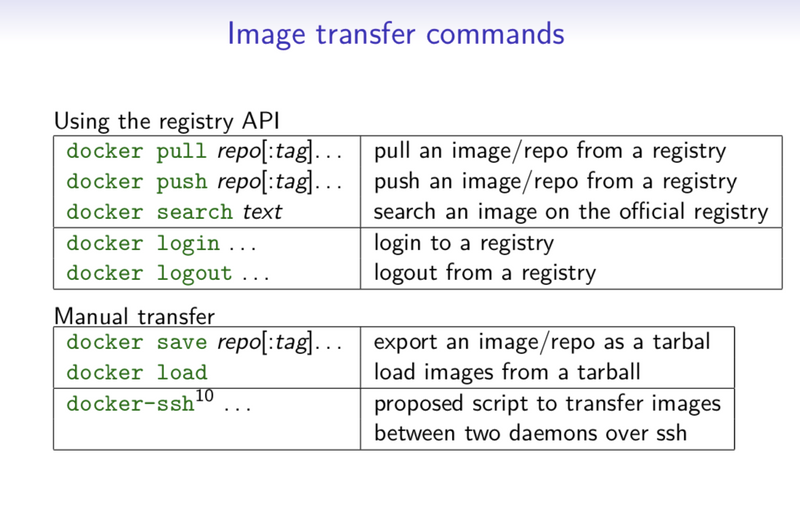
Image Transfer Commands
Here’s the list of Docker image transfer commands:
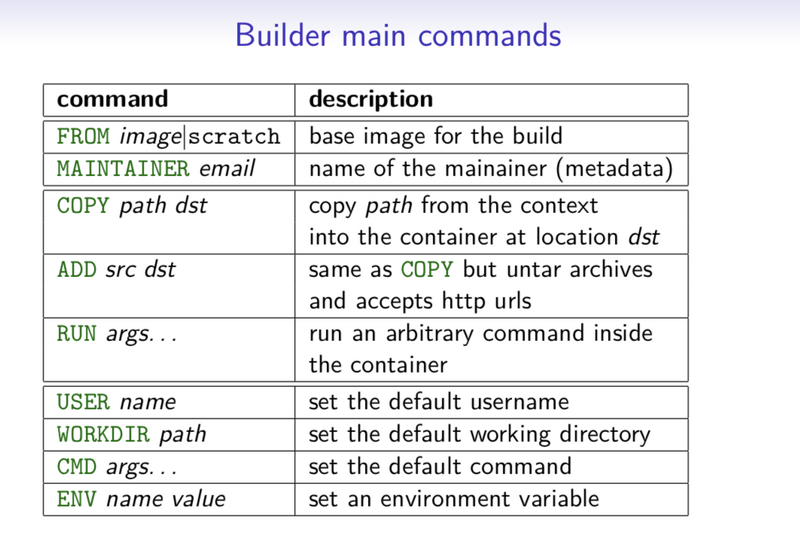
Builder Main Commands
Want to know how to build Docker Image? Do check out the list of Image Build Commands:
The Docker CLI
Manage images
docker build
docker build [options] .
  -t "app/container_name"    # name
Create an image from a Dockerfile.
docker run
docker run [options] IMAGE
  # see `docker create` for options
Run a command in an image.
Manage containers
docker create
docker create [options] IMAGE
  -a, --attach               # attach stdout/err
  -i, --interactive          # attach stdin (interactive)
  -t, --tty                  # pseudo-tty
      --name NAME            # name your image
  -p, --publish 5000:5000    # port map
      --expose 5432          # expose a port to linked containers
  -P, --publish-all          # publish all ports
      --link container:alias # linking
  -v, --volume `pwd`:/app    # mount (absolute paths needed)
  -e, --env NAME=hello       # env vars
Example
$ docker create --name app_redis_1 \
  --expose 6379 \
  redis:3.0.2
Create a container from an image.
docker exec
docker exec [options] CONTAINER COMMAND
  -d, --detach        # run in background
  -i, --interactive   # stdin
  -t, --tty           # interactive
Example
$ docker exec app_web_1 tail logs/development.log
$ docker exec -t -i app_web_1 rails c
Run commands in a container.
docker start
docker start [options] CONTAINER
  -a, --attach        # attach stdout/err
  -i, --interactive   # attach stdin

docker stop [options] CONTAINER
Start/stop a container.
docker ps
$ docker ps
$ docker ps -a
$ docker kill $ID
Manage containers using ps/kill.
Images
docker images
$ docker images
  REPOSITORY   TAG        ID
  ubuntu       12.10      b750fe78269d
  me/myapp     latest     7b2431a8d968
$ docker images -a # also show intermediate
Manages images.
docker rmi
docker rmi b750fe78269d
Deletes images.
Also see
- Getting Started (docker.io)
Dockerfile
Inheritance
FROM ruby:2.2.2
Variables
ENV APP_HOME /myapp
RUN mkdir $APP_HOME
Initialization
RUN bundle install
WORKDIR /myapp
VOLUME ["/data"]
# Specification for mount point
ADD file.xyz /file.xyz
COPY --chown=user:group host_file.xyz /path/container_file.xyz
Onbuild
ONBUILD RUN bundle install
# when used with another file
Commands
EXPOSE 5900
CMD    ["bundle", "exec", "rails", "server"]
Entrypoint
ENTRYPOINT ["executable", "param1", "param2"]
ENTRYPOINT command param1 param2
Configures a container that will run as an executable.
ENTRYPOINT exec top -b
This will use shell processing to substitute shell variables, and will ignore any CMD or docker run command line arguments.
Metadata
LABEL version="1.0"
LABEL "com.example.vendor"="ACME Incorporated"
LABEL com.example.label-with-value="foo"
LABEL description="This text illustrates \
that label-values can span multiple lines."
See also
docker-compose
Basic example
# docker-compose.yml
version: '2'

services:
  web:
    build: .
    # build from Dockerfile
    context: ./Path
    dockerfile: Dockerfile
    ports:
     - "5000:5000"
    volumes:
     - .:/code
  redis:
    image: redis
Commands
docker-compose start
docker-compose stop
docker-compose pause
docker-compose unpause
docker-compose ps
docker-compose up
docker-compose down
Reference
Building
web:
  # build from Dockerfile
  build: .
  # build from custom Dockerfile
  build:
    context: ./dir
    dockerfile: Dockerfile.dev
  # build from image
  image: ubuntu
  image: ubuntu:14.04
  image: tutum/influxdb
  image: example-registry:4000/postgresql
  image: a4bc65fd
Ports
  ports:
    - "3000"
    - "8000:80"  # guest:host
  # expose ports to linked services (not to host)
  expose: ["3000"]
Commands
  # command to execute
  command: bundle exec thin -p 3000
  command: [bundle, exec, thin, -p, 3000]
  # override the entrypoint
  entrypoint: /app/start.sh
  entrypoint: [php, -d, vendor/bin/phpunit]
Environment variables
  # environment vars
  environment:
    RACK_ENV: development
  environment:
    - RACK_ENV=development
  # environment vars from file
  env_file: .env
  env_file: [.env, .development.env]
Dependencies
  # makes the `db` service available as the hostname `database`
  # (implies depends_on)
  links:
    - db:database
    - redis
  # make sure `db` is alive before starting
  depends_on:
    - db
Other options
  # make this service extend another
  extends:
    file: common.yml  # optional
    service: webapp
  volumes:
    - /var/lib/mysql
    - ./_data:/var/lib/mysql
Advanced features
Labels
services:
  web:
    labels:
      com.example.description: "Accounting web app"
DNS servers
services:
  web:
    dns: 8.8.8.8
    dns:
      - 8.8.8.8
      - 8.8.4.4
Devices
services:
  web:
    devices:
    - "/dev/ttyUSB0:/dev/ttyUSB0"
External links
services:
  web:
    external_links:
      - redis_1
      - project_db_1:mysql
Hosts
services:
  web:
    extra_hosts:
      - "somehost:192.168.1.100"
services
To view list of all the services running in swarm
docker service ls
To see all running services
docker stack services stack_name
to see all services logs
docker service logs stack_name service_name
To scale services quickly across qualified node
docker service scale stack_name_service_name=replicas
clean up
To clean or prune unused (dangling) images
docker image prune
To remove all images which are not in use containers , add - a
docker image prune -a
To prune your entire system
docker system prune
To leave swarm
docker swarm leave
To remove swarm ( deletes all volume data and database info)
docker stack rm stack_name
To kill all running containers
docker kill $(docker ps -q )
Docker Security
Docker Scout
Command line tool for Docker Scout:
docker scout
Analyzes a software artifact for vulnerabilities
docker scout cves [OPTIONS] IMAGE|DIRECTORY|ARCHIVE
Display vulnerabilities from a docker save tarball
docker save redis > redis.tar
Display vulnerabilities from an OCI directory
skopeo copy --override-os linux docker://alpine oci:redis
Export vulnerabilities to a SARIF JSON file
docker scout cves --format sarif --output redis.sarif.json redis
Comparing two images
docker scout compare --to redis:6.0 redis:6-bullseye
Displaying the Quick Overview of an Image
docker scout quickview redis:6.0
What is Docker Compose?
Docker Compose is a tool that makes it easier to create and run multi-container applications. It automates the process of managing several Docker containers simultaneously, such as a website frontend, API, and database service.
Docker Compose allows you to define your application’s containers as code inside a YAML file you can commit to your source repository. Once you’ve created your file (normally named docker-compose.yml), you can start all your containers (called “services”) with a single Compose command.
Compared with manually starting and linking containers, Compose is quicker, easier, and more repeatable. Your containers will run with the same configuration every time—there’s no risk of forgetting to include an important docker run flag.
Compose automatically creates a Docker network for your project, ensuring your containers can communicate with each other. It also manages your Docker storage volumes, automatically reattaching them after a service is restarted or replaced.
Why use Docker Compose?
Most real-world applications have several services with dependency relationships—for example, your app may run in one container, but depend on a database server that’s deployed adjacently in another container. Moreover, services usually need to be configured with storage volumes, environment variables, port bindings, and other settings before they can be deployed.
Compose lets you encapsulate these requirements as a “stack” of containers that’s specific to your app. Using Compose to bring up the stack starts every container using the config values you’ve set in your file. This improves developer ergonomics, supports reuse of the stack in multiple environments, and helps prevent accidental misconfiguration.
What is the difference between Docker and Docker Compose?
In this article, we’ll share the basics of what Compose is and how to use it. We’ll also provide some examples of using Compose to deploy popular applications. Let’s get started!
We will cover:
What is Docker Compose
Docker Compose benefits
Using Docker Compose
Docker Compose usage examples
What is Docker Compose?
Docker Compose is a tool that makes it easier to create and run multi-container applications. It automates the process of managing several Docker containers simultaneously, such as a website frontend, API, and database service.
Docker Compose allows you to define your application’s containers as code inside a YAML file you can commit to your source repository. Once you’ve created your file (normally named docker-compose.yml), you can start all your containers (called “services”) with a single Compose command.
Compared with manually starting and linking containers, Compose is quicker, easier, and more repeatable. Your containers will run with the same configuration every time—there’s no risk of forgetting to include an important docker run flag.
Compose automatically creates a Docker network for your project, ensuring your containers can communicate with each other. It also manages your Docker storage volumes, automatically reattaching them after a service is restarted or replaced.
Why use Docker Compose?
Most real-world applications have several services with dependency relationships—for example, your app may run in one container, but depend on a database server that’s deployed adjacently in another container. Moreover, services usually need to be configured with storage volumes, environment variables, port bindings, and other settings before they can be deployed.
Compose lets you encapsulate these requirements as a “stack” of containers that’s specific to your app. Using Compose to bring up the stack starts every container using the config values you’ve set in your file. This improves developer ergonomics, supports reuse of the stack in multiple environments, and helps prevent accidental misconfiguration.
What is the difference between Docker and Docker Compose?
Docker is a containerization engine that provides a CLI for building, running, and managing individual containers on your host.
Compose is a tool that expands Docker with support for multi-container management. It supports “stacks” of containers that are declaratively defined in project-level config files.
You can use Docker without Compose; however, adopting Compose when you’re developing a containerized system allows you to deploy your app in any environment with a single command. Whereas the Docker CLI only interacts with one container at a time, Compose integrates with your project and is aware of the relationships between your containers.
Docker Compose benefits
Below are some of the benefits of using Docker Compose:
- Fast and easy configuration with YAML scripts
- Single host deployment
- Increased productivity
- Security with isolated containers
Tutorial: Using Docker Compose
Let’s see how to get started using Compose in your own application. We’ll create a simple Node.js app that requires a connection to a Redis server running in another container.
1. Check if Docker Compose is installed
Historically, Docker Compose was distributed as a standalone binary called docker-compose, separately to Docker Engine. Since the launch of Compose v2, the command is now built into the docker CLI as docker compose. Compose v1 is no longer supported.
You should already have Docker Compose v2 available if you’re using a modern version of Docker Desktop or Docker Engine. You can check by running the docker compose version command:
$ docker compose version
Docker Compose version v2.18.1
2. Create Your Application
Begin this tutorial by copying the following code and saving it to app.js inside your working directory:
const express = require("express");
const {createClient: createRedisClient} = require("redis");

(async function () {

    const app = express();

    const redisClient = createRedisClient({
        url: `redis://redis:6379`
    });

    await redisClient.connect();

    app.get("/", async (request, response) => {
        const counterValue = await redisClient.get("counter");
        const newCounterValue = ((parseInt(counterValue) || 0) + 1);
        await redisClient.set("counter", newCounterValue);
        response.send(`Page loads: ${newCounterValue}`);
    });

    app.listen(80);

})();
The code uses the Express web server package to create a simple hit tracking application. Each time you visit the app, it logs your hit in Redis, then displays the total number of page loads.
Use npm to install the app’s dependencies:
$ npm install express redis
Next, copy the following Dockerfile content to the Dockerfile in your working directory:
FROM node:18-alpine

EXPOSE 80
WORKDIR /app

COPY package.json .
COPY package-lock.json .
RUN npm install

COPY app.js .

ENTRYPOINT ["node", "app.js"]
Compose will build this Dockerfile later to create the Docker image for your application.
3. Create a Docker Compose file
Now, you’re ready to add Compose to your project. This app is a great candidate for Compose because you need two containers to successfully run the app:
- Container 1 – The Node.js server app you’ve created.
- Container 2 – A Redis instance for your Node.js app to connect to.
Creating a docker-compose.yml file is the first step in using Compose. Copy the following content and save it to your own docker-compose.yml—don’t worry, we’ll explain it below:
services:
  app:
    image: app:latest
    build:
      context: .
    ports:
      - ${APP_PORT:-80}:80
  redis:
    image: redis:6
Let’s dive into what’s going on here.
- The top-level
servicesfield is where you define the containers that your app requires. - Two services are specified for this app:
app(your Node.js application) andredis(your Redis server). - Each service has an
imagefield that defines the Docker image the container will run. In the case of the app service, it’s the customapp:latestimage. As this may not exist yet, thebuildfield is set to tell Compose it can build the image using the working directory (.) as the build context. Theredisservice is simpler, as it only needs to reference the official Redis image on Docker Hub. - The
appservice has aportsfield that declares the port bindings to apply to the container, similarly to the-pflag ofdocker run. An interpolated variable is used; this means that the port number given by yourAPP_PORTenvironment variable will be supplied when it’s set, with a fallback to the default port 80.
From this explanation, you can see that the Compose file contains all the configuration needed to launch a functioning deployment of the app.
4. Bring Up Your Containers
Now, you can use Compose to bring up the stack!
Call docker compose up to start all the services in your docker-compose.yml file. In the same way as when calling docker run, you should add the -d argument to detach your terminal and run the services in the background:
$ docker compose up -d
[+] Building 0.5s (11/11) FINISHED
...
[+] Running 3/3
 ✔ Network node-redis_default    Created  0.1s
 ✔ Container node-redis-redis-1  Started  0.7s
 ✔ Container node-redis-app-1    Started  0.6s
Because your app’s image doesn’t exist yet, Compose will first build it from your Dockerfile. It’ll then run your stack by creating a Docker network and starting your containers.
Visit localhost in your browser to see your app in action.
install docker compose
Try refreshing the page a few times—you’ll see the counter increase as each hit is recorded in Redis.docker compose file In the app.js file, we set the Redis client URL to redis:6379. The redis hostname matches the name of the redis service in docker-compose.yml.
Compose uses the names of your services to assign your container hostnames; because the containers are part of the same Docker network, your app container can resolve the redis hostname to your Redis instance.
5. Manage your Docker Compose stack – commands
Now that you’ve started your app, you can use other Docker Compose commands to manage your stack:
docker compose ps
You can see the containers that Compose has created by running the ps command; the output matches that produced by docker ps:
$ docker compose ps
NAME                 IMAGE               COMMAND                  SERVICE             CREATED             STATUS              PORTS
node-redis-app-1     app:latest          "node app.js"            app                 12 minutes ago      Up 12 minutes       0.0.0.0:80->80/tcp, :::80->80/tcp
node-redis-redis-1   redis:6             "docker-entrypoint.s…"   redis               12 minutes ago      Up 12 minutes       6379/tcp
docker compose stop
This command will stop all the Docker containers
created by the stack. Use docker compose start to restart them again afterwards.
docker compose restart
The restart command forces an immediate restart of your stack’s containers.
docker compose down
Use this command to remove the objects created by docker compose up. It will destroy your stack’s containers and networks.
Volumes are not deleted unless you set the -v or --volumes flag. This prevents accidental loss of persistent data.
docker compose logs
View the output from your stack’s containers with the logs command. This collates the standard output and error streams from all the containers in the stack. Each log line is tagged with the name of the container that created it.
docker compose build
You can force a rebuild of your images with the build command. This will rebuild the images for the services in your docker-compose.yml file that include the build field in their configuration.
Afterwards, you can repeat the docker compose up command to restart your stack with the rebuilt images.
docker compose push
After building your images, use push to push them all to their remote registry URLs. Similarly, docker compose pull will retrieve the images needed by your stack, without starting any containers.
6. Use Compose Profiles
Sometimes, a service in your stack might be optional. For example, you could expand the demo application to support the use of alternative database engines instead of Redis. When a different engine is used, you wouldn’t need the Redis container.
You can accommodate these requirements using Compose’s profiles feature. Assigning services to profiles allows you to manually activate them when you run Compose commands:
services:
  app:
    image: app:latest
    build:
      context: .
    ports:
      - ${APP_PORT:-80}:80
  redis:
    image: redis:6
    profiles:
      - with-redis
This docker-compose.yml file assigns the redis service to a profile called with-redis. Now the Redis container will only be considered when you include the --profile with-redis flag with your docker compose commands:
# Does not start Redis
$ docker compose up -d

# Will start Redis
$ docker compose --profile with-redis up -d
7. Understand Docker Compose projects
Projects are an important concept in Docker Compose v2. Your “project” is your docker-compose.yml file and the resources it creates.
Compose uses your working directory’s docker-compose.yml file by default. It assumes your project’s name is equal to your working directory’s name. This name prefixes Docker objects that Compose creates, such as your containers and networks. You can override the project name by setting Compose’s --project-name flag or by including a top-level name field in your docker-compose.yml file:
name: "demo-app"
services:
  ...
You can run Docker Compose commands from outstide your project’s working directory by setting the --profile-directory flag:
$ docker compose --profile-directory=/path/to/directory ps
The flag accepts a path to a docker-compose.yml file, or a directory that contains one.
8. Set Docker Compose environment variables
One of Docker Compose’s advantages is the ease with which you can set environment variables for your services.
Instead of manually repeating docker run -e flags, you can define variables in your docker-compose.yml file, set default values, and facilitate simple overrides:
services:
  app:
    image: app:latest
    build:
      context: .
    environment:
      - DEV_MODE
      - REDIS_ENABLED=1
      - REDIS_HOST_URL=${REDIS_HOST:-redis}
    ports:
      - ${APP_PORT:-80}:80
This example demonstrates a few different ways to set a variable:
-
DEV_MODE– Not supplying a value means Compose will take it from the environment variable set in your shell. -
REDIS_ENABLED=1– Setting a specific value will ensure it’s used (unless it’s overridden later on). -
REDIS_HOST_URL=${REDIS_HOST:-redis}– This interpolated example assignsREDIS_HOST_URLto the value of yourREDIS_HOSTshell variable, falling back to a default value ofredis. -
${APP_PORT:-80}– Environment variables set in your shell can be interpolated into arbitrary fields in yourdocker-compose.ymlfile, permitting easy customization of your stack’s configuration.
Furthermore, you can override these values by creating an environment file—either .env, which is automatically loaded, or another file which you pass to Compose’s --env-file flag:
$ cat config.env
DEV_MODE=1
APP_PORT=8000

$ docker compose --env-file=config.env up -d
9. Control service startup order
Many applications require their components to wait for dependencies to be ready—in our demo app above, the Node application will crash if it starts before the Redis container is live, for example.
You can control the order in which services start by setting the depends_on field in your docker-compose.yml file:
services:
  app:
    image: app:latest
    build:
      context: .
    depends_on:
      - redis
    ports:
      - ${APP_PORT:-80}:80
  redis:
    image: redis:6
Now Compose will delay starting the app service until the redis container is running. For greater safety, you can wait until the container is passing its healthcheck by using the long form of depends_on instead:
services:
  app:
    image: app:latest
    build:
      context: .
    depends_on:
      redis:
        condition: service_healthy
    ports:
      - ${APP_PORT:-80}:80
  redis:
    image: redis:6
Docker Compose Examples
Do you want to see Compose in action, deploying some real-world applications? Here are some examples!
WordPress (Apache/PHP and MySQL) with Docker Compose
WordPress is the most popular website content management system (CMS). It’s a PHP application that requires a MySQL or MariaDB database connection. Consequently, there are two containers to deploy with Docker:
- WordPress application container – Serves WordPress using PHP and the Apache web server.
- MySQL database container – Runs the database server that the WordPress container will connect to.
The following docker-compose.yml file can be used to create these containers and bring up a functioning WordPress site:
services:
  wordpress:
    image: wordpress:${WORDPRESS_TAG:-6.2}
    depends_on:
      - mysql
    ports:
      - ${WORDPRESS_PORT:-80}:80
    environment:
      - WORDPRESS_DB_HOST=mysql
      - WORDPRESS_DB_USER=wordpress
      - WORDPRESS_DB_PASSWORD=${DATABASE_USER_PASSWORD}
      - WORDPRESS_DB_NAME=wordpress
    volumes:
      - wordpress:/var/www/html
    restart: unless-stopped
  mysql:
    image: mysql:8.0
    environment:
      - MYSQL_DATABASE=wordpress
      - MYSQL_USER=wordpress
      - MYSQL_PASSWORD=${DATABASE_USER_PASSWORD}
      - MYSQL_RANDOM_ROOT_PASSWORD="1"
    volumes:
      - mysql:/var/lib/mysql
    restart: unless-stopped

volumes:
  wordpress:
  mysql:
This Compose file contains everything required to configure a WordPress deployment with a connection to a MySQL database.
Environment variables are set to configure the MySQL instance and supply credentials to the WordPress container.
Docker volumes are also defined to store the persistent data created by the containers, independently of their container lifecycles.
Now you can bring up MySQL with a simple command—the only environment variable you need is the wordpress database user’s password:
$ DATABASE_USER_PASSWORD=abc123 docker compose up -d
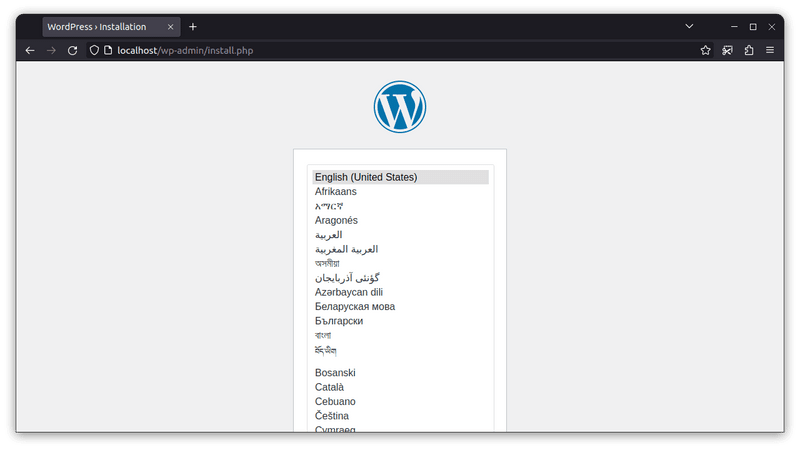
Visit localhost in your browser to access your WordPress site’s installation page:
Prometheus and Grafana with Docker Compose
Prometheus is a popular time-series database used to collect metrics from applications. It’s often paired with Grafana, an observability platform that allows data from Prometheus and other sources to be visualized on graphical dashboards.
Let’s use Docker Compose to deploy and connect these applications.
First, create a Prometheus config file—this configures the application to scrape its own metrics, which supplies data for our demonstration purposes:
scrape_configs:
- job_name: prometheus
  honor_timestamps: true
  scrape_interval: 10s
  scrape_timeout: 5s
  metrics_path: /metrics
  scheme: http
  static_configs:
  - targets:
    - localhost:9090
Save the file to prometheus/prometheus.yml in your working directory.
Next, create a Grafana file that will configure the application with a data source connection to your Prometheus instance:
apiVersion: 1

datasources:
- name: Prometheus
  type: prometheus
  url: http://prometheus:9090
  access: proxy
  isDefault: true
  editable: true
This file should be saved to grafana/grafana.yml in your working directory.
Finally, copy the following Compose file and save it to docker-compose.yml:
services:
  prometheus:
    image: prom/prometheus:latest
    command:
      - "--config.file=/etc/prometheus/prometheus.yml"
    ports:
      - 9090:9090
    volumes:
      - ./prometheus:/etc/prometheus
      - prometheus:/prometheus
    restart: unless-stopped
  grafana:
    image: grafana/grafana:latest
    ports:
      - ${GRAFANA_PORT:-3000}:3000
    environment:
      - GF_SECURITY_ADMIN_USER=${GRAFANA_USER:-admin}
      - GF_SECURITY_ADMIN_PASSWORD=${GRAFANA_PASSWORD:-grafana}
    volumes:
      - ./grafana:/etc/grafana/provisioning/datasources
    restart: unless-stopped
volumes:
  prometheus:
Use docker compose up to start the services and optionally set custom user credentials for your Grafana account:
$ GRAFANA_USER=demo GRAFANA_PASSWORD=foobar docker compose up -d
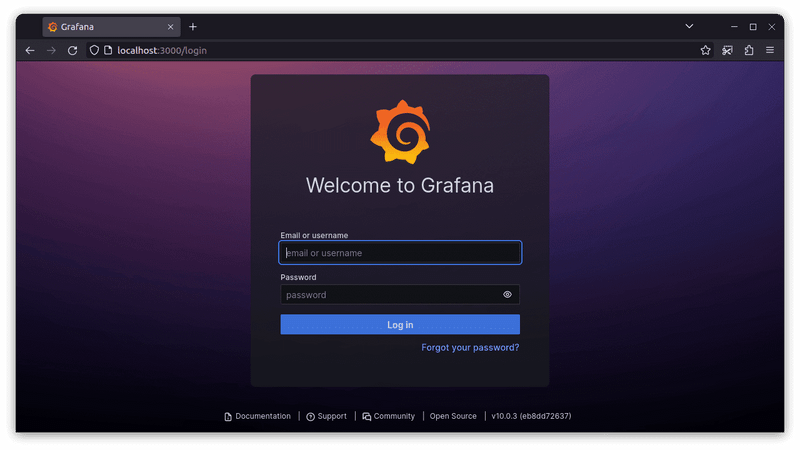
Now visit localhost:3000 in your browser to login to Grafana:
Key Points
In this article, you’ve learned how Docker Compose allows you to work with stacks of multiple Docker containers. We’ve shown how to create a Compose file and looked at some examples for WordPress and Prometheus/Grafana.
Docker image build using container
Make directory for project_dir
mkdir myhtml_project
cd myhtml_project
Directory Structure
Assume your project structure looks like this.
/my-html-project
    ├── Dockerfile
    ├── index.html
Dockerfile
Create a Dockerfile in the root of your project directory:
# Use the official Nginx image from the Docker Hub
FROM nginx:alpine

# Copy the static HTML files into the Nginx directory
COPY . /usr/share/nginx/html

# Expose port 80
EXPOSE 80

# Start Nginx server
CMD ["nginx", "-g", "daemon off;"]
index.html
This is your main HTML file. You can add any HTML content you want here. For this example, it will be a simple "Hello, World!" page.
<!DOCTYPE html>
<html lang="en">
<head>
    <meta charset="UTF-8">
    <meta name="viewport" content="width=device-width, initial-scale=1.0">
    <title>My HTML Site</title>
</head>
<body>
    <h1>Hello, World!</h1>
    <p>Welcome to my website served by Nginx in Docker!</p>
</body>
</html>
Explanation:
Base Image: The Dockerfile uses the official nginx:alpine image, which is a lightweight version of Nginx.
Copy Files: The COPY instruction copies all files from the current directory (.) to /usr/share/nginx/html in the container, which is the default directory where Nginx serves files from.
Expose Port: Port 80 is exposed so that Nginx can be accessed on this port.
Run Nginx: The CMD instruction runs Nginx in the foreground with daemon off.
Build the Docker image:
docker build -t rthway/myhtml_project .
Run the Docker container:
docker run -d -p 80:80 rthway/myhtml_project
docker images check
REPOSITORY                      TAG       IMAGE ID       CREATED          SIZE
rthway/myhtml_project       latest    561d51d411a9   50 minutes ago   43.2MB
Docker check run container
CONTAINER ID   IMAGE                   COMMAND                  CREATED         STATUS         PORTS                               NAMES
3f276d487907   rthway/myhtml_project   "/docker-entrypoint.…"   8 seconds ago   Up 8 seconds   0.0.0.0:80->80/tcp, :::80->80/tcp   charming_chatelet
Docker enter container
docker exec -it rthway/myhtml_project sh
let's Edit html file on container
cd /usr/share/nginx/html/
vi index.html
# lets edit nessesary and save it
exit from container
exit
Docker convert container to image
docker tag rthway/myhtml_project rthway/myhtml_new_project
Docker images check
REPOSITORY                  TAG       IMAGE ID       CREATED          SIZE
rthway/myhtml_new_project   latest    561d51d411a9   1 minutes ago   43.2MB
rthway/myhtml_project       latest    561d51d411a9   58 minutes ago   43.2MB
docker image push to docker hub
docker push rthway/myhtml_new_project
Now you can use Compose to interact with your application’s containers, while avoiding error-prone docker run CLI commands. A single docker compose up will start all the containers in your stack, guaranteeing consistent configuration in any environment.


Top comments (0)