To jump in the depths about this popular orchestration system for the management of multi-container applications at a scale, we have come up with a brief description of its first part-Pods
So, What exactly are the Pods?
In simple words, the pods are the group of one or more containers that are deployed to a single node, which represents the process running on the cluster. Unlike other systems introduced in the past, what users may find different is how the system doesn’t directly run the containers. Instead of that, the Kubernetes combines one or more containers into a high-level structure, which are known as pods.All of the containers in the same pod share the same IP address, hostname, IPC(International Patent Classification), including other resources. The container can communicate with each other as long as they are in the same pod, they act as they are the integrated part of a single machine and at the same time maintaining some level of isolation from other pods. There is also the possibility of the individual applications within a Pod’s context may have some further sub-isolations part applied. In the matter of containers in different pods, the containers have a different IP address that varies from each pod and cannot communicate with each other without a special configuration.
Further, the Kubernetes uses the whole pod as the smallest deployable unit instead of a single container; there are also good reasons for it. As the pods represent the layer of abstractions, and it helps the system to wrap the container that should be managed as a single entity. The containers in the pod have access to the shared volumes (a directory that is accessible to all the containers that are running in a pod) that are used to mount each container’s filesystems. Generally, the pods are used as Kubernetes’s replicating units. In case the application of the user becomes very popular, and the load cannot be handled by a single pod, the users can configure the Kubernetes to deploy the new replicas of their pod to the cluster as per their need. Even when the load isn’t that heavy, it is best to have multiple copies of the pod running in the production system to ensure that the load is balanced and so that the system is failure resistance. So, what are the other uses of pods?
An example of the pod:
apiVersion: v1
kind: Pod
metadata:
  name: example-app
  labels:
    app: example-app
    version: v1
    role: backend
spec:
  containers:
  - name: java
    image: companyname/java
    ports:
    - containerPort: 443
    volumeMounts:
    - mountPath: /volumes/logs
      name: logs
  - name: logger
    image: companyname/logger:v1.2.3
    ports:
    - containerPort: 9999
    volumeMounts:
    - mountPath: /logs
      name: logs
  - name: monitoring
    image: companyname/monitoring:v4.5.6
    ports:
    - containerPort: 1234
Uses of Pods
- The pods act as the mode of the pattern of several co-existing processes that form a single cohesive unit of service. They make the deployment of the application and its management easily accessible, providing the high-level of abstraction for the user and controller to run the program specific to requirements.
- They are used to abstract the network and storage from the underlying container.
- The pods make moving of containers around the cluster more easily accessible as the containers are managed in an organized way and labeled according to their nature.
- The pods allow data sharing and communication between their constituents. The containers in a pod use the same IP and port space, so they can locate each other and communicate using the ‘localhost.’ The containers coordinate their usage of ports and perform together as needed by the application.
Types of Pods
Customarily, the pods in the Kubernetes cluster can be used in two major ways:
1. Pods for a single container
The single-container pod is the commonly used pod system in the Kubernetes. As the system of Kubernetes uses the pods as the miniature unit of the system and doesn’t directly deal with the containers, the one-container pod wraps the single container to interact with the system. So, these containers are suitable for applications that are composed of just a single container.
2. Pods for multiple containers that need to work as a single cohesive unit
In case the application runs with the multiple containers, the multi-container pods tightly couples containers that need to share the resources. The co-located containers in this type of pods act as the single cohesive unit sharing the volume and working as the need for the application. The significant purpose of a multi-container pod is to co-locate, co-manage, and support the helper process for the primary application. However, there are some downside like, if you have 3 containers inside same pod, let say 1,2, and 3. If container 1 needs scaling, we need to scale all 3. This is simply wasting memory and resource usages.
Pods and Controllers
The Kubernetes pod works as a group of containers that are deployed together to interact with the system, on the other hand, the controller is the manager in the system that maintains the pods and makes sure that they set on a specified state. The controllers also play a very crucial role in the system as they are in charge of replacing the pods, in case they fail to perform. Similarly, the controllers are also responsible for running the required number of the pods’ replicas in the whole cluster in the situations if they get deleted or terminated.
The desired state of the replication controller is customized according to the need of the application deployer. When the change is made in the properties of the controller to get it in the desired state, the systems are updated in order to meet the specified state. The controller can also be taken as the process supervisor that ensures the specified number of processes are running smoothly on a single server or on several servers. In cases, if there are too many pods running in the system, the controller stops the surplus pods, and if there are only a few numbers of pods, the controller starts the new ones.
Pod Templates
The Pod templates field is the component of the controller. The Pod templates contain a ‘pod specification’ field that determines how a pod should run, including how the containers should work together within a pod and the volume the pod should mount. The controller uses the Pod templates to create a pod and manage it’s stated as desired by the application. Each controller separated for a workload resource uses the templates as the desired state of workload object necessary to run the application. Also, the characteristics of a pod can be changed using the new template, all the pods running in the system are not bound to accept the new changes and the changes templates doesn’t affect them, however, the new pods will reflect the characteristics mention in the new template. The pods won’t receive the templates updates directly, instead of that, the controller creates a new pod to match requirements set by the new templates.
apiVersion: batch/v1
kind: Job
metadata:
  name: hello
spec:
  template:
    # This is the pod template
    spec:
      containers:
      - name: hello
        image: busybox
        command: ['sh', '-c', 'echo "Hello, Kubernetes!" && sleep 3600']
      restartPolicy: OnFailure
Creating pods
The pods are created by using the controller,such as Deployment, which creates and destroys the replicas of the pods as per necessity. As the pods are transitory, they are no created directly; after creating the pods, they are scheduled to run specific to the needs in the user’s cluster. Further, the controllers also create and manage the pods to meet the specification as the pods are not able to repair or replace themselves when needed. These controllers also are important in updating the pods and changing the version of the application running in the container.
The pods are labeled taking their name, role, nature, version, etc. into consideration. Then the pods are selected by the replication controllers depending on the similarities for a certain role, as per the need of the applications and also for more complex action depending on the demand of the user. The labeling system is exceptionally flexible by design, and the users can experiment with the practices that work best for them.
Basically, there are thee way of creating a pod in the Kubernetes cluster:
1. Imperative Method
The pods can be created with the kubectl command that is directly applied to the Kubernetes cluster. For example, if the user wants to deploy the Nginx web server into the cluster, the user can directly create a pod.
$ kubectl run --generator=run-pod/v1 nginx --image=nginx
pod/nginx created

$ kubectl get pods nginx
NAME READY STATUS RESTARTS AGE
nginx 1/1 Running 0 35s
2. Declarative Method In this process, the pods are created by writing the manifests and using the kubectl apply. This manifest contains the metadata and the specification details w.r.t that help the user to create the object they want. This method is also quite helpful for updating the objects running in the Kubernetes cluster.
First create an nginx-deployment file in declarative way:
vim simple_deployment.yaml
apiVersion: apps/v1
kind: Deployment
metadata:
  name: nginx-deployment
spec:
  selector:
    matchLabels:
      app: nginx-deployment
  minReadySeconds: 5
  template:
    metadata:
      labels:
        app: nginx-deployment
    spec:
      containers:
      - name: nginx
        image: nginx:1.14.2
        ports:
        - containerPort: 80
Now, let’s create a pod using simple_deployment.yaml file, we have just created and validate.
$ kubectl create -f simple_deployment.yaml

deployment.apps/nginx-deployment created

$ kubectl get deployment nginx-deployment
NAME READY UP-TO-DATE AVAILABLE AGE
nginx-deployment 1/1 1 1 19s

$ kubectl get pods -l app=nginx-deployment
NAME READY STATUS RESTARTS AGE
nginx-deployment-5684d7c768-t8xsc 1/1 Running 0 38s
3. Using an Rest API interface The API server performs the authentication, authorization, and admission control of the clients. In the cluster, the API is exported on port 443, which can be accessed through the TLS connection. The self-signed certificate which is generated during the cluster configuration is available at ‘$USER/.kube/config’ on the client machine. A simple nginx pod:
cat > nginx-pod.json <<EOF
{
  "apiVersion": "apps/v1",
  "kind": "Deployment",
  "metadata": {
    "name": "nginx-deployment"
  },
  "spec": {
    "selector": {
      "matchLabels": {
        "app": "nginx"
      }
    },
    "minReadySeconds": 5,
    "template": {
      "metadata": {
        "labels": {
          "app": "nginx"
        }
      },
      "spec": {
        "containers": [
          {
            "name": "nginx",
            "image": "nginx:1.14.2",
            "ports": [
              {
                "containerPort": 80
              }
            ]
          }
        ]
      }
    }
  }
}
EOF
Lifecycle of Pods
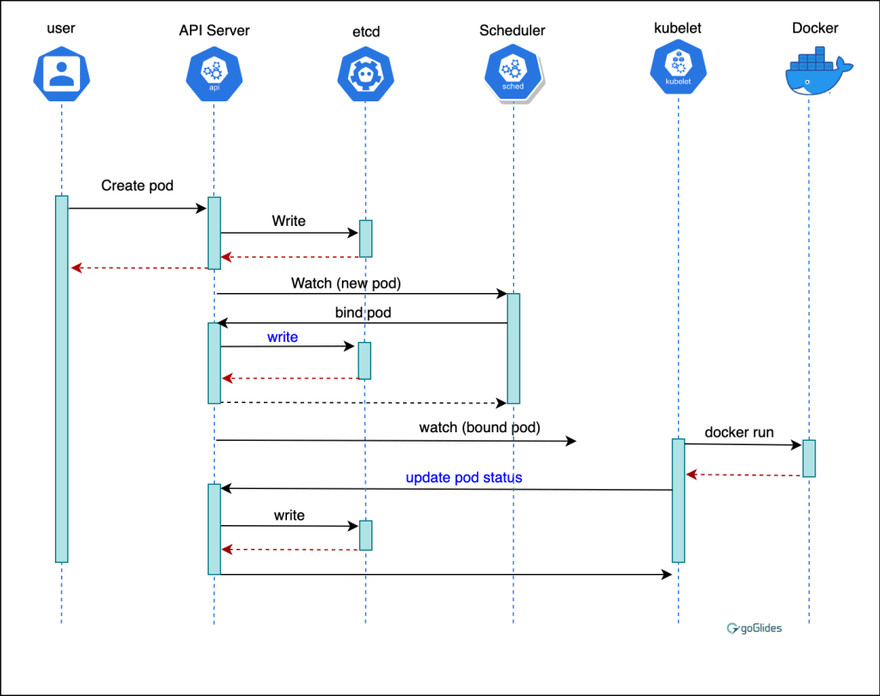
Image Source: Joe Beda’s Blog.
The status of pods can determine in which phase of its lifecycle. The pods are not designed to run forever, and the terminated pods cannot be brought back. Pods don’t cease to exist unless the user himself or the controller deletes the pods. The pods in the system have a PodStaus API object which determines the current life phase of the pod. The pods themselves publish their phase to the PodStatus, and the user or controller can take the necessary actions accordingly. The lifecycle of the pods that are created using cronjobs or jobs can be classified into five phases:
1. Pending
This is the state of the pod when it has been created and already accepted by the cluster; however, all the containers inside the pod are not fully functional at the moment. This phase determines the missing container for the pod to be fully functional.
2. Running The running state of the pod represents it’s successful bound to a node after the completion of creating all the necessary containers in it. In this phase, at least one container is running; it either in the process of starting or restarting.
3. Succeeded
The succeeded phase of the pod’s lifecycle determines the deletion of all the containers in a specific pod. Whether it be they are out of the use or need new replacements, the pod is emptied deleting all the containers. The terminated pods do not start again after being removed from the system.
4. Failed
The failed phase of the pods states the termination of all the containers in a pod, but at least one container has terminated in failure. Such cases can occur if a container exists with a non-zero status or the container was terminated by the system itself.
5. Unknown
The unknown phase is published by the pods in PodStatus when the state of that particular pod cannot be determined.
Furthermore, to provide brief details about the condition of the pods and what is cause for that status of the pods, the PodStaus also contains an array named ‘PodCondtions.’ The PodCondition represents the condition of the pod, indicating the conditions that are the cause for the current phase of the pods. This is the helpful component of the system that aids the user in taking the appropriate actions or troubleshoot the pods taking the situation into consideration.
The ‘PodConditions’ are represented in the pod manifest as ‘conditions’; the field has a ‘type’ and ‘status.’ The ‘field’ contains the ‘PodScheduled,’ ’Ready,’ ‘Initialized,’ and ‘Unschedulable’ condition of the whereas, the ‘status’ field determines ‘type’ field, including ‘True,’ ‘False’ or ‘Unknown’ statuses.
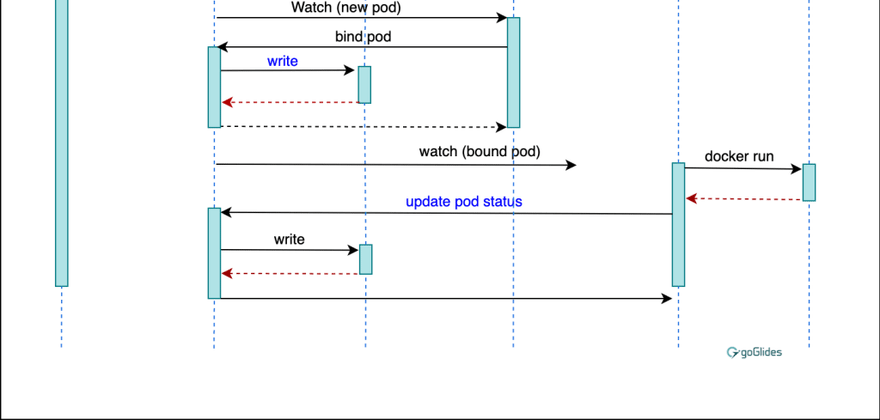
Termination of pods

Image source: Harshal Shah’s Blog.
As the pods represent the processing running on the cluster, after their processes are complete, they can be gracefully terminated. Kubernetes provides the 30 seconds grace period for the deletion of the pods that are no longer required. The grace period can be configured according to the wish of the user by setting the ‘–grace-period’ while interacting with the cluster to request the termination.
Here are the steps for the termination of a pod:
Step 1: The users send commands or API calls to terminate the pod.
Step 2: The Kubernetes updates the Pod status with the time period beyond which the pod is considered ‘dead’(the termination request period plus the grace period set by the user).
Step 3: The Kubernetes system marks the pod as ‘Terminating and stops sending traffics to the pod.
Step 4: The termination request is sent to the main process ‘PID 1’ in each container of the pod, and the ‘grace period’ countdown commences. Then the containers start the graceful shutdown of the running application and exit it.
Step 5: In case, if a container doesn’t terminate within the marked grace period, a ‘SIGKILL’ is sent by the system to terminate the container violently.
Step 6: The Kubernetes finishes deleting the pod on the API server on the Kubernetes Master and is no longer visible from the client.


Top comments (0)