- Objective
- Basic Kubernetes Terminologies
- How Does Kubernetes Work?
- Kubernetes Components & Architecture
- Worker Node Components
- Kubernetes & Docker
- Tools Requirements:
- Installing & Getting Started with Kubernetes
Objective
The goal of this blog is to assist you in completing your CKA (Certified Kubernetes Administrator) and CKD (Certified Kubernetes Developer) certifications. While writing this blog, I intend to sponsor one of the candidates directly. The same work went into the blog. If you want to know more about the sponsorship program, take a look on blog or follow #goglidesdevsponsorship for a future update.
Why should we use Kubernetes?
Kubernetes is a container orchestration system that can be used to deploy and manage containerized applications at scale. Kubernetes was initially designed by Google and is now maintained by the Cloud Native Computing Foundation. It is one of the most popular container orchestration systems available and is used by companies such as Twitter, eBay, and The New York Times. Redhat product OpenShift is entirely based on Kubernetes distribution.
Kubernetes has several advantages over other container orchestration systems:
- It is very scalable and can easily handle deployments of thousands of containers.
- It is very flexible and can be used to deploy a wide variety of applications.
- It is very robust and can automatically recover from failures.
Kubernetes is an excellent choice for deploying and managing containerized applications at scale. If you are looking for a scalable, flexible, and robust container orchestration system, Kubernetes is a great option.
Features of Kubernetes
- Service discovery and load balancing: Kubernetes can automatically assign unique IP addresses to each container in deployment and expose them as a single service. Kubernetes can then load balance traffic across all of the containers in the deployment.
- Self-healing: If a container fails, Kubernetes can automatically restart it. If a node fails, Kubernetes can automatically restart the containers on a different node.
- Rolling updates: Kubernetes can automatically roll out new versions of a containerized application and then roll back to a previous version if needed.
- Horizontal scaling: Kubernetes can easily scale deployments by adding or removing containers.
- Batch execution: Kubernetes can run batch jobs and monitor them to ensure that they are completed successfully.
- Self Monitoring: Kubernetes can automatically detect and diagnose problems with deployments.
- Secret and configuration management: Kubernetes can manage secrets and configuration data for deployments.
- Storage orchestration: Kubernetes can automatically mount persistent storage volumes for deployments.
- Plugin ecosystem: There are a wide variety of plugins available for Kubernetes, such as logging, monitoring, and image builders.
- Automatic Scheduling: Based on CPU, Memory, Storage Type, GPU, and Application type, Kubernetes can automatically schedule a workload on the most appropriate node. Kubernetes is a powerful system with many features. These are just some of the most notable features that Kubernetes offers. For a complete list of features, check out the Kubernetes documentation.
What is Containerization?
Containerization is a method of packaging software so that it can be run in an isolated environment. This is contrasted with virtualization, which runs multiple virtual machines in a single physical machine. Containerization is more efficient than virtualization because it does not require the overhead of running multiple operating systems.
Containerization is a great way to package and deploy software. It is more efficient than virtualization and can provide better isolation. If you are looking for a way to package and deploy software, containerization is an excellent option.
What is Container Orchestration?
Container orchestration is the process of managing and coordinating containers. This includes container deployment, container scaling, and container monitoring.
Several different container orchestration systems are available, including Kubernetes, Docker Swarm, and Mesos.
Container orchestration is a necessary part of deploying and managing containers at scale. If you are looking to deploy and manage containers at scale, you need to use a container orchestration system.
Kubernetes is one of the most popular container orchestration systems available. It is very scalable and can easily handle deployments of thousands of containers. It is also very flexible and can be used to deploy various applications.
If you are looking for a scalable and flexible container orchestration system, Kubernetes is a great option.
Basic Kubernetes Terminologies
Before we learn what Kubernetes is and how it operates, let us first understand a few application program interfaces that are a part of Kubernetes.
- Node: A node like a virtual machine is a machine entity or physical hardware. It acts as a worker instance within the Kubernetes Cluster. The nodes are responsible for performing the assigned tasks. Nodes are the physical infrastructure that allows your application to run on the Virtual Machine’s server.
- Pods: Pods are a group of one or more containers that share network and storage with a Kubernetes configuration, which allows you to move containers within the cluster more efficiently. Each particular pod is assigned with an IP address, a hostname, IPC, which enable it to be accessed by other pods within a cluster.
- Service: Service helps in separating the work definitions from the pods. Services are a sort of static pointers to the pods—services help in assuring that each pod receives an IP address.
- Replica Set: The primary function of a replica set is to ensure that a given number of pods are running at a particular time. Replica Set is also a vital aspect of the Kubernetes autoscaling functionality. If a pod crashes or dies, the Replica Set makes sure a new one is created. In case there are too many pods, it cut down on them, and if there are few, then it creates new pods. Replica sets also make it much easier to target a particular set of pods.
- Kubelet: A Kubelet is present inside each of the Nodes. Each node has a Kubelet. The primary responsibility of the Kubelet is to manage the nodes. It reads the container manifests and ensures that the particular containers are up and running.
- Kubectl: A Kubectl is simply a command-line configuration interface for Kubernetes. It consists of an extensive list of available commands that can be used to manage Kubernetes.
How Does Kubernetes Work?
When you first deploy Kubernetes, you get a Cluster. A Cluster consists of two parts, i.e., The Control Plane and Compute Machines. The control plane includes Master Nodes, and the Compute Machines consist of Worker Nodes. The worker nodes are responsible for running the Pods, which are made up of Containers. The Control Plane is responsible for managing the worker nodes as well as the pods within the cluster.
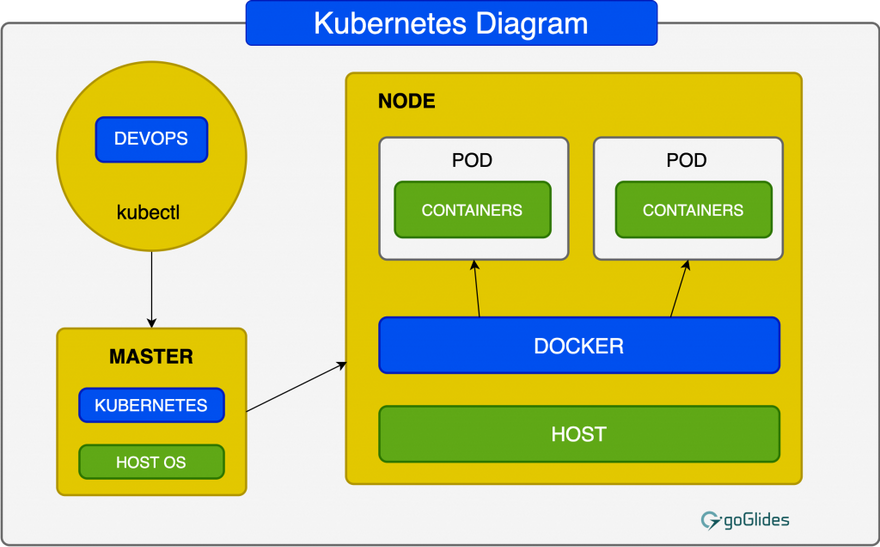
You can see the image above, Kubernetes operates on top of the operating system and then interacts with the pods of the container that are running on the nodes. The operator relays the command to the master node, which then distributes it to the secondary nodes. The node that is best suited for the particular task will be automatically decided, and the resources required for the task will be allocated to the particular pod required to fulfill the assigned work.
Kubernetes Components & Architecture
Before studying the Kubernetes Components, let’s take a brief look at the principles and design that define Kubernetes.
The Kubernetes Cluster design is based on three simple principles, i.e.
- Easy to use: The Cluster should be operable using minimum commands.
- Extendable: It should be customizable.
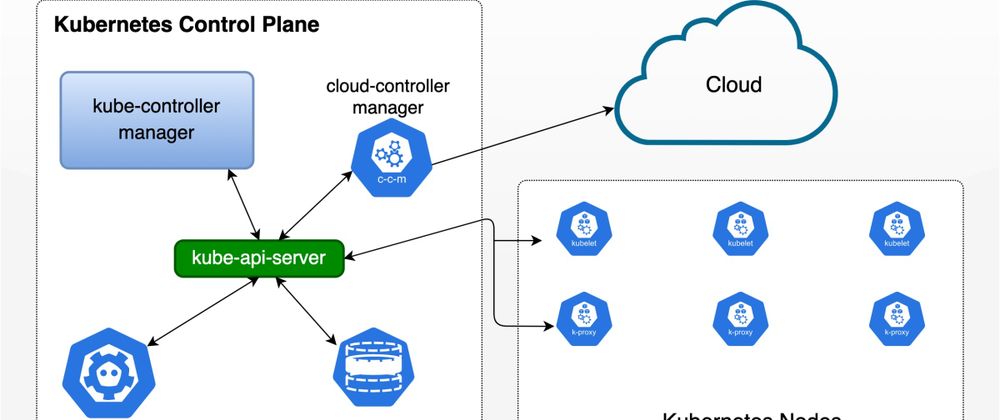
- Secure: Probably the most important, The Kubernetes Cluster should always follow the latest up-to-date security practices and principles. Kubernetes consists of many components that all communicate with each other through the API server. As we talked about before, the Kubernetes cluster consists of The Control Plane, which holds the Master Node, and the Compute Machine, which holds the Worker Node.

The above image shows the components inside the Kubernetes Control Plane and the components inside of the Compute Machine.
Now let’s take a closer look at the components.
Control Plane Components
The Control Plane is the central part of the Kubernetes cluster. Inside the Control Plane is the Master Node, which holds all the components that control the Kubernetes Cluster. It makes the entire decision about the cluster. It also detects as well as response to any cluster events.
- kube-apiserver: This is the front end of the Kubernetes Control Plane. It handles the internal as well as external requests. The kube-apiserver has been specifically designed to scale horizontally, which means that it is scaling up by deploying more instances. It also helps to communicate with all the other components inside the cluster.
- etcd: The primary function of ‘etcd’ is to store the configuration information. The nodes can then use the information within the cluster. As the etcd contains sensitive information, it can only be accessed by the Kubernetes API server. It is a distributed key-value store responsible for implementing locks within the cluster.
- kube-scheduler: A vital component of the Kubernetes, a kube-scheduler, is responsible for the distribution of the container and the workloads across multiple nodes. In simple terms, it allocates newly formed pods to the available nodes. The kube-scheduler is responsible for finding newly formed containers and assigning them to the available nodes.
-
kube-controller-manager: This is a component of the Master Node that is responsible for running the controller. The kube-controller-manager contains several controller functions compiled into a single binary to save time and reduce complexity.
The controller functions include:
- Node controller: It notices and responds whenever a particular node goes down.
- Replication controller: It is responsible for maintaining the correct number of pods.
- Endpoints controller: It is responsible for populating the endpoint objects.
- Service accounts & token controller: It is responsible for creating default accounts and API access tokens for the new namespaces.
- Cloud-controller-manager: The cloud-controller-manager allows you to interact and link your cluster to your cloud provider’s API. It means that it allows you to talk to your cloud providers. The cloud-controller-manager also combines several different control functions into one.
The controller functions include:
- Node Controller: It is responsible for checking whether or not the node has been deleted from the cloud provider after it stops responding.
- Route Controller: It is responsible for setting up routes in the underlying cloud infrastructure.
- Service Controller: It is responsible for creating, updating, and deleting the cloud provider load balancers.
Worker Node Components
The Master Node controls the worker node. The node components will run on every node while maintaining running pods as well as providing the Kubernetes runtime environment.
- kubelet: We talked briefly about what kubelet is. A kubelet is present inside of the Node. Each node has a kubelet. The primary responsibility of the Kubelet is to manage the nodes. It reads the container manifests and ensures that the particular containers are up and running.
- kube-proxy: A kube-proxy is a network proxy service that runs on each of the nodes within a cluster. It also helps the external host by making services available. It also assists in forwarding all the requests to the correct containers and is also capable of adequately performing first load balancing. A kube-proxy managed the pods within a node creates new containers’ health checkups, etc.
- container runtime: A container runtime is responsible for running the containers. Kubernetes supports several different container runtimes, such as Docker, CRI-O, containers as well as any and all implementations of the Kubernetes Container Runtime Interface.
- add-ons: Kubernetes add-ons are optional components that provide additional functionality to the Kubernetes cluster. For example, the kube-dns add-on provides DNS service discovery for the cluster.
Kubernetes & Docker
Docker is a tool that is used for building, distributing as well as running Docker containers. Docker provides the user with its clustering tools that can be used to arrange and schedule the containers on the clusters. Likewise, Kubernetes is a more extensive container orchestration system for Docker. It is meant for the effective coordination of the cluster of nodes efficiently. Although Kubernetes and Docker are different types of technologies, they coordinate well with one another and help in the management and the deployment of containers in a distributed architecture. When using Kubernetes with Docker, the automated system requests the Docker to do things such as launch a specified container, start and stop the containers, etc., in cases when it would have been done manually by an admin for all the containers.
Tools Requirements:
kubectl: kubectl is a Kubernetes command-line tool that allows users to manage Kubernetes clusters.
kubeadm: kubeadm is a Kubernetes tool that helps users to set up and configure a Kubernetes cluster.
minikube: Minikube is a Kubernetes tool that allows users to run a single-node Kubernetes cluster on their local machine.
You can install all required tools from official page.
Installing & Getting Started with Kubernetes
The first thing that is required is for you to install Kubernetes on your hardware or one of the major cloud providers. Installing Kubernetes is quite tricky because there are many components involved. But there are plenty of tools, both open-source and paid solutions, in the market place, which makes the installation process more comfortable. There are many ways how you can install a Kubernetes cluster. For this tutorial, we will be using Minikube. For that, you will first need to start and run two things, i.e., Kubectl and Minikube.
Kubectl is a command-line interface (CLI) tool that will allow you to interact with the cluster.
Minikube is a binary that will deploy the cluster locally on your development machine.
With these tools, you can now start arranging your containerized applications to the cluster in a few short minutes. After you have installed Minikube, you can now run a single node cluster within your local machine.
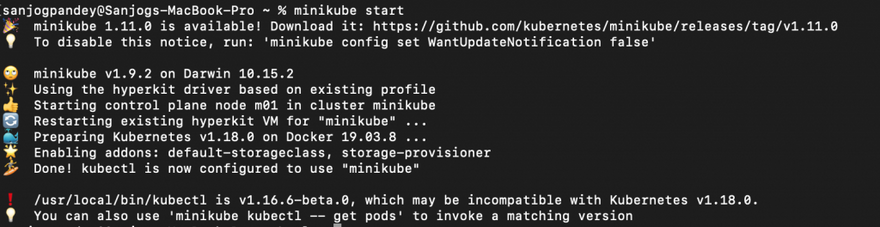
To start the Minikube cluster, you can use the code.
minikube start
Likewise, if you want to interact with the Kubernetes Cluster, you will need to install Kubectl CLI. Once you installed it, you can use the following codes to interact with the Kubernetes cluster.
kubectl config get-contexts
kubectl config set-contexts <context-name>

kubectl config current-context

Kubectl config delete-context <context-name>
By now, you will have a local single Node Kubernetes cluster up and running on your machine. Now, if you are looking to deploy your first containerized application, then you run the following codes to Minikube. In this demonstration, we will be deploying a simple Hello World with an exposed endpoint on the Minikube IP address.
Start with,
kubectl create deployment hello-minikube --image=k8s.gcr.io/echoserver:1.10
You will see that your deployment was successful. To view the deployment, you can use :
kubectl get deployments

kubectl get pods

kubectl expose deployment hello-minikube --type=NodePort --port=8080

kubectl get services

minikube service hello-minikube --url
To test whether or not your exposed Service has reached the pod, you can curl the response from your terminal. To do that, you can use:

curl http://<minikube-ip>:<port>
The HTTP request has made via your Kubernetes Service. And once you check your logs, you will see the following,
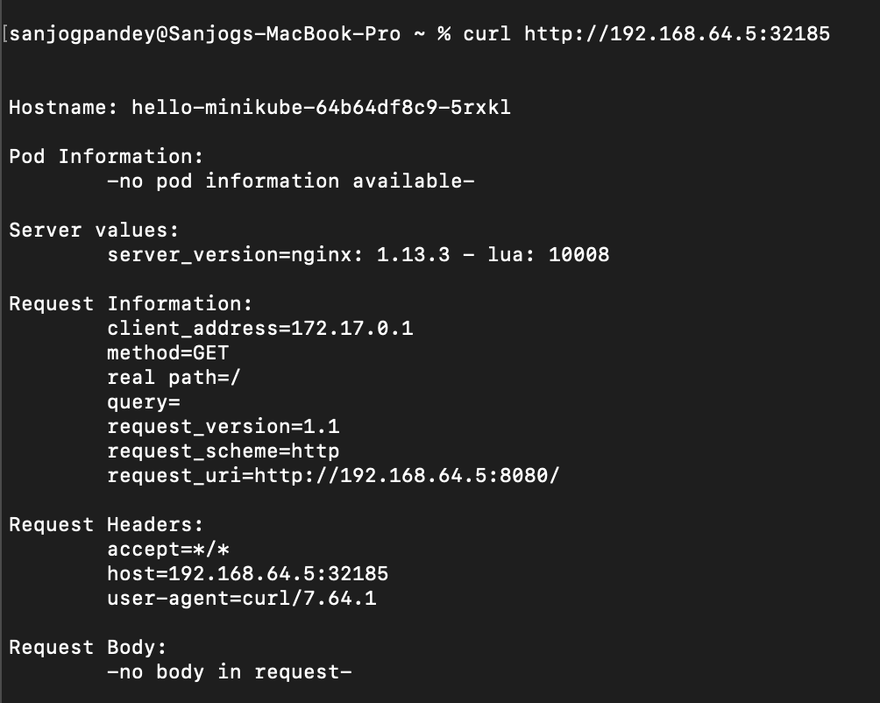
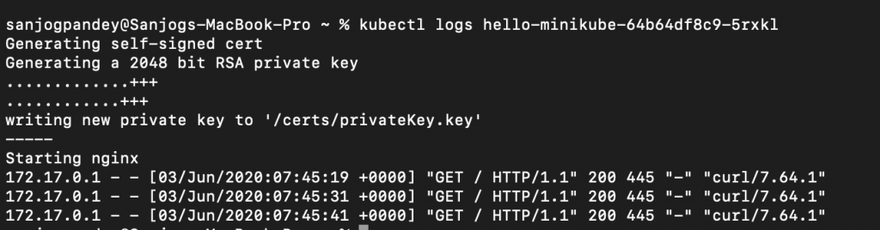
Now once you have followed the above steps, you should have a functioning Kubernetes pod and deployment that is running a simple Hello World application.
Likewise, if you are looking to start using Kubernetes, you can start by trying to build a Kubernetes Cluster. You can start by taking a look at different Managed Kubernetes offering provided by some top cloud providers.


Top comments (0)