
Section 1
Introduction
Kubernetes is an open source container orchestration platform, allowing large numbers of containers to work together in harmony, reducing operational burden. It helps with things like running containers across many different machines, scaling up or down by adding or removing containers when demand changes, keeping storage consistent with multiple instances of an application, distributing load between the containers, launching new containers on different machines if something fails.
Google open-sourced the Kubernetes project in 2014. Kubernetes builds upon a decade and a half of experience that Google has with running production workloads at scale, combined with best-of-breed ideas and practices from the community. It's a portable, extensible open-source platform for managing containerized workloads and services, that facilitates both declarative configuration and automation. It has a large, rapidly growing ecosystem. Kubernetes services, support, and tools are widely available.
Kubernetes is a tool you can use if you do not want to develop something specific in order to handle all the aforementioned issues. It can help you pilot your container cluster, hence its name, which means pilot or helmsman in greek.
The Kubernetes Control Plane consists of a collection of processes running on your cluster:
The Kubernetes Master is a collection of three processes that run on a single node in your cluster, which is designated as the master node. Those processes are kube-apiserver, kube-controller-manager and kube-scheduler.
Containers are a great way to package, deploy, and manage applications. However, to build a reliable, scalable containerized application, you need a place to run containers, scale them, update them, and provide them with networking and storage. Kubernetes is the most popular container orchestration system. It simplifies deploying, monitoring, and scaling application components, making it easy to develop flexible, reliable applications.
Section 2
What Is Kubernetes?
Kubernetes, also known by its abbreviation “k8s”, is an open-source container orchestration system. It manages a “cluster” of multiple hosts that are used to run containers. Originally created by Google, in March of 2016, it was donated to the Cloud Native Computing Foundation (CNCF).
Kubernetes is declarative. This means that you can create and update “resources” that describe which containers to run, how to configure them, and how to route network traffic to them. Kubernetes continuously updates and monitors the cluster to ensure it matches the desired state, including auto-restart, re-scheduling, and replication to ensure applications start and remain running.
Kubernetes is available as a service from cloud providers including Google, Amazon, and Microsoft, or in a variety of distributions including Red Hat OpenShift, Rancher Kubernetes, and VMWare Tanzu.
Section 3
Core Kubernetes Concepts
Because Kubernetes is declarative, getting started in Kubernetes mostly means understanding what resources we can create and how they are used to deploy and configure containers in the cluster. To define resources, we use YAML format. The available resources and fields for each resource may change with new Kubernetes versions, so it’s important to double-check the API reference for your version to know what’s available. It’s also important to use the correct apiVersion on each resource to match your version of Kubernetes. This Refcard uses the API from Kubernetes 1.24, released May 2022, but all resources shown are backwards compatible through Kubernetes 1.19. Lastly, the examples featured in this Refcard are available in the associated GitHub repository.
Pod
A Pod is a group of one or more containers. Kubernetes will schedule all containers for a Pod into the same host, with the same network namespace, so they all have the same IP address and can access each other using localhost. The containers in a Pod can also share storage volumes.
We don’t typically create Pod resources directly. Instead, we have Kubernetes manage them through a controller such as a Deployment or StatefulSet. Controllers provide fault tolerance, scalability, and rolling updates.
Deployment
A Deployment manages one or more identical Pod instances. Kubernetes will make sure that the specified number of Pods is running, and on a rolling update, it will replace Pod instances gradually, allowing for application updates with zero downtime. Here is an example Deployment:
YAML
apiVersion: apps/v1
kind: Deployment
metadata:
  name: nginx
spec:
  replicas: 3
  selector:
    matchLabels:
      app: nginx
  template:
    metadata:
      labels:
        app: nginx
    spec:
      containers:
      - name: nginx
        image: nginx:1.23.1-alpine
        volumeMounts:
        - mountPath: /usr/share/nginx
          name: www-data
          readOnly: true
        resources:
          requests:
            memory: "128Mi"
            cpu: "50m"
          limits:
            memory: "128Mi"
            cpu: "50m"
      initContainers:
      - name: git-clone
        image: alpine/git
        args:
        - "clone"
        - "https://github.com/book-of-kubernetes/hello-world-static"
        - "/www/html"
        volumeMounts:
        - mountPath: /www
          name: www-data
      volumes:
      - name: www-data
        emptyDir: {}
The apiVersion and kind uniquely identify the type of the resource. Deployments are in the apps API group, and here, we are specifying v1 as the version. As a result, Kubernetes knows what fields to expect in the rest of the YAML specification.
For a controller such as a Deployment, the template section specifies exactly what the created Pods should look like. Kubernetes will automatically create three Pods per the replicas field using this template. Kubernetes will monitor these Pods and automatically restart them if the container terminates. Deployments use the matchLabels selector field to determine which Pods to manage. This field must always have the same data as the metadata.labels field inside the template. The Deployment will take ownership of any running Pods that match the matchLabels selector, even if they were created separately, so keep these names unique.
The example above defines one container in the Pod and additionally defines an initContainer. The initContainer runs before the main Pod container starts. In this case, it uses Git to populate a directory. Because this directory is part of a single volume that is specified as a volumeMount in both containers, the resulting files are also mounted into the main container to be served by NGINX. This example uses an initContainer to run Git because Git runs and then exits; if Git was run as a second regular container in the Pod, Kubernetes would interpret this as a container failure and restart the Pod.
Finally, we specify requests and limits for our main container. Kubernetes uses these to ensure that each node in the cluster has enough capacity for its deployed Pods. Requests and limits are also used with quotas so that different applications and users in a multi-tenant cluster don’t interfere with each other. It is good practice to identify the resource needs of each container in a Pod and apply limits.
StatefulSet
Each new Pod in the above Deployment starts with an empty directory, but what about cases where we need real persistent storage? The StatefulSet also manages multiple Pods, but each Pod is associated with its own unique storage, and that storage is kept when the Pod is replaced.
Here is an example StatefulSet:
YAML
apiVersion: apps/v1
kind: StatefulSet
metadata:
  name: postgres
spec:
  serviceName: postgres
  replicas: 2
  selector:
    matchLabels:
      app: postgres
  template:
    metadata:
      labels:
        app: postgres
    spec:
      containers:
      - name: postgres
        image: postgres
        env:
        - name: POSTGRES_PASSWORD
          value: "supersecret"
        - name: PGDATA
          value: /data/pgdata
        volumeMounts:
        - name: postgres-volume
          mountPath: /data
  volumeClaimTemplates:
  - metadata:
      name: postgres-volume
    spec:
      accessModes:
      - ReadWriteOnce
      resources:
        requests:
          storage: 1Gi
Like a Deployment, a StatefulSet is in the apps API group, uses a selector to discover its Pods, and uses a template to create those Pods. However, a StatefulSet also has a volumeClaimTemplates section that specifies the persistent storage provided to each Pod.
When this StatefulSet is created, it will create two Pods: postgres-0 and postgres-1. Each Pod will have associated persistent storage. If a Pod is replaced, the new Pod will have the same name and be attached to the same storage. Each of these Pods will be discoverable within the cluster using the combination of the Pod name and the serviceName.
The env field is one way to provide environment variables to containers. The PGDATA variable tells PostgreSQL where to store its database files, so we ensure those are placed on the persistent volume. We also specify the POSTGRES_PASSWORD directly; in a production application, we would use a Secret as described below.
The StatefulSet is one important resource needed to deploy a highly available PostgreSQL database server. We also need a way for the instances to find each other and a way to configure clients to find the current primary instance. In the application example below, we use a Kubernetes Operator to accomplish this automatically.
Service
A Service provides network load balancing to a group of Pods. Every time Kubernetes creates a Pod, it assigns it a unique IP address. When a Pod is replaced, the new Pod receives a new IP. By declaring a Service, we can provide a single point of entry for all the Pods in a Deployment. This single point of entry (hostname and IP address) remains valid as Pods come and go. The Kubernetes cluster even provides a DNS server so that we can use Service names as regular hostnames. Here is the Service that matches our NGINX Deployment above:
YAML
kind: Service
apiVersion: v1
metadata:
  name: nginx
spec:
  selector:
    app: nginx
  ports:
  - protocol: TCP
    port: 80
Unlike the Deployment and StatefulSet, the Service is in the “core” API group, so we only need to specify the apiVersion as v1. Like the Deployment and StatefulSet we saw above, the Service uses the selector field to discover its Pods, so it automatically stays up to date. For this reason, Services can be created before the Pods exist; this demonstrates an important advantage of the declarative Kubernetes approach.
Services rely on Kubernetes to provide a unique IP address and route traffic, so the way Services are configured can be different depending on how your Kubernetes installation is configured. The most common type of Service is ClusterIP, which is also the default. ClusterIP means the Service has an IP address accessible only from within the Kubernetes cluster, so exposing the Service outside the cluster requires another resource such as an Ingress.
It’s important to know that when network traffic is sent to a Service address and port, Kubernetes uses port forwarding to route traffic to a specific Pod. Only the declared ports are forwarded, so other kinds of traffic (like ICMP ping) will not work to communicate with a Service address, even within the cluster.
Ingress
An Ingress is one approach for routing HTTP traffic from outside the cluster. (An alternate and more advanced approach is a service mesh such as Istio.) To use an Ingress, a cluster administrator first deploys an “ingress controller”. This is a regular Kubernetes Deployment, but it registers with the Kubernetes cluster to be notified when an Ingress resource is created, updated, or deleted. It then configures itself to route HTTP traffic based on the Ingress resources.
The advantage of this approach is that only the ingress controller needs an IP address that is reachable from outside the cluster, simplifying configuration and potentially saving money.
Here is the Ingress example to go with the NGINX Deployment and Service:
apiVersion: networking.k8s.io/v1
kind: Ingress
metadata:
  name: nginx
spec:
  rules:
  - http:
      paths:
      - path: /
        PathType: Prefix
        backend:
          service:
            name: nginx
            port:
              number: 80
This example routes all traffic in the cluster to a single Service, so it is only useful for a sandbox. In a production cluster, you can use DNS wildcards to route all hostnames in a domain to the ingress controller’s IP address, and then use host rules to route each host’s traffic to the correct application.
PersistentVolumeClaim
The StatefulSet example above tells Kubernetes to create and manage persistent storage for us. We can also create persistent storage directly using a PersistentVolumeClaim.
A PersistentVolumeClaim requests Kubernetes to dynamically allocate storage from a StorageClass. The StorageClass is typically created by the administrator of the Kubernetes cluster and must already exist. Once the PersistentVolumeClaim is created, it can be attached to a Pod by declaring it in the volumes field. Kubernetes will keep the storage while the PersistentVolumeClaim exists, even if the attached Pod is deleted.
YAML
kind: PersistentVolumeClaim
apiVersion: v1
metadata:
  name: web-static-files
spec:
  accessModes:
  - ReadWriteMany
  resources:
    requests:
      storage: 8Gi
ConfigMap and Secret
In the StatefulSet example above, we specified environment variables directly in the env field. A better approach is to externalize the configuration into a separate ConfigMap or Secret. Both these resources work similarly and can be used to provide either environment variables or file content to containers. The major difference is that a Secret is base-64 encoded to simplify storage of binary content; additionally, as these are separate resources it is possible to configure cluster authorization separately so access to Secrets can be more limited.
To externalize our PostgreSQL environment variables, we’ll use both a ConfigMap and a Secret. First, the ConfigMap:
YAML
---
kind: ConfigMap
apiVersion: v1
metadata:
  name: pgsql
data:
  PGDATA: /data/pgdata
Then, the Secret:
  ---
kind: Secret
apiVersion: v1
metadata:
  name: pgsql
stringData:
  POSTGRES_PASSWORD: supersecret
Besides the kind, the one difference is that we use stringData with the Secret to tell Kubernetes to do the base-64 encoding for us.
To use these externalized environment variables, we replace the env field of the StatefulSet with the following:
YAML
envFrom:
- configMapRef:
    name: pgsql
- secretRef:
    name: pgsql
Each of the key-value pairs in the ConfigMap and Secret will be turned into environment variables for the PostgreSQL server running in the container.
Kustomize, Helm, and Operators
Managing all of these different types of resources becomes challenging, even with the ability to externalize configuration using ConfigMap and Secret. Most application components require multiple resources for deployment and often need different configuration for different environments, such as development and production. The Kubernetes ecosystem has a rich set of tools to simplify managing resources:
- Kustomize is built into Kubernetes itself. It supports applying patches to a set of base YAML resource files. The base file can contain default values, while the patches tailor the deployment to a different environment.
- Helm is a separate tool that brings templates to YAML resource files. A set of templated resources, known as a Helm chart, can be uploaded to a registry and easily used in many different clusters, with the ability to easily tailor each individual deployment by supplying a set of variables in a YAML file.
- Operators are a Kubernetes design pattern rather than a single tool. An operator runs in the Kubernetes cluster and registers a
CustomResourceDefinition(CRD). It watches the cluster for instances of that custom resource and updates the cluster accordingly. The example application below demonstrates the use of the “Postgres Operator” to rapidly deploy a highly available PostgreSQL database server.
Section 4
Kubernetes Architecture
Kubernetes uses a client-server architecture, as seen here:
Figure 1: Kubernetes Architecture
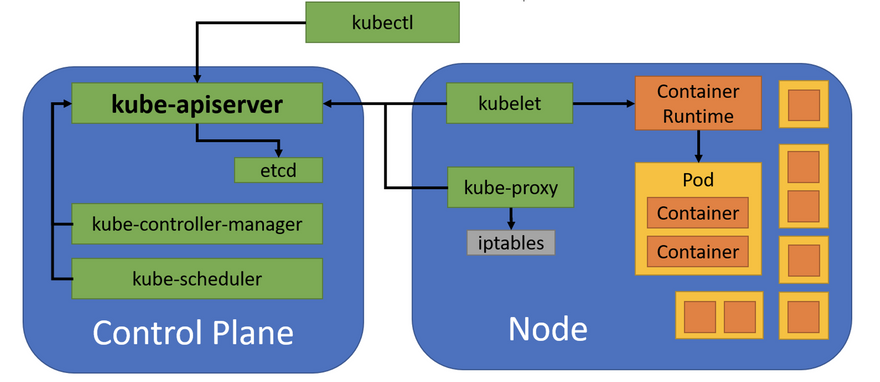
A Kubernetes cluster is a set of physical or virtual machines and other infrastructure resources that are used to run applications. The control plane includes all the services that manage the cluster. The machines that run the containers are called nodes. The control plane services are typically run as containers on the nodes, with multiple instances running in the cluster to provide high availability; this provides an easy way to keep the control plane services up and running and simplifies updates.
Control Plane
The most important control plane service is kube-apiserver, the Kubernetes API server. It accepts connections from clients and provides an API to query and modify the resources running in the cluster. The API server is assisted by:
-
etcd– A distributed key-value store used to record cluster state -
kube-controller-manager– A monitoring service that decides what changes to make when resources are added, changed, or removed -
kube-scheduler– A service that decides where to run pods based on the available nodes and their configuration
Node
A node is a physical or virtual machine with the necessary services to run containers. A Kubernetes cluster should have as many nodes as necessary for all the required pods. Each node runs kubelet, which receives commands to run containers and uses the container engine (e.g., containerd or CRI-O) to run them, and kube-proxy, which manages networking rules so connections to service IP addresses are correctly routed to pods.
As shown in figure 1, each node can run multiple Pods, and each Pod can include one or more containers. All containers in a Pod are in the same network namespace, so those containers share an IP address.
Section 5
Getting Started With Kubernetes
Now that we have learned about some key Kubernetes resources and we understand the Kubernetes architecture, we’re ready to put our knowledge into practice. We’ll need a development cluster to use for practice. We’ll control this cluster using the command-line utility kubectl.
Creating a Development Cluster
Running a production Kubernetes cluster is a complex job. Unless you’re deeply familiar with Kubernetes configuration, it’s best to use one of the many cloud options or distributions above. Kubernetes can run anything that can be packaged in a container, so insecure public clusters are quickly exploited for Bitcoin mining or other nefarious purposes.
For a development environment, there are many great options, including Minikube, Microk8s, and Rancher k3s. You can install any of these on an existing machine by following their installation instructions, or even easier, you can use automation from the associated GitHub repository to create a sandbox virtual machine with k3s. The README file in the repository has all the instructions you need.
Once you’ve set up your cluster, you will interact with it using the standard Kubernetes command-line client program kubectl. You can download kubectl from its website; it’s a single binary so there’s no installation needed.
Kubectl
kubectl is a command-line utility that controls the Kubernetes cluster. Commands use this format:
kubectl [command] [type] [name] [flags]
The parts of the command are as follows:
-
[command]specifies the operation that needs to be performed on the resource. For example, create, get, describe, delete, or scale. -
[type]specifies the Kubernetes resource type, such as pod (po), service (svc), deployment (deploy), statefulset (sts), ingress (ing), or persistentvolumeclaim (pvc). Resource types are case-insensitive, and you can specify the singular, plural, or abbreviated forms. -
[name]specifies the name of the resource, if applicable. Names are case-sensitive. If the name is omitted, details for all resources will be displayed (for example,kubectl get podswill list all pods). -
[flags]specifies options for the command.
Some examples of kubectl commands and their purpose:
Command/Purpose
kubectl apply -f nginx.yaml
Create or update the resources specified in the YAML file. Kubernetes records the state of the resource when it was last applied so that it can figure out what changes to make.
kubectl delete -f nginx.yml
Delete the resources specified in the YAML file. If any resources do not exist, they are ignored.
kubectl get pods
List all Pods in the default namespace. See below for more information on namespaces.
kubectl describe pod nginx
Show metadata and status for the nginx Pod. The name must match exactly.
First, let’s use kubectl version to verify that the cluster is running as expected and we can talk to it:
YAML
kubectl version
[...]
Client Version: version.Info{Major:"1", Minor:"24", GitVersion:"v1.24.3+k3s1",[...]
Kustomize Version: v4.5.4
Server Version: version.Info{Major:"1", Minor:"24", GitVersion:"v1.24.3+k3s1",[...]
This will report the exact version in use, which is valuable in making sure you are using the correct API documentation.
Section 6
Run Your First Container
Most of the time when using kubectl, we create YAML resource files, so we can maintain configuration in version-controlled repositories. However, we can create a simple Deployment using kubectl without using a YAML file:
YAML
kubectl create deployment nginx --image=nginx
deployment.apps/nginx created
This command will create a Deployment, which will then create a Pod with one container running NGINX. We can use kubectl to get the status of the Deployment:
YAML
kubectl get deploy

NAME    READY   UP-TO-DATE   AVAILABLE   AGE

nginx   1/1     1            1           10s
To see the Pod that the Deployment created, run:
YAML
kubectl get po

NAME                  READY STATUS  ... AGE

nginx-8f458dc5b-nd98w 1/1   Running ... 15s
The reason the Pod has two sets of random characters in the name is that the Deployment has created a ReplicaSet to perform the actual Pod management, and the ReplicaSet created the Pod.
YAML
kubectl delete deploy nginx

kubectl apply -f ‘nginx-*.yaml’

deployment.apps/nginx created

ingress.networking.k8s.io/nginx created

service/nginx created
We now have three replicas because that is what was specified in the YAML file:
YAML
kubectl get deploy

NAME    READY   UP-TO-DATE   AVAILABLE   AGE

nginx   3/3     3            3           89s
Also, if you’re running in a cluster with an ingress controller, such as the k3s sandbox created by the associated GitHub repository, traffic to the ingress controller will now be routed to one of our NGINX Pods:
HTML
curl http://localhost

[...]

 <h1>Hello, world!</h1>

[...]
Scale Applications
Deployments can be scaled up and down from the command line as well as in the YAML file:
YAML
kubectl scale --replicas=5 deploy/nginx

deployment.extensions/nginx scaled
The Kubernetes controller will then work with the scheduler to create or delete Pods as needed to achieve the requested number. This is reflected in the Deployment:
YAML
kubectl get deploy

NAME    READY   UP-TO-DATE   AVAILABLE   AGE

nginx   5/5     5            5           4m46s
Kubernetes also provides a HorizontalPodAutoscaler (hpa) that can dynamically scale a Deployment up or down based on current resource utilization.
Delete Applications
Once you are done exploring the NGINX example, you can destroy it with the delete command.
YAML
kubectl delete -f ‘nginx-*.yaml’

deployment.extensions "nginx" deleted

ingress.networking.k8s.io "nginx" deleted

service "nginx" deleted
Because Kubernetes monitors Pods to maintain the desired number of replicas, we must delete the Deployment to remove the application. Simply deleting a Pod managed by a Deployment will just cause Kubernetes to create another Pod.
Section 7
Example Application
Let’s put multiple Kubernetes features together to deploy an example to-do application, written in Node.js, together with a highly available PostgreSQL database server. Here is the planned architecture:
Figure 2: To-do Application Architecture
As with our NGINX example, we use an Ingress to bring in HTTP traffic from outside the cluster and forward it to a Service. The Service provides a well-known name and consistent IP address for our application. The Service keeps track of our application’s Pods and routes traffic to a Pod IP address.
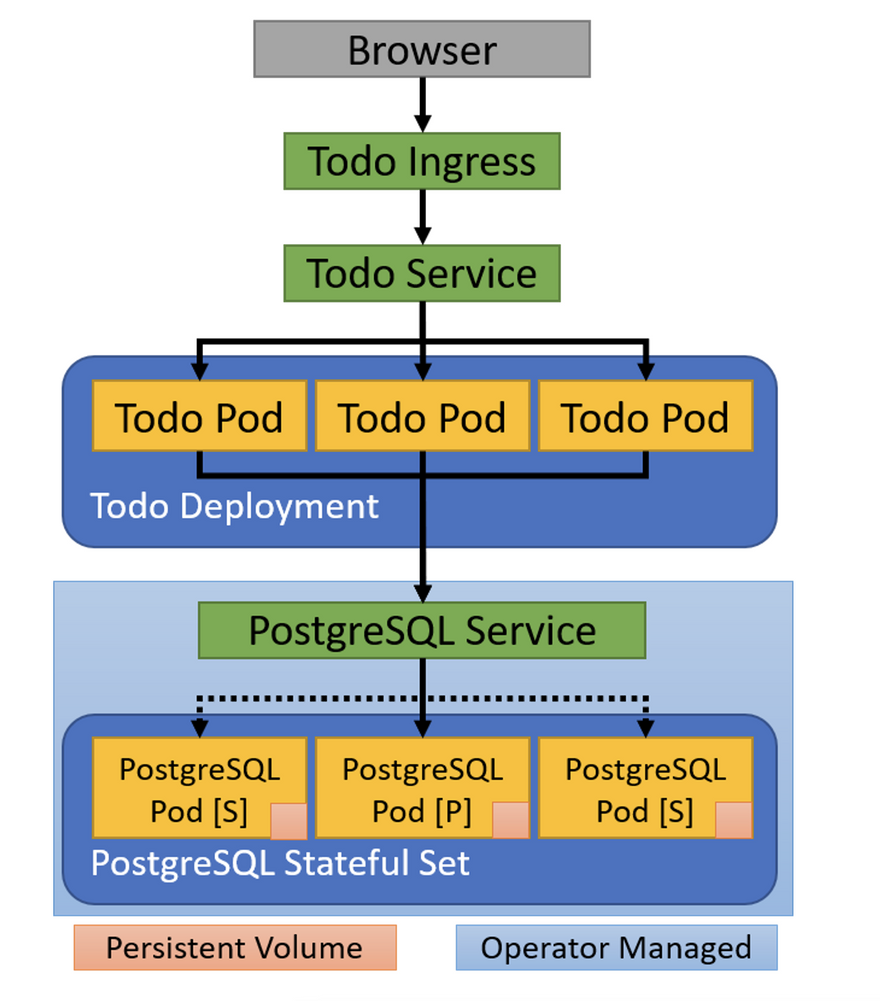
The application stores the list of to-do items in a PostgreSQL database. The PostgreSQL database also has a Service to provide a well-known name and IP address for the primary database server instance. This name and IP address stays the same even if the primary instance goes down and is replaced by a secondary instance (shown with dashed lines in the figure).
Let’s start by deploying PostgreSQL. We’ll use the Postgres Operator to simplify deploying and configuring a highly available database. First, we deploy the operator itself to the cluster:
YAML
kubectl apply -k github.com/rthway/postgres-operator/manifests

serviceaccount/postgres-operator created

clusterrole...io/postgres-operator created

clusterrole...io/postgres-pod created

clusterrolebinding...io/postgres-operator created

configmap/postgres-operator created

service/postgres-operator created

deployment.apps/postgres-operator created
The command kubectl apply -k uses Kustomize to read the file manifests/kustomization.yaml from the Postgres Operator repository. The result is that the operator is now installed into our cluster and the Deployment is listening for a brand-new Kubernetes resource, Postgresql.
This means we can deploy a highly available PostgreSQL database instance to our cluster by creating a PostgreSQL resource.
apiVersion: "acid.zalan.do/v1"
kind: postgresql
metadata:
  name: todo-db
spec:
  teamId: todo
  volume:
    size: 1Gi
  numberOfInstances: 3
  env:
  - name: ALLOW_NOSSL
    value: "1"
  users:
    todo:
    - superuser
    - createdb
  databases:
    todo: todo
  postgresql:
    version: "14"
This shows the power of the Kubernetes operator design pattern. The Postgres Operator is able to register a new Postgresql resource type with the Kubernetes API server as a CustomResourceDefinition. As a result, when we apply the todo-db resource above to the cluster, the API server is able to recognize it and validate the YAML we provide.
The Postgres Operator also registers with the Kubernetes API server to watch for new Postgresql resources. When a new resource is detected, the Postgres Operator interacts with the API server to create the necessary Service, StatefulSet, Secret, and other required resources needed for a highly available PostgreSQL database.
The remaining components in our to-do example application are similar to what we’ve seen before. You can inspect the details for yourself in the associated GitHub repository. It’s particularly worth looking to see how the PostgreSQL database configuration and credentials are injected into the Node.js application using environment variables. The database username and password are automatically generated by the Postgres Operator, so they have to be injected from a Secret.
Let’s create all of the resources for our to-do application. Run this command from the todo directory:
YAML
kubectl apply -f '*.yaml'
deployment.apps/todo created
postgresql.acid.zalan.do/todo-db created
ingress.networking.k8s.io/todo-ingress created
service/todo created
It may take several minutes for all of the application components to be up and running. Once they are up and running, we can inspect them using kubectl get:
YAML
kubectl get deploy
NAME              READY UP-TO-DATE AVAILABLE
postgres-operator 1/1   1          1
todo              3/3   3          3
This shows the Deployment for our to-do application and the Deployment for the Postgres Operator. The actual PostgreSQL database needs persistent storage, so the operator does not create a Deployment; instead, it creates a StatefulSet:
YAML
kubectl get sts
NAME      READY   AGE
todo-db   3/3     9m38s
Additionally, there are a number of Services created for our application:
kubectl get svc
NAME              TYPE        ... PORT(S)
kubernetes        ClusterIP   ... 443/TCP
postgres-operator ClusterIP   ... 8080/TCP
todo-db           ClusterIP   ... 5432/TCP
todo-db-repl      ClusterIP   ... 5432/TCP
todo-db-config    ClusterIP   ... <none>
todo              ClusterIP   ... 5000/TCP
The todo service handles routing traffic to the application layer, while the todo-db service points to the current primary database instance. The Postgres operator uses the todo-db-repl and todo-db-config services to manage replication from the primary to the secondary instances.
As before, if you’re running in a cluster with an ingress controller, such as the k3s sandbox created traffic to the ingress controller will be routed to our application:
curl http://localhost/todo/
[...]
<title>Todo-Backend client</title>
[...]
If you’re running in the sandbox virtual machine from the associated GitHub repository, you should be able to see and use the to-do application by visiting http://localhost:48080/todo/ in your browser.
If you’re having issues, use kubectl get to inspect all the resources created and the associated pods to see if one is failing. You can use kubectl logs to see the output from any pod.
There are more Kubernetes resources for you to explore in this application, including the individual Pods, the PersistentVolumeClaims created by the StatefulSet, and the Secrets used to store database credentials so they can be injected into the Node.js application. Once you’ve finished exploring, you can remove the to-do application from your cluster:
kubectl delete -f '*.yaml'
deployment.apps "todo" deleted
postgresql.acid.zalan.do "todo-db" deleted
ingress...io "todo-ingress" deleted
service "todo" deleted
When we delete the PostgreSQL resource, the Postgres Operator automatically deletes the StatefulSet, Services, Secrets, and other resources it created to deploy the highly available PostgreSQL database.
Section 8
Namespace, Resource Quotas, and Limits
Kubernetes uses namespaces to avoid name collisions, control access, and set quotas. When we created resources above, we didn’t specify a namespace, so they all went into the default namespace. Other resources that are part of the cluster infrastructure are in the namespace kube-system.
To see Pods in kube-system, we can run:
$ kubectl get po -n kube-system
NAME                       READY   STATUS
...
coredns-7944c66d8d-rmxnr   1/1     Running
...
Resource Isolation
A new Namespace can be created from a YAML resource definition:
YAML
apiVersion: v1
kind: Namespace
metadata:
  name: development
  labels:
    name: development
Once we’ve created the Namespace, we can create resources in it using the --namespace (-n) flag, or by specifying the namespace in the resource’s metadata:
YAML
apiVersion: v1
kind: Pod
metadata:
  name: webserver
  namespace: development
...
By using separate namespaces, we can have many Pods named webserver and not have to worry about name collisions. Also, Kubernetes DNS works with namespaces. Simple host names look for Services in the current namespace, but we can use the full name for Services in other namespaces. For example, we could find the PostgreSQL database we created for our to-do application by using todo-db.default.svc from anywhere in the cluster.
Access Control
Kubernetes supports Role Based Access Control (RBAC).
Here’s an example that limits developers to read-only access for Pods in the production namespace. First, we create a ClusterRole, a common set of permissions we can apply to any namespace:
YAML
kind: ClusterRole
apiVersion: rbac.authorization.k8s.io/v1
metadata:
  name: pod-read-only
rules:
- apiGroups: [""] # "" is the core API group
  resources: ["pods"]
  verbs: ["get", "watch", "list"]
Next, we use a RoleBinding to give members of the developers group permissions in the production namespace:
YAML
kind: RoleBinding
apiVersion: rbac.authorization.k8s.io/v1
metadata:
  name: read-only
  namespace: production
subjects:
- kind: Group
  name: developers
  apiGroup: rbac.authorization.k8s.io
roleRef:
  kind: ClusterRole
  name: pod-read-only
  apiGroup: rbac.authorization.k8s.io
Alternatively, we can use a ClusterRoleBinding to apply a role to a user or group in all namespaces.
Resource Quotas
By default, Pods have unlimited resources, but they receive resources on a “best effort” basis. To control the number of Pods in a namespace or to limit the resources Pods in a namespace can use, we can apply a ResourceQuota to a namespace:
YAML
apiVersion: v1
kind: ResourceQuota
metadata:
  name: compute-resources
  namespace: sandbox
spec:
  hard:
    cpu: "5"
    memory: 10Gi
Kubernetes will now reject Pods in this namespace unless we apply a limit:
YAML
apiVersion: v1
kind: Pod
metadata:
  name: webserver
  namespace: sandbox
spec:
  containers:
  - image: nginx
    name: nginx
    resources:
      limits:
        memory: "128Mi"
        cpu: "500m"
Note that we can request fractions of a CPU and use varying units for memory. Pods that specify limits receive a higher-priority quality of service class compared to “best effort” Pods, so it is good practice to specify limits wherever possible.
Section 9
Conclusion
Kubernetes is the most popular container orchestration framework. It is a powerful and reliable way to run containerized applications in production, providing reliability and scalability. This Refcard has shown a few of the most important resource types in Kubernetes to help you get started deploying applications, and with what you’ve learned here, you can start exploring all that Kubernetes has to offer.


Top comments (0)