
Get started with Amazon EC2 Linux instances
Use this tutorial to get started with Amazon Elastic Compute Cloud (Amazon EC2). You'll learn how to launch, connect to, and use a Linux instance. An instance is a virtual server in the AWS Cloud. With Amazon EC2, you can set up and configure the operating system and applications that run on your instance.
Best practices for Amazon EC2
To ensure the maximum benefit from Amazon EC2, we recommend that you perform the following best practices.
Security
Manage access to AWS resources and APIs using identity federation with an identity provider and IAM roles whenever possible. For more information, see Creating IAM policies in the IAM User Guide.
Implement the least permissive rules for your security group. For more information, see Security group rules.
Regularly patch, update, and secure the operating system and applications on your instance. For more information about updating AL2023, see Updating AL2023 in the AL2023 User Guide. For more information about updating Amazon Linux 2 or the Amazon Linux AMI, see Manage software on your Linux instance in the Amazon EC2 User Guide for Linux Instances.
Use Amazon Inspector to automatically discover and scan Amazon EC2 instances for software vulnerabilities and unintended network exposure. For more information, see the Amazon Inspector User Guide.
Use AWS Security Hub controls to monitor your Amazon EC2 resources against security best practices and security standards. For more information about using Security Hub, see Amazon Elastic Compute Cloud controls in the AWS Security Hub User Guide.
Storage
Understand the implications of the root device type for data persistence, backup, and recovery. For more information, see Storage for the root device.
Use separate Amazon EBS volumes for the operating system versus your data. Ensure that the volume with your data persists after instance termination. For more information, see Preserve data when an instance is terminated.
Use the instance store available for your instance to store temporary data. Remember that the data stored in instance store is deleted when you stop, hibernate, or terminate your instance. If you use instance store for database storage, ensure that you have a cluster with a replication factor that ensures fault tolerance.
Encrypt EBS volumes and snapshots. For more information, see Amazon EBS encryption in the Amazon EBS User Guide.
Resource management
Use instance metadata and custom resource tags to track and identify your AWS resources. For more information, see Instance metadata and user data and Tag your Amazon EC2 resources.
View your current limits for Amazon EC2. Plan to request any limit increases in advance of the time that you'll need them. For more information, see Amazon EC2 service quotas.
Use AWS Trusted Advisor to inspect your AWS environment, and then make recommendations when opportunities exist to save money, improve system availability and performance, or help close security gaps. For more information, see AWS Trusted Advisor in the AWS Support User Guide.
Backup and recovery
Regularly back up your EBS volumes using Amazon EBS snapshots, and create an Amazon Machine Image (AMI) from your instance to save the configuration as a template for launching future instances. For more information about AWS services that help achieve this use case, see AWS Backup and Amazon Data Lifecycle Manager.
Deploy critical components of your application across multiple Availability Zones, and replicate your data appropriately.
Design your applications to handle dynamic IP addressing when your instance restarts. For more information, see Amazon EC2 instance IP addressing.
Monitor and respond to events. For more information, see Monitor Amazon EC2.
Ensure that you are prepared to handle failover. For a basic solution, you can manually attach a network interface or Elastic IP address to a replacement instance. For more information, see Elastic network interfaces. For an automated solution, you can use Amazon EC2 Auto Scaling. For more information, see the Amazon EC2 Auto Scaling User Guide.
Regularly test the process of recovering your instances and Amazon EBS volumes to ensure data and services are restored successfully.
Networking
- Set the time-to-live (TTL) value for your applications to 255, for IPv4 and IPv6. If you use a smaller value, there is a risk that the TTL will expire while application traffic is in transit, causing reachability issues for your instances.
Step 1: Launch an instance
To launch an instance
Open the Amazon EC2 console at https://console.aws.amazon.com/ec2/.
From the EC2 console dashboard, in the Launch instance box, choose Launch instance.
Under Name and tags, for Name, enter a descriptive name for your instance.
-
Under Application and OS Images (Amazon Machine Image), do the following:
a. Choose Quick Start, and then choose Amazon Linux. This is the operating system (OS) for your instance.
b. From Amazon Machine Image (AMI), select an HVM version of Amazon Linux 2. Notice that these AMIs are marked Free Tier eligible. An Amazon Machine Image (AMI) is a basic configuration that serves as a template for your instance.
Under Instance type, from the Instance type list, you can select the hardware configuration for your instance. Choose the
t2.microinstance type, which is selected by default. Thet2.microinstance type is eligible for the Free Tier. In Regions wheret2.microis unavailable, you can use at3.microinstance under the Free Tier.Under Key pair (login), for Key pair name, choose the key pair that you created when getting set up.
Warning:
Do not choose **Proceed without a key pair (Not recommended). If you launch your instance without a key pair, then you can't connect to it.
- Next to Network settings, choose Edit. For Security group name, you'll see that the wizard created and selected a security group for you. You can use this security group, or alternatively you can select the security group that you created when getting set up using the following steps:
a. Choose Select existing security group
b. From Common security groups, choose your security group from the list of existing security groups.
Keep the default selections for the other configuration settings for your instance.
Review a summary of your instance configuration in the Summary panel, and when you're ready, choose Launch instance.
A confirmation page lets you know that your instance is launching. Choose View all instances to close the confirmation page and return to the console.
On the Instances screen, you can view the status of the launch. It takes a short time for an instance to launch. When you launch an instance, its initial state is
pending. After the instance starts, its state changes torunningand it receives a public DNS name. If the Public IPv4 DNS column is hidden, choose the settings icon () in the top-right corner, toggle on Public IPv4 DNS, and choose Confirm.
It can take a few minutes for the instance to be ready for you to connect to it. Check that your instance has passed its status checks; you can view this information in the Status check column.
Step 2: Connect to your instance
There are several ways to connect to your Linux instance. For more information, see Connect to your Linux instance.
There are many ways to connect to your Linux instance. Some vary depending on the operating system of the local machine that you connect from. Others, like EC2 Instance Connect or AWS Systems Manager Session Manager, don't vary. In this section, you can learn how to connect to your Linux instance and transfer files between your local computer and your instance. For information about how to connect to a Windows instance.
Before you connect to your Linux instance, complete the following prerequisites.
Get information about your instance
Locate the private key and set permissions
(Optional) Get the instance fingerprint
Then, choose from one of the following options to connect to your Linux instance.
Options to connect based on your local operating system
- Connect from a Linux or macOS local machine using SSH
- Connect from a Windows local machine
Options to connect from any local operating system
- Connect to your Linux instance with AWS Systems Manager Session Manager
- Connect to your Linux instance with EC2 Instance Connect.
Connect to your Linux instance using an SSH client
Use the following procedure to connect to your Linux instance using an SSH client. If you receive an error while attempting to connect to your instance.
Connect to your instance using SSH
- In a terminal window, use the ssh command to connect to the instance. You specify the path and file name of the private key (
.pem), the user name for your instance, and the public DNS name or IPv6 address for your instance. For more information about how to find the private key, the user name for your instance, and the DNS name or IPv6 address for an instance, see Locate the private key and set permissions and Get information about your instance. To connect to your instance, use one of the following commands.
-   (Public DNS) To connect using your instance's public DNS name, enter the following command.

    ssh -i `/path/key-pair-name`.pem `instance-user-name`@`instance-public-dns-name

-   (IPv6) Alternatively, if your instance has an IPv6 address, to connect using your instance's IPv6 address, enter the following command.

    ``ssh -i `/path/key-pair-name`.pem `instance-user-name`@`instance-IPv6-address` ``


You see a response like the following:

The authenticity of host 'ec2-198-51-100-1.compute-1.amazonaws.com (198-51-100-1)' can't be established.
ECDSA key fingerprint is l4UB/neBad9tvkgJf1QZWxheQmR59WgrgzEimCG6kZY.
Are you sure you want to continue connecting (yes/no)?
(Optional) Verify that the fingerprint in the security alert matches the fingerprint that you previously obtained in (Optional) Get the instance fingerprint. If these fingerprints don't match, someone might be attempting a man-in-the-middle attack. If they match, continue to the next step.
-
Enter
yes.You see a response like the following:
Warning: Permanently added 'ec2-198-51-100-1.compute-1.amazonaws.com' (ECDSA) to the list of known hosts.
Transfer files to Linux instances using an SCP client
One way to transfer files between your local computer and a Linux instance is to use the secure copy protocol (SCP). This section describes how to transfer files with SCP. The procedure is similar to the procedure for connecting to an instance with SSH.
The following procedure steps you through using SCP to transfer a file using the instance's public DNS name, or the IPv6 address if your instance has one.
To use SCP to transfer files between your computer and your instance
- Determine the location of the source file on your computer and the destination path on the instance. In the following examples, the name of the private key file is
key-pair-name.pem, the file to transfer ismy-file.txt, the user name for the instance is ec2-user, the public DNS name of the instance isinstance-public-dns-name, and the IPv6 address of the instance isinstance-IPv6-address.
-   (Public DNS) To transfer a file to the destination on the instance, enter the following command from your computer.

    ``scp -i `/path/key-pair-name`.pem `/path/my-file.txt` `ec2-user`@`instance-public-dns-name`:`path/` ``

-   (IPv6) To transfer a file to the destination on the instance if the instance has an IPv6 address, enter the following command from your computer. The IPv6 address must be enclosed in square brackets (`[ ]`), which must be escaped (`\`).

    ``scp -i `/path/key-pair-name`.pem `/path/my-file.txt` `ec2-user`@\[`instance-IPv6-address`\]:`path/` ``
-
If you haven't already connected to the instance using SSH, you see a response like the following:
The authenticity of host 'ec2-198-51-100-1.compute-1.amazonaws.com (10.254.142.33)'
can't be established.
RSA key fingerprint is 1f:51:ae:28:bf:89:e9:d8:1f:25:5d:37:2d:7d:b8:ca:9f:f5:f1:6f.
Are you sure you want to continue connecting (yes/no)?(Optional) You can optionally verify that the fingerprint in the security alert matches the instance fingerprint. For more information, see (Optional) Get the instance fingerprint.
Enter
yes. -
If the transfer is successful, the response is similar to the following:
Warning: Permanently added 'ec2-198-51-100-1.compute-1.amazonaws.com' (RSA)
to the list of known hosts.
my-file.txt 100% 480 24.4KB/s 00:00 To transfer a file in the other direction (from your Amazon EC2 instance to your computer), reverse the order of the host parameters. For example, you can transfer
my-file.txtfrom your EC2 instance to the a destination on your local computer asmy-file2.txt, as shown in the following examples.
-   (Public DNS) To transfer a file to a destination on your computer, enter the following command from your computer.

    ``scp -i `/path/key-pair-name`.pem `ec2-user`@`instance-public-dns-name`:`path/my-file.txt path/my-file2.txt` ``

-   (IPv6) To transfer a file to a destination on your computer if the instance has an IPv6 address, enter the following command from your computer. The IPv6 address must be enclosed in square brackets (`[ ]`), which must be escaped (`\`).

    ``scp -i `/path/key-pair-name`.pem `ec2-user`@\[`instance-IPv6-address`\]:`path/my-file.txt path/my-file2.txt` ``
Connect to your Linux instance from Windows
- OpenSSH
- PuTTY
- Windows Subsystem for Linux
Connect to your Linux instance with AWS Systems Manager Session Manager
To connect to a Linux instance using Session Manager with the Amazon EC2 console
Open the Amazon EC2 console at https://console.aws.amazon.com/ec2/.
In the navigation pane, choose Instances.
Select the instance and choose Connect.
Choose Session Manager.
Choose Connect.
Connect to your Linux instance with EC2 Instance Connect
Open the Amazon EC2 console at https://console.aws.amazon.com/ec2/.
In the navigation pane, choose Instances.
Select the instance and choose Connect.
Choose EC2 Instance Connect.
Verify the user name and choose Connect to open a terminal window.
Step 3: Create a custom Linux AMI
Create a Linux AMI from an instance
You can create an AMI using the AWS Management Console or the command line.
To create an AMI
Open the Amazon EC2 console at https://console.aws.amazon.com/ec2/.
In the navigation pane, choose Instances.
-
Select the instance from which to create the AMI, and then choose Actions, Image and templates, Create image.
Tip
If this option is disabled, your instance isn't an Amazon EBS-backed instance.
-
On the Create image page, specify the following information:
- For Image name, enter a unique name for the image, up to 127 characters.
- For Image description, enter an optional description of the image, up to 255 characters.
- For No reboot, either keep the Enable check box cleared (the default), or select it.
- If the **Enable** check box for **No reboot** is cleared, when Amazon EC2 creates the new AMI, it reboots the instance so that it can take snapshots of the attached volumes while data is at rest, in order to ensure a consistent state. - If the **Enable** check box for **No reboot** is selected, when Amazon EC2 creates the new AMI, it does not shut down and reboot the instance. ### Warning If you choose to enable **No reboot**, we can't guarantee the file system integrity of the created image.-
Instance volumes – You can modify the root volume, and add additional Amazon EBS and instance store volumes, as follows:
- The root volume is defined in the first row.
- To change the size of the root volume, for **Size**, enter the required value. - If you select **Delete on termination**, when you terminate the instance created from this AMI, the EBS volume is deleted. If you clear **Delete on termination**, when you terminate the instance, the EBS volume is not deleted. For more information, see [Preserve data when an instance is terminated](https://docs.aws.amazon.com/AWSEC2/latest/UserGuide/terminate-instances-considerations.html#preserving-volumes-on-termination).- To add an EBS volume, choose Add volume (which adds a new row). For Storage type, choose EBS, and fill in the fields in the row. When you launch an instance from your new AMI, additional volumes are automatically attached to the instance. Empty volumes must be formatted and mounted. Volumes based on a snapshot must be mounted.
- To add an instance store volume, see Add instance store volumes to an AMI. When you launch an instance from your new AMI, additional volumes are automatically initialized and mounted. These volumes do not contain data from the instance store volumes of the running instance on which you based your AMI.
Tags – You can tag the AMI and the snapshots with the same tags, or you can tag them with different tags.
- To tag the AMI and the snapshots with the _same_ tags, choose **Tag image and snapshots together**. The same tags are applied to the AMI and every snapshot that is created. - To tag the AMI and the snapshots with _different_ tags, choose **Tag image and snapshots separately**. Different tags are applied to the AMI and the snapshots that are created. However, all the snapshots get the same tags; you can't tag each snapshot with a different tag. To add a tag, choose **Add tag**, and enter the key and value for the tag. Repeat for each tag.- When you're ready to create your AMI, choose Create image.
-
To view the status of your AMI while it is being created:
- In the navigation pane, choose AMIs.
-
Set the filter to Owned by me, and find your AMI in the list.
Initially, the status is
pendingbut should change toavailableafter a few minutes.
-
(Optional) To view the snapshot that was created for the new AMI:
- Note the ID of your AMI that you located in the previous step.
- In the navigation pane, choose Snapshots.
-
Set the filter to Owned by me, and then find the snapshot with the new AMI ID in the Description column.
When you launch an instance from this AMI, Amazon EC2 uses this snapshot to create its root device volume.
Create a Linux AMI from a snapshot
If you have a snapshot of the root device volume of an instance, you can create an AMI from this snapshot using the AWS Management Console or the command line.
To create an AMI from a snapshot
Open the Amazon EC2 console at https://console.aws.amazon.com/ec2/.
In the navigation pane, choose Snapshots.
Select the snapshot from which to create the AMI, and then choose Actions, Create image from snapshot.
-
On the Create image from snapshot page, specify the following information:
- For Image name, enter a descriptive name for the image.
- For Description, enter a brief description for the image.
- For Architecture, choose the image architecture. Choose i386 for 32-bit, x86_64 for 64-bit, arm64 for 64-bit ARM, or x86_64 for 64-bit macOS.
- For Root device name, enter the device name to use for the root device volume. For more information, see Device names on Linux instances.
- For Virtualization type, choose the virtualization type to be used by instances launched from this AMI. For more information, see Linux AMI virtualization types.
- (For paravirtual virtualization only) For Kernel ID, select the operating system kernel for the image. If you're using a snapshot of the root device volume of an instance, select the same kernel ID as the original instance. If you're unsure, use the default kernel.
- (For paravirtual virtualization only) For RAM disk ID, select the RAM disk for the image. If you select a specific kernel, you may need to select a specific RAM disk with the drivers to support it.
- For Boot mode, choose the boot mode for the image, or choose Use default so that when an instance is launched with this AMI, it boots with the boot mode supported by the instance type. For more information, see Set the boot mode of an AMI.
-
(Optional) Under Block device mappings, customize the root volume and add additional data volumes.
For each volume, you can specify the size, type, performance characteristics, the behavior of delete on termination, and encryption status. For the root volume, the size can't be smaller than the size of the snapshot. For volume type, General Purpose SSD
gp3is the default selection. (Optional) Under Tags, you can add one or more tags to the new AMI. To add a tag, choose Add tag, and enter the key and value for the tag. Repeat for each tag.
-
When you're ready to create your AMI, choose Create image.
Launch an instance from an AMI you created
You can launch an instance from an AMI that you created from an instance or snapshot.
To launch an instance from your AMI
Open the Amazon EC2 console at https://console.aws.amazon.com/ec2/.
In the navigation pane, under Images, choose AMIs.
Set the filter to Owned by me and select your AMI.
Choose Launch instance from AMI.
Accept the default values or specify custom values in the launch instance wizard.
Elastic IP addresses
An Elastic IP address is a static IPv4 address designed for dynamic cloud computing. An Elastic IP address is allocated to your AWS account, and is yours until you release it. By using an Elastic IP address, you can mask the failure of an instance or software by rapidly remapping the address to another instance in your account. Alternatively, you can specify the Elastic IP address in a DNS record for your domain, so that your domain points to your instance.
Elastic IP address basics
The following are the basic characteristics of an Elastic IP address:
An Elastic IP address is static; it does not change over time.
An Elastic IP address is for use in a specific Region only, and cannot be moved to a different Region.
An Elastic IP address comes from Amazon's pool of IPv4 addresses, or from a custom IPv4 address pool that you have brought to your AWS account.
To use an Elastic IP address, you first allocate one to your account, and then associate it with your instance or a network interface.
When you associate an Elastic IP address with an instance, it is also associated with the instance's primary network interface. When you associate an Elastic IP address with a network interface that is attached to an instance, it is also associated with the instance.
When you associate an Elastic IP address with an instance or its primary network interface, the instance's public IPv4 address (if it had one) is released back into Amazon's pool of public IPv4 addresses. You cannot reuse a public IPv4 address, and you cannot convert a public IPv4 address to an Elastic IP address. For more information, see Public IPv4 addresses.
You can disassociate an Elastic IP address from a resource, and then associate it with a different resource. To avoid unexpected behavior, ensure that all active connections to the resource named in the existing association are closed before you make the change. After you have associated your Elastic IP address to a different resource, you can reopen your connections to the newly associated resource.
A disassociated Elastic IP address remains allocated to your account until you explicitly release it. We impose a small hourly charge for Elastic IP addresses that are not associated with a running instance.
When you associate an Elastic IP address with an instance that previously had a public IPv4 address, the public DNS host name of the instance changes to match the Elastic IP address.
We resolve a public DNS host name to the public IPv4 address or the Elastic IP address of the instance outside the network of the instance, and to the private IPv4 address of the instance from within the network of the instance.
When you allocate an Elastic IP address from an IP address pool that you have brought to your AWS account, it does not count toward your Elastic IP address limits. For more information, see Elastic IP address quota.
When you allocate the Elastic IP addresses, you can associate the Elastic IP addresses with a network border group. This is the location from which we advertise the CIDR block. Setting the network border group limits the CIDR block to this group. If you do not specify the network border group, we set the border group containing all of the Availability Zones in the Region (for example,
us-west-2).-
An Elastic IP address is for use in a specific network border group only.
Work with Elastic IP addresses
The following sections describe how you can work with Elastic IP addresses.
To allocate an Elastic IP address
Open the Amazon EC2 console at https://console.aws.amazon.com/ec2/.
In the navigation pane, choose Network & Security, Elastic IPs.
Choose Allocate Elastic IP address.
-
(Optional) When you allocate an Elastic IP address (EIP), you choose the Network border group in which to allocate the EIP. A network border group is a collection of Availability Zones (AZs), Local Zones, or Wavelength Zones from which AWS advertises a public IP address. Local Zones and Wavelength Zones may have different network border groups than the AZs in a Region to ensure minimum latency or physical distance between the AWS network and the customers accessing the resources in these Zones.
Important
You must allocate an EIP in the same network border group as the AWS resource that will be associated with the EIP. An EIP in one network border group can only be advertised in zones in that network border group and not in any other zones represented by other network border groups.
If you have Local Zones or Wavelength Zones enabled (for more information, see Enable a Local Zone or Enable Wavelength Zones), you can choose a network border group for AZs, Local Zones, or Wavelength Zones. Choose the network border group carefully as the EIP and the AWS resource it is associated with must reside in the same network border group. You can use the EC2 console to view the network border group that your Availability Zones, Local Zones, or Wavelength Zones are in (see Local Zones). Typically, all Availability Zones in a Region belong to the same network border group, whereas Local Zones or Wavelength Zones belong to their own separate network border groups.
If you don't have Local Zones or Wavelength Zones enabled, when you allocate an EIP, the network border group that represents all of the AZs for the Region (such as
us-west-2) is predefined for you and you cannot change it. This means that the EIP that you allocate to this network border group will be advertised in all AZs in the Region you're in. For Public IPv4 address pool, choose one of the following:
-   **Amazon's pool of IPv4 addresses**—If you want an IPv4 address to be allocated from Amazon's pool of IPv4 addresses.

-   **Public IPv4 address that you bring to your AWS account**—If you want to allocate an IPv4 address from an IP address pool that you have brought to your AWS account. This option is disabled if you do not have any IP address pools.

-   **Customer owned pool of IPv4 addresses**—If you want to allocate an IPv4 address from a pool created from your on-premises network for use with an AWS Outpost. This option is disabled if you do not have an AWS Outpost.
-
(Optional) Add or remove a tag.
[Add a tag] Choose Add new tag and do the following:
-   For  **Key**, enter the key name.

-   For  **Value**, enter the key value.


[Remove a tag] Choose  **Remove**  to the right of the tag’s Key and Value.
- Choose Allocate. ### Associate an Elastic IP address with an instance or network interface
If you're associating an Elastic IP address with your instance to enable communication with the internet, you must also ensure that your instance is in a public subnet. For more information, see Internet gateways in the Amazon VPC User Guide.
You can associate an Elastic IP address with an instance or network interface using one of the following methods.
To associate an Elastic IP address with an instance
Open the Amazon EC2 console at https://console.aws.amazon.com/ec2/.
In the navigation pane, choose Elastic IPs.
Select the Elastic IP address to associate and choose Actions, Associate Elastic IP address.
For Resource type, choose Instance.
For instance, choose the instance with which to associate the Elastic IP address. You can also enter text to search for a specific instance.
(Optional) For Private IP address, specify a private IP address with which to associate the Elastic IP address.
Choose Associate.
To associate an Elastic IP address with a network interface
Open the Amazon EC2 console at https://console.aws.amazon.com/ec2/.
In the navigation pane, choose Elastic IPs.
Select the Elastic IP address to associate and choose Actions, Associate Elastic IP address.
For Resource type, choose Network interface.
For Network interface, choose the network interface with which to associate the Elastic IP address. You can also enter text to search for a specific network interface.
(Optional) For Private IP address, specify a private IP address with which to associate the Elastic IP address.
Choose Associate.
Disassociate an Elastic IP address
You can disassociate an Elastic IP address from an instance or network interface at any time. After you disassociate the Elastic IP address, you can reassociate it with another resource.
You can disassociate an Elastic IP address using one of the following methods.
- Console
- AWS CLI
- PowerShell
To disassociate and reassociate an Elastic IP address
Open the Amazon EC2 console at https://console.aws.amazon.com/ec2/.
In the navigation pane, choose Elastic IPs.
Select the Elastic IP address to disassociate, choose Actions, Disassociate Elastic IP address.
4. Choose Disassociate.
Create your first Auto Scaling group
This tutorial provides a hands-on introduction to Amazon EC2 Auto Scaling through the AWS Management Console. You'll create a launch template that defines your EC2 instances and an Auto Scaling group with a single instance in it. After launching your Auto Scaling group, you'll terminate the instance and verify that the instance was removed from service and replaced. To maintain a constant number of instances, Amazon EC2 Auto Scaling detects and responds to Amazon EC2 health and reachability checks automatically.
Tasks
- Step 1: Create a launch template
- Step 2: Create a single-instance Auto Scaling group
- Step 3: Verify your Auto Scaling group
- Step 4: Terminate an instance in your Auto Scaling group
- Step 5: Next steps
- Step 6: Clean up ## Step 1: Create a launch template
In this step, you create a launch template that specifies the type of EC2 instance that Amazon EC2 Auto Scaling creates for you. Include information such as the ID of the Amazon Machine Image (AMI) to use, the instance type, the key pair, and security groups.
To create a launch template
Open the Amazon EC2 console and go to the Launch templates page.
On the top navigation bar, select an AWS Region. The launch template and Auto Scaling group that you create are tied to the Region that you specify.
Choose Create launch template.
For Launch template name, enter
my-template-for-auto-scaling.Under Auto Scaling guidance, select the check box.
For Application and OS Images (Amazon Machine Image), choose a version of Amazon Linux 2 (HVM) from the Quick Start list. The AMI serves as a basic configuration template for your instances.
For Instance type, choose a hardware configuration that is compatible with the AMI that you specified.
(Optional) For Key pair (login), choose an existing key pair. You use key pairs to connect to an Amazon EC2 instance with SSH. Connecting to an instance is not included as part of this tutorial. Therefore, you don't need to specify a key pair unless you intend to connect to your instance using SSH.
-
For Network settings, expand Advanced network configuration and do the following:
- Choose Add network interface to configure the primary network interface.
- For Auto-assign public IP, specify whether your instance receives a public IPv4 address. By default, Amazon EC2 assigns a public IPv4 address if the EC2 instance is launched into a default subnet or if the instance is launched into a subnet that's been configured to automatically assign a public IPv4 address. If you don't need to connect to your instance, choose Disable.
- For Security group ID, choose a security group in the same VPC that you plan to use as the VPC for your Auto Scaling group. If you don't specify a security group, your instance is automatically associated with the default security group for the VPC.
- For Delete on termination, choose Yes to delete the network interface when the instance is deleted.
Choose Create launch template.
On the confirmation page, choose Create Auto Scaling group.
Step 2: Create a single-instance Auto Scaling group
Use the following procedure to continue where you left off after creating a launch template.
To create an Auto Scaling group
On the Choose launch template or configuration page, for Auto Scaling group name, enter
my-first-asg.-
Choose Next.
The Choose instance launch options page appears, allowing you to choose the VPC network settings you want the Auto Scaling group to use and giving you options for launching On-Demand and Spot Instances.
In the Network section, keep VPC set to the default VPC for your chosen AWS Region, or select your own VPC. The default VPC is automatically configured to provide internet connectivity to your instance. This VPC includes a public subnet in each Availability Zone in the Region.
For Availability Zones and subnets, choose a subnet from each Availability Zone that you want to include. Use subnets in multiple Availability Zones for high availability. For more information, see Considerations when choosing VPC subnets.
In the Instance type requirements section, use the default setting to simplify this step. (Do not override the launch template.) For this tutorial, you will launch only one On-Demand Instance using the instance type specified in your launch template.
-
Keep the rest of the defaults for this tutorial and choose Skip to review.
Note
The initial size of the group is determined by its desired capacity. The default value is
1instance. On the Review page, review the information for the group, and then choose Create Auto Scaling group.
Step 3: Verify your Auto Scaling group
Now that you have created an Auto Scaling group, you are ready to verify that the group has launched an EC2 instance.
Tip
In the following procedure, you look at the Activity history and Instances sections for the Auto Scaling group. In both, the named columns should already be displayed. To display hidden columns or change the number of rows shown, choose the gear icon on the top right corner of each section to open the preferences modal, update the settings as needed, and choose Confirm.
To verify that your Auto Scaling group has launched an EC2 instance
Open the Auto Scaling groups page of the Amazon EC2 console.
-
Select the check box next to the Auto Scaling group that you just created.
A split pane opens up in the bottom of the Auto Scaling groups page. The first tab available is the Details tab, showing information about the Auto Scaling group.
Choose the second tab, Activity. Under Activity history, you can view the progress of activities that are associated with the Auto Scaling group. The Status column shows the current status of your instance. While your instance is launching, the status column shows
Not yet in service. The status changes toSuccessfulafter the instance is launched. You can also use the refresh button to see the current status of your instance.On the Instance management tab, under Instances, you can view the status of the instance.
Verify that your instance launched successfully. It takes a short time for an instance to launch.
-   The  **Lifecycle**  column shows the state of your instance. Initially, your instance is in the  `Pending`  state. After an instance is ready to receive traffic, its state is  `InService`.

-   The  **Health status**  column shows the result of the Amazon EC2 Auto Scaling health checks on your instance.
Step 4: Terminate an instance in your Auto Scaling group
Use these steps to learn more about how Amazon EC2 Auto Scaling works, specifically, how it launches new instances when necessary. The minimum size for the Auto Scaling group that you created in this tutorial is one instance. Therefore, if you terminate that running instance, Amazon EC2 Auto Scaling must launch a new instance to replace it.
Open the Auto Scaling groups page of the Amazon EC2 console.
Select the check box next to your Auto Scaling group.
-
On the Instance management tab, under Instances, select the ID of the instance.
This takes you to the Instances page of the Amazon EC2 console, where you can terminate the instance.
Choose Actions, Instance State, Terminate. When prompted for confirmation, choose Yes, Terminate.
-
On the navigation pane, under Auto Scaling, choose Auto Scaling Groups. Select your Auto Scaling group and choose the Activity tab.
When you terminate an instance from the Instances page, it takes a minute or two after you terminate the instance before a new instance launches. In the activity history, when the scaling activity starts, you see an entry for the termination of the first instance and an entry for the launch of a new instance. Use the refresh button until you see the new entries.
On the Instance management tab, the Instances section shows the new instance only.
On the navigation pane, under Instances, choose Instances. This page shows both the terminated instance and the new running instance.
Step 5: Next steps
Go to the next step if you would like to delete the basic infrastructure that you just created. Otherwise, you can use this infrastructure as your base and try one or more of the following:
Connect to your Linux instance using Session Manager or SSH. For more information, see Connect to your Linux instance using Session Manager and Connect to your Linux instance using SSH in the Amazon EC2 User Guide for Linux Instances.
Configure an Amazon SNS notification to notify you whenever your Auto Scaling group launches or terminates instances. For more information, see Amazon SNS notification options.
Manually scale your Auto Scaling group to test the SNS notification. For more information, see Change the desired capacity of your Auto Scaling group.
You can also start familiarizing yourself with auto scaling concepts by reading about Target tracking scaling policies. If the load on your application changes, your Auto Scaling group can scale out (add instances) and scale in (run fewer instances) automatically by adjusting the desired capacity of the group between the minimum and maximum capacity limits. For more information about setting these limits, see Set scaling limits for your Auto Scaling group.
Step 6: Clean up
You can either delete your scaling infrastructure or delete just your Auto Scaling group and keep your launch template to use later.
If you launched an instance that is not within the AWS Free Tier, you should terminate your instance to prevent additional charges. When you terminate the instance, the data associated with it will also be deleted.
To delete your Auto Scaling group
Open the Auto Scaling groups page of the Amazon EC2 console.
Select the check box next to your Auto Scaling group (
my-first-asg).Choose Delete.
-
When prompted for confirmation, type
deleteto confirm deleting the specified Auto Scaling group and then choose Delete.A loading icon in the Name column indicates that the Auto Scaling group is being deleted. When the deletion has occurred, the Desired, Min, and Max columns show
0instances for the Auto Scaling group. It takes a few minutes to terminate the instance and delete the group. Refresh the list to see the current state.
Skip the following procedure if you would like to keep your launch template.
To delete your launch template
Open the Launch templates page of the Amazon EC2 console.
Select your launch template (
my-template-for-auto-scaling).Choose Actions, Delete template.
When prompted for confirmation, type
Deleteto confirm deleting the specified launch template and then choose Delete.
Elastic Load Balancing
Elastic Load Balancing automatically distributes your incoming traffic across multiple targets, such as EC2 instances, containers, and IP addresses, in one or more Availability Zones. It monitors the health of its registered targets, and routes traffic only to the healthy targets. Elastic Load Balancing scales your load balancer capacity automatically in response to changes in incoming traffic.
Load balancer benefits
A load balancer distributes workloads across multiple compute resources, such as virtual servers. Using a load balancer increases the availability and fault tolerance of your applications.
You can add and remove compute resources from your load balancer as your needs change, without disrupting the overall flow of requests to your applications.
You can configure health checks, which monitor the health of the compute resources, so that the load balancer sends requests only to the healthy ones. You can also offload the work of encryption and decryption to your load balancer so that your compute resources can focus on their main work.
Features of Elastic Load Balancing
Elastic Load Balancing supports the following load balancers: Application Load Balancers, Network Load Balancers, Gateway Load Balancers, and Classic Load Balancers. You can select the type of load balancer that best suits your needs.
How Elastic Load Balancing works
A load balancer accepts incoming traffic from clients and routes requests to its registered targets (such as EC2 instances) in one or more Availability Zones. The load balancer also monitors the health of its registered targets and ensures that it routes traffic only to healthy targets. When the load balancer detects an unhealthy target, it stops routing traffic to that target. It then resumes routing traffic to that target when it detects that the target is healthy again.
You configure your load balancer to accept incoming traffic by specifying one or more listeners. A listener is a process that checks for connection requests. It is configured with a protocol and port number for connections from clients to the load balancer. Likewise, it is configured with a protocol and port number for connections from the load balancer to the targets.
Elastic Load Balancing supports the following types of load balancers:
Application Load Balancers
Network Load Balancers
Gateway Load Balancers
Classic Load Balancers
There is a key difference in how the load balancer types are configured. With Application Load Balancers, Network Load Balancers, and Gateway Load Balancers, you register targets in target groups, and route traffic to the target groups. With Classic Load Balancers, you register instances with the load balancer.
Availability Zones and load balancer nodes
When you enable an Availability Zone for your load balancer, Elastic Load Balancing creates a load balancer node in the Availability Zone. If you register targets in an Availability Zone but do not enable the Availability Zone, these registered targets do not receive traffic. Your load balancer is most effective when you ensure that each enabled Availability Zone has at least one registered target.
We recommend enabling multiple Availability Zones for all load balancers. With an Application Load Balancer however, it is a requirement that you enable at least two or more Availability Zones. This configuration helps ensure that the load balancer can continue to route traffic. If one Availability Zone becomes unavailable or has no healthy targets, the load balancer can route traffic to the healthy targets in another Availability Zone.
After you disable an Availability Zone, the targets in that Availability Zone remain registered with the load balancer. However, even though they remain registered, the load balancer does not route traffic to them.
Cross-zone load balancing
The nodes for your load balancer distribute requests from clients to registered targets. When cross-zone load balancing is enabled, each load balancer node distributes traffic across the registered targets in all enabled Availability Zones. When cross-zone load balancing is disabled, each load balancer node distributes traffic only across the registered targets in its Availability Zone.
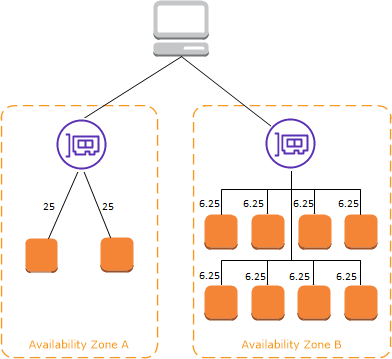
The following diagrams demonstrate the effect of cross-zone load balancing with round robin as the default routing algorithm. There are two enabled Availability Zones, with two targets in Availability Zone A and eight targets in Availability Zone B. Clients send requests, and Amazon Route 53 responds to each request with the IP address of one of the load balancer nodes. Based on the round robin routing algorithm, traffic is distributed such that each load balancer node receives 50% of the traffic from the clients. Each load balancer node distributes its share of the traffic across the registered targets in its scope.
If cross-zone load balancing is enabled, each of the 10 targets receives 10% of the traffic. This is because each load balancer node can route its 50% of the client traffic to all 10 targets.

If cross-zone load balancing is disabled:
Each of the two targets in Availability Zone A receives 25% of the traffic.
Each of the eight targets in Availability Zone B receives 6.25% of the traffic.
This is because each load balancer node can route its 50% of the client traffic only to targets in its Availability Zone.
With Application Load Balancers, cross-zone load balancing is always enabled at the load balancer level. At the target group level, cross-zone load balancing can be disabled. For more information, see Turn off cross-zone load balancing in the User Guide for Application Load Balancers.
With Network Load Balancers and Gateway Load Balancers, cross-zone load balancing is disabled by default. After you create the load balancer, you can enable or disable cross-zone load balancing at any time.
When you create a Classic Load Balancer, the default for cross-zone load balancing depends on how you create the load balancer. With the API or CLI, cross-zone load balancing is disabled by default. With the AWS Management Console, the option to enable cross-zone load balancing is selected by default. After you create a Classic Load Balancer, you can enable or disable cross-zone load balancing at any time. For more information, see Enable cross-zone load balancing in the User Guide for Classic Load Balancers.
Zonal shift
Zonal shift is a capability in Amazon Route 53 Application Recovery Controller (Route 53 ARC). With zonal shift, you can shift a load balancer resource away from an impaired Availability Zone with a single action. This way, you can continue operating from other healthy Availability Zones in an AWS Region.
When you start a zonal shift, your load balancer stops sending traffic for the resource to the affected Availability Zone. Route 53 ARC creates the zonal shift immediately. However, it can take a short time, typically up to a few minutes, to complete existing, in-progress connections in the affected Availability Zone. For more information, see How a zonal shift works: health checks and zonal IP addresses in the Amazon Route 53 Application Recovery Controller Developer Guide.
Zonal shifts are only supported on Application Load Balancers and Network Load Balancers with cross-zone load balancing turned off. If you turn on cross-zone load balancing, you can't start a zonal shift. For more information, see Resources supported for zonal shifts in the Amazon Route 53 Application Recovery Controller Developer Guide.
Before you use a zonal shift, review the following:
Cross-zone load balancing isn't supported with zonal shifts. You must turn off cross-zone load balancing to use this capability.
Zonal shift isn't supported when you use an Application Load Balancer as an accelerator endpoint in AWS Global Accelerator.
You can start a zonal shift for a specific load balancer only for a single Availability Zone. You can't start a zonal shift for multiple Availability Zones.
AWS proactively removes zonal load balancer IP addresses from DNS when multiple infrastructure issues impact services. Always check current Availability Zone capacity before you start a zonal shift. If your load balancers have cross-zone load balancing turned off and you use a zonal shift to remove a zonal load balancer IP address, the Availability Zone affected by the zonal shift also loses target capacity.
When an Application Load Balancer is a target of a Network Load Balancer, always start the zonal shift from the Network Load Balancer. If you start a zonal shift from the Application Load Balancer, the Network Load Balancer doesn't recognize the shift and continues to send traffic to the Application Load Balancer.
For more guidance and information, see Best practices with Route 53 ARC zonal shifts in the Amazon Route 53 Application Recovery Controller Developer Guide.
Request routing
Before a client sends a request to your load balancer, it resolves the load balancer's domain name using a Domain Name System (DNS) server. The DNS entry is controlled by Amazon, because your load balancers are in the amazonaws.com domain. The Amazon DNS servers return one or more IP addresses to the client. These are the IP addresses of the load balancer nodes for your load balancer. With Network Load Balancers, Elastic Load Balancing creates a network interface for each Availability Zone that you enable, and uses it to get a static IP address. You can optionally associate one Elastic IP address with each network interface when you create the Network Load Balancer.
As traffic to your application changes over time, Elastic Load Balancing scales your load balancer and updates the DNS entry. The DNS entry also specifies the time-to-live (TTL) of 60 seconds. This helps ensure that the IP addresses can be remapped quickly in response to changing traffic.
The client determines which IP address to use to send requests to the load balancer. The load balancer node that receives the request selects a healthy registered target and sends the request to the target using its private IP address.
For more information, see Routing traffic to an ELB load balancer in the Amazon Route 53 Developer Guide.
Routing algorithm
With Application Load Balancers, the load balancer node that receives the request uses the following process:
Evaluates the listener rules in priority order to determine which rule to apply.
Selects a target from the target group for the rule action, using the routing algorithm configured for the target group. The default routing algorithm is round robin. Routing is performed independently for each target group, even when a target is registered with multiple target groups.
With Network Load Balancers, the load balancer node that receives the connection uses the following process:
- Selects a target from the target group for the default rule using a flow hash algorithm. It bases the algorithm on:
-   The protocol

-   The source IP address and source port

-   The destination IP address and destination port

-   The TCP sequence number
- Routes each individual TCP connection to a single target for the life of the connection. The TCP connections from a client have different source ports and sequence numbers, and can be routed to different targets.
With Classic Load Balancers, the load balancer node that receives the request selects a registered instance as follows:
Uses the round robin routing algorithm for TCP listeners
Uses the least outstanding requests routing algorithm for HTTP and HTTPS listeners
HTTP connections
Classic Load Balancers use pre-open connections, but Application Load Balancers do not. Both Classic Load Balancers and Application Load Balancers use connection multiplexing. This means that requests from multiple clients on multiple front-end connections can be routed to a given target through a single backend connection. Connection multiplexing improves latency and reduces the load on your applications. To prevent connection multiplexing, disable HTTP keep-alive headers by setting the Connection: close header in your HTTP responses.
Application Load Balancers and Classic Load Balancers support pipelined HTTP on front-end connections. They do not support pipelined HTTP on backend connections.
Application Load Balancers support the following HTTP request methods: GET, HEAD, POST, PUT, DELETE, OPTIONS, and PATCH.
Application Load Balancers support the following protocols on front-end connections: HTTP/0.9, HTTP/1.0, HTTP/1.1, and HTTP/2. You can use HTTP/2 only with HTTPS listeners, and can send up to 128 requests in parallel using one HTTP/2 connection. Application Load Balancers also support connection upgrades from HTTP to WebSockets. However, if there is a connection upgrade, Application Load Balancer listener routing rules and AWS WAF integrations no longer apply.
Application Load Balancers use HTTP/1.1 on backend connections (load balancer to registered target) by default. However, you can use the protocol version to send the request to the targets using HTTP/2 or gRPC. For more information, see Protocol versions. The keep-alive header is supported on backend connections by default. For HTTP/1.0 requests from clients that do not have a host header, the load balancer generates a host header for the HTTP/1.1 requests sent on the backend connections. The host header contains the DNS name of the load balancer.
Classic Load Balancers support the following protocols on front-end connections (client to load balancer): HTTP/0.9, HTTP/1.0, and HTTP/1.1. They use HTTP/1.1 on backend connections (load balancer to registered target). The keep-alive header is supported on backend connections by default. For HTTP/1.0 requests from clients that do not have a host header, the load balancer generates a host header for the HTTP/1.1 requests sent on the backend connections. The host header contains the IP address of the load balancer node.
HTTP headers
Application Load Balancers and Classic Load Balancers automatically add X-Forwarded-For, X-Forwarded-Proto, and X-Forwarded-Port headers to the request.
Application Load Balancers convert the hostnames in HTTP host headers to lower case before sending them to targets.
For front-end connections that use HTTP/2, the header names are in lowercase. Before the request is sent to the target using HTTP/1.1, the following header names are converted to mixed case: X-Forwarded-For, X-Forwarded-Proto, X-Forwarded-Port, Host, X-Amzn-Trace-Id, Upgrade, and Connection. All other header names are in lowercase.
Application Load Balancers and Classic Load Balancers honor the connection header from the incoming client request after proxying the response back to the client.
When Application Load Balancers and Classic Load Balancers using HTTP/1.1 receive an Expect: 100-Continue header, they immediately respond with HTTP/1.1 100 Continue without testing the content length header. The Expect: 100-Continue request header is not forwarded to it's targets.
When using HTTP/2, Application Load Balancers do not support the Expect: 100-Continue header from client requests. The Application Load Balancer will not respond with HTTP/2 100 Continue or forward this header to its targets.
HTTP header limits
The following size limits for Application Load Balancers are hard limits that cannot be changed:
Request line: 16 K
Single header: 16 K
Entire response header: 32 K
Entire request header: 64 K
Load balancer scheme
When you create a load balancer, you must choose whether to make it an internal load balancer or an internet-facing load balancer.
The nodes of an internet-facing load balancer have public IP addresses. The DNS name of an internet-facing load balancer is publicly resolvable to the public IP addresses of the nodes. Therefore, internet-facing load balancers can route requests from clients over the internet.
The nodes of an internal load balancer have only private IP addresses. The DNS name of an internal load balancer is publicly resolvable to the private IP addresses of the nodes. Therefore, internal load balancers can only route requests from clients with access to the VPC for the load balancer.
Both internet-facing and internal load balancers route requests to your targets using private IP addresses. Therefore, your targets do not need public IP addresses to receive requests from an internal or an internet-facing load balancer.
If your application has multiple tiers, you can design an architecture that uses both internal and internet-facing load balancers. For example, this is true if your application uses web servers that must be connected to the internet, and application servers that are only connected to the web servers. Create an internet-facing load balancer and register the web servers with it. Create an internal load balancer and register the application servers with it. The web servers receive requests from the internet-facing load balancer and send requests for the application servers to the internal load balancer. The application servers receive requests from the internal load balancer.
Network MTU for your load balancer
The maximum transmission unit (MTU) determines the size, in bytes, for the largest packet that can be sent over the network. The larger the MTU of a connection, the more data that can be passed in a single packet. Ethernet frames consist of the packet, or the actual data you are sending, and the network overhead information information that surrounds it. Traffic sent over an internet gateway has an MTU of 1500. This means that if a packet is over 1500 bytes, it is fragmented to be sent using multiple frames, or it is dropped if the Don't Fragment is set in the IP header.
The MTU size on load balancer nodes is not configurable. Jumbo frames (9001 MTU) are standard across load balancer nodes for Application Load Balancers, Network Load Balancers, and Classic Load Balancers. Gateway Load Balancers support 8500 MTU. For more information, see Maximum transmission unit (MTU) in the User Guide for Gateway Load Balancers.
The path MTU is the maximum packet size that is supported on the path between the originating host and the receiving host. Path MTU Discovery (PMTUD) is used to determine the path MTU between two devices. Path MTU Discovery is especially important if the client or target does not support jumbo frames.
When a host sends a packet that is larger than the MTU of the receiving host or larger than the MTU of a device along the path, the receiving host or device drops the packet, and then returns the following ICMP message: Destination Unreachable: Fragmentation Needed and Don't Fragment was Set (Type 3, Code 4). This instructs the transmitting host to split the payload into multiple smaller packets, and retransmit them.
If packets larger than the MTU size of the client or target interface continue to be dropped, it is likely that Path MTU Discovery (PMTUD) is not working. To avoid this, ensure that Path MTU Discovery is working end to end, and that you have enabled jumbo frames on your clients and targets.
There are several ways to get started with the Elastic Load Balancing. You can set up an Application Load Balancer, Network Load Balancer, or Gateway Load Balancer with APIs, AWS Command Line Interfaces (CLI), or through the AWS Management Console.
When you use Elastic Load Balancing with Auto Scaling, you can build highly available, fault-tolerant applications which automatically scale capacity up or down based on fluctuations in demand.
Follow the Getting Started with AWS Management Console steps below or read more resources below to get started now.
Getting started with the AWS Management Console
Let's get started by creating a load balancer with the Elastic Load Balancing wizard in the AWS Management Console, a point-and-click web-based interface.
- Create an account and sign into the console
- Create a load balancer by selecting Application Load Balancer or Network Load Balancer
- Specify a unique name and a network
Create listeners for your load balancer (HTTP or HTTPS for Application Load Balancer and TCP or UDP for Network Load Balancer)
Configure health checks for your load balancer
Do one of the following:
- Manually register EC2 instances to your Target Group and register the Target Group with your load balancer
- Associate your load balancer with an Auto Scaling group that is registered to a Target Group # Getting started with Application Load Balancers
This tutorial provides a hands-on introduction to Application Load Balancers through the AWS Management Console, a web-based interface. To create your first Application Load Balancer, complete the following steps.
Tasks
- Before you begin]
- Step 1: Configure your target group
- tep 2: Choose a load balancer type
- Step 3: Configure your load balancer and listener
- Step 4: Test your load balance
- [tep 5: (Optional) Delete your load balancer
Before you begin
Decide which two Availability Zones you will use for your EC2 instances. Configure your virtual private cloud (VPC) with at least one public subnet in each of these Availability Zones. These public subnets are used to configure the load balancer. You can launch your EC2 instances in other subnets of these Availability Zones instead.
Launch at least one EC2 instance in each Availability Zone. Be sure to install a web server, such as Apache or Internet Information Services (IIS), on each EC2 instance. Ensure that the security groups for these instances allow HTTP access on port 80.
Step 1: Configure your target group
Create a target group, which is used in request routing. The default rule for your listener routes requests to the registered targets in this target group. The load balancer checks the health of targets in this target group using the health check settings defined for the target group.
To configure your target group
Open the Amazon EC2 console at https://console.aws.amazon.com/ec2/.
In the navigation pane, under Load Balancing, choose Target Groups.
Choose Create target group.
Under Basic configuration, keep the Target type as instance.
For Target group name, enter a name for the new target group.
Keep the default protocol (HTTP) and port (80).
Select the VPC containing your instances. Keep the protocol version as HTTP1.
For Health checks, keep the default settings.
Choose Next.
-
On the Register targets page, complete the following steps. This is an optional step for creating the load balancer. However, you must register this target if you want to test your load balancer and ensure that it is routing traffic to this target.
- For Available instances, select one or more instances.
- Keep the default port 80, and choose Include as pending below.
Choose Create target group.
Step 2: Choose a load balancer type
Elastic Load Balancing supports different types of load balancers. For this tutorial, you create an Application Load Balancer.
To create a Application Load Balancer
Open the Amazon EC2 console at https://console.aws.amazon.com/ec2/.
On the navigation bar, choose a Region for your load balancer. Be sure to choose the same Region that you used for your EC2 instances.
In the navigation pane, under Load Balancing, choose Load Balancers.
Choose Create Load Balancer.
For Application Load Balancer, choose Create.
Step 3: Configure your load balancer and listener
To create an Application Load Balancer, you must first provide basic configuration information for your load balancer, such as a name, scheme, and IP address type. Then, you provide information about your network, and one or more listeners. A listener is a process that checks for connection requests. It is configured with a protocol and a port for connections from clients to the load balancer. For more information about supported protocols and ports, see Listener configuration.
To configure your load balancer and listener
For Load balancer name, enter a name for your load balancer. For example,
my-alb.For Scheme and IP address type, keep the default values.
For Network mapping, select the VPC that you used for your EC2 instances. Select at least two Availability Zones and one subnet per zone. For each Availability Zone that you used to launch your EC2 instances, select the Availability Zone and then select one public subnet for that Availability Zone.
For Security groups, we select the default security group for the VPC that you selected in the previous step. You can choose a different security group instead. The security group must include rules that allow the load balancer to communicate with registered targets on both the listener port and the health check port. For more information, see Security group rules.
For Listeners and routing, keep the default protocol and port, and select your target group from the list. This configures a listener that accepts HTTP traffic on port 80 and forwards traffic to the selected target group by default. For this tutorial, you are not creating an HTTPS listener.
For Default action, select the target group that you created and registered in Step 1: Configure your target group.
(Optional) Add a tag to categorize your load balancer. Tag keys must be unique for each load balancer. Allowed characters are letters, spaces, numbers (in UTF-8), and the following special characters: + - = . _ : / @. Do not use leading or trailing spaces. Tag values are case-sensitive.
Review your configuration, and choose Create load balancer. A few default attributes are applied to your load balancer during creation. You can view and edit them after creating the load balancer. For more information, see Load balancer attributes.
Step 4: Test your load balancer
After creating the load balancer, verify that it's sending traffic to your EC2 instances.
To test your load balancer
After you are notified that your load balancer was created successfully, choose Close.
In the navigation pane, under Load Balancing, choose Target Groups.
Select the newly created target group.
Choose Targets and verify that your instances are ready. If the status of an instance is
initial, it's probably because the instance is still in the process of being registered, or it has not passed the minimum number of health checks to be considered healthy. After the status of at least one instance ishealthy, you can test your load balancer.In the navigation pane, under Load Balancing, choose Load Balancers.
Select the newly created load balancer.
Choose Description and copy the DNS name of the load balancer (for example, my-load-balancer-1234567890abcdef.elb.us-east-2.amazonaws.com). Paste the DNS name into the address field of an internet-connected web browser. If everything is working, the browser displays the default page of your server.
(Optional) To define additional listener rules, see Add a rule.
Step 5: (Optional) Delete your load balancer
As soon as your load balancer becomes available, you are billed for each hour or partial hour that you keep it running. When you no longer need a load balancer, you can delete it. As soon as the load balancer is deleted, you stop incurring charges for it. Note that deleting a load balancer does not affect the targets registered with the load balancer. For example, your EC2 instances continue to run after deleting the load balancer created in this guide.
To delete your load balancer
Open the Amazon EC2 console at https://console.aws.amazon.com/ec2/.
In the navigation pane, under Load Balancing, choose Load Balancers.
Select the checkbox for the load balancer, choose Actions, then choose Delete.
4. When prompted for confirmation, choose Yes, Delete.
Getting started with Network Load Balancers
This tutorial provides a hands-on introduction to Network Load Balancers through the AWS Management Console, a web-based interface. To create your first Network Load Balancer, complete the following steps.
Tasks
- Step 1: Configure your target group
- Step 2: Choose a load balancer type
- Step 3: Configure your load balancer and listener
- Step 4: Test your load balancer
- Step 5: (Optional) Delete your load balancer
Before you begin
Decide which Availability Zones you will use for your EC2 instances. Configure your virtual private cloud (VPC) with at least one public subnet in each of these Availability Zones. These public subnets are used to configure the load balancer. You can launch your EC2 instances in other subnets of these Availability Zones instead.
Launch at least one EC2 instance in each Availability Zone. Ensure that the security groups for these instances allow TCP access from clients on the listener port and health check requests from your VPC. For more information, see Target security groups.
Step 1: Configure your target group
Create a target group, which is used in request routing. The rule for your listener routes requests to the registered targets in this target group. The load balancer checks the health of targets in this target group using the health check settings defined for the target group.
To configure your target group
Open the Amazon EC2 console at https://console.aws.amazon.com/ec2/.
In the navigation pane, under Load Balancing, choose Target Groups.
Choose Create target group.
Keep the target type as instances.
For Target group name, enter a name for the new target group.
For Protocol, choose TCP, and for Port, choose 80.
For VPC, select the VPC that contains your instances.
For Health checks, keep the default settings.
Choose Next.
-
On the Register targets page, complete the following steps. This is an optional step to create a target group. However, you must register your targets if you want to test your load balancer and ensure that it is routing traffic to your targets.
- For Available instances, select one or more instances.
- Keep the default port 80, and choose Include as pending below.
Choose Create target group.
Step 2: Choose a load balancer type
Elastic Load Balancing supports different types of load balancers. For this tutorial, you create a Network Load Balancer.
To create a Network Load Balancer
Open the Amazon EC2 console at https://console.aws.amazon.com/ec2/.
On the navigation bar, choose a Region for your load balancer. Be sure to choose the same Region that you used for your EC2 instances.
In the navigation pane, under Load Balancing, choose Load Balancers.
Choose Create load balancer.
For Network Load Balancer, choose Create.
Step 3: Configure your load balancer and listener
To create a Network Load Balancer, you must first provide basic configuration information for your load balancer, such as a name, scheme, and IP address type. Then provide information about your network, and one or more listeners. A listener is a process that checks for connection requests. It is configured with a protocol and a port for connections from clients to the load balancer. For more information about supported protocols and ports, see Listener configuration.
To configure your load balancer and listener
For Load balancer name, enter a name for your load balancer. For example,
my-nlb.For Scheme and IP address type, keep the default values.
-
For Network mapping, select the VPC that you used for your EC2 instances. For each Availability Zone that you used to launch your EC2 instances, select the Availability Zone and then select one public subnet for that Availability Zone.
By default, AWS assigns an IPv4 address to each load balancer node from the subnet for its Availability Zone. Alternatively, when you create an internet-facing load balancer, you can select an Elastic IP address for each Availability Zone. This provides your load balancer with static IP addresses.
-
For Security groups, we preselect the default security group for your VPC. You can select other security groups as needed. If you don't have a suitable security group, choose Create a new security group and create one that meets your security needs. For more information, see Create a security group in the Amazon VPC User Guide.
Warning
If you don't associate any security groups with your load balancer now, you can't associate them later on.
For Listeners and routing, keep the default protocol and port, and select the target group from the list. This configures a listener that accepts TCP traffic on port 80 and forwards traffic to the selected target group by default.
(Optional) Add tags to categorize your load balancer. Tag keys must be unique for each load balancer. Allowed characters are letters, spaces, numbers (in UTF-8), and the following special characters: + - = . _ : / @. Do not use leading or trailing spaces. Tag values are case-sensitive.
Review your configuration, and choose Create load balancer. A few default attributes are applied to your load balancer during creation. You can view and edit them after creating the load balancer. For more information, see Load balancer attributes.
Step 4: Test your load balancer
After creating the load balancer, verify that it's sending traffic to your EC2 instances.
To test your load balancer
After you are notified that your load balancer was created successfully, choose Close.
In the navigation pane, under Load Balancing, choose Target Groups.
Select the newly created target group.
Choose Targets and verify that your instances are ready. If the status of an instance is
initial, it's probably because the instance is still in the process of being registered, or it has not passed the minimum number of health checks to be considered healthy. After the status of at least one instance ishealthy, you can test your load balancer.In the navigation pane, under Load Balancing, choose Load Balancers.
Select the name of the newly created load balancer to open its details page.
Copy the DNS name of the load balancer (for example, my-load-balancer-1234567890abcdef.elb.us-east-2.amazonaws.com). Paste the DNS name into the address field of an internet-connected web browser. If everything is working, the browser displays the default page of your server.
Step 5: (Optional) Delete your load balancer
As soon as your load balancer becomes available, you are billed for each hour or partial hour that you keep it running. When you no longer need a load balancer, you can delete it. As soon as the load balancer is deleted, you stop incurring charges for it. Note that deleting a load balancer does not affect the targets registered with the load balancer. For example, your EC2 instances continue to run.
To delete your load balancer
Open the Amazon EC2 console at https://console.aws.amazon.com/ec2/.
In the navigation pane, under Load Balancing, choose Load Balancers.
Select the checkbox for the load balancer, and choose Actions, Delete.
4. When prompted for confirmation, enter confirm and choose Delete.
Virtual private clouds
Amazon Virtual Private Cloud (Amazon VPC) enables you to define a virtual network in your own logically isolated area within the AWS cloud, known as a virtual private cloud or VPC. You can create AWS resources, such as Amazon EC2 instances, into the subnets of your VPC. Your VPC closely resembles a traditional network that you might operate in your own data center, with the benefits of using scalable infrastructure from AWS. You can configure your VPC; you can select its IP address range, create subnets, and configure route tables, network gateways, and security settings. You can connect instances in your VPC to the internet or to your own data center.
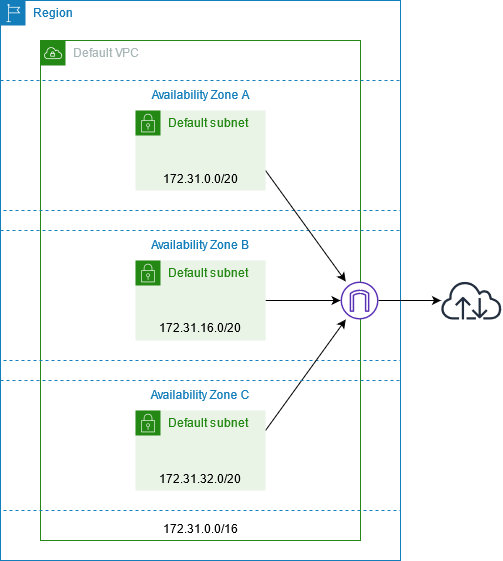
Your default VPCs
When you create your AWS account, we create a default VPC in each Region. A default VPC is a VPC that is already configured and ready for you to use. For example, there is a default subnet for each Availability Zone in each default VPC, an internet gateway attached to the VPC, and there's a route in the main route table that sends all traffic (0.0.0.0/0) to the internet gateway. Alternatively, you can create your own VPC and configure it to meet your needs.
Create additional VPCs
Use the following procedure to create a VPC with the subnets, gateways, and routing configuration that you need.
To create a VPC
Open the Amazon VPC console at https://console.aws.amazon.com/vpc/.
Choose Create VPC.
Under Resources to create, choose VPC and more.
For Name tag auto-generation, enter a name for the VPC.
For IPv4 CIDR block, either keep the default suggestion, enter the CIDR block required by your application or network.
For Number of Availability Zones, choose 2, so that you can launch instances in multiple Availability Zones to ensure high availability.
If your instances must be accessible from the internet, do one of the following:
-   If your instances can be in a public subnet, select a nonzero value for  **Number of public subnets**. Keep both options under  **DNS options**  selected. You can optionally add private subnets now or later on.

-   If your instances must be in a private subnet, select  **0**  for  **Number of public subnets**. For  **Number of private subnets**, select a number depending on your needs (the possible values correspond to 1 or 2 private subnets per Availability Zone). For  **NAT gateways**, if your instances in both Availability Zones send or receive a significant volume of traffic across Availability Zones, select  **1 per AZ**. Otherwise, select  **In 1 AZ**  and launch instances that send or receive cross-zone traffic in the same Availability Zone as the NAT gateway.
Expand Customize subnet CIDR blocks. Either keep the default suggestions, or enter a CIDR block for each subnet. For more information, see Subnet CIDR blocks in the Amazon VPC User Guide.
Review the Preview pane, which shows the VPC resources that will be created based on your selections.
Choose Create VPC.
Access the internet from your instances
Instances launched into a default subnet have access to the internet, as the VPC is configured to assign public IP addresses and DNS hostnames, and the main route table is configured with a route to an internet gateway attached to the VPC.
For the subnets that you create in your VPCs, do one of the following to ensure that instances that you launch in these subnets have access to the internet:
Configure an internet gateway. For more information, see Connect to the internet using an internet gateway in the Amazon VPC User Guide.
Configure a public NAT gateway. For more information, see Access the internet from a private subnet in the Amazon VPC User Guide.
SSH access to your instances
To connect to an instance, you must authorize SSH traffic to the instance from your network. You must also specify a key pair when you launch the instance and specify the .pem file when you connect to the instance. For more information, see Locate the private key and set permissions.
Shared subnets
When launching EC2 instances into shared VPC subnets, note the following:
Participants can run instances in a shared VPC subnet by passing in the shared subnet ID. If participants want to pass in a security group ID or network interface ID when they run an instance, the participant must own the security group or network interface.
Participants can start, stop, terminate, and describe instances that they've created in a shared VPC subnet. Participants cannot start, stop, terminate, or describe instances created by the VPC owner in a shared VPC subnet.
VPC owners cannot start, stop, terminate, or describe instances created by participants in a shared VPC subnet.
IPv6-only subnets
An EC2 instance launched in an IPv6-only subnet receives an IPv6 address but not an IPv4 address. Any instances that you launch into an IPv6-only subnet must be instances built on the AWS Nitro System.


Top comments (0)