
What is Virtualization?
Virtualization is technology that you can use to create virtual representations of servers, storage, networks, and other physical machines. Virtual software mimics the functions of physical hardware to run multiple virtual machines simultaneously on a single physical machine. Businesses use virtualization to use their hardware resources efficiently and get greater returns from their investment. It also powers cloud computing services that help organizations manage infrastructure more efficiently.
Virtual machines and hypervisors are two important concepts in virtualization.
Virtual machine
A virtual machine is a software-defined computer that runs on a physical computer with a separate operating system and computing resources. The physical computer is called the host machine and virtual machines are guest machines. Multiple virtual machines can run on a single physical machine. Virtual machines are abstracted from the computer hardware by a hypervisor.
Hypervisor
The hypervisor is a software component that manages multiple virtual machines in a computer. It ensures that each virtual machine gets the allocated resources and does not interfere with the operation of other virtual machines. There are two types of hypervisors.
Type 1 Hypervisor:
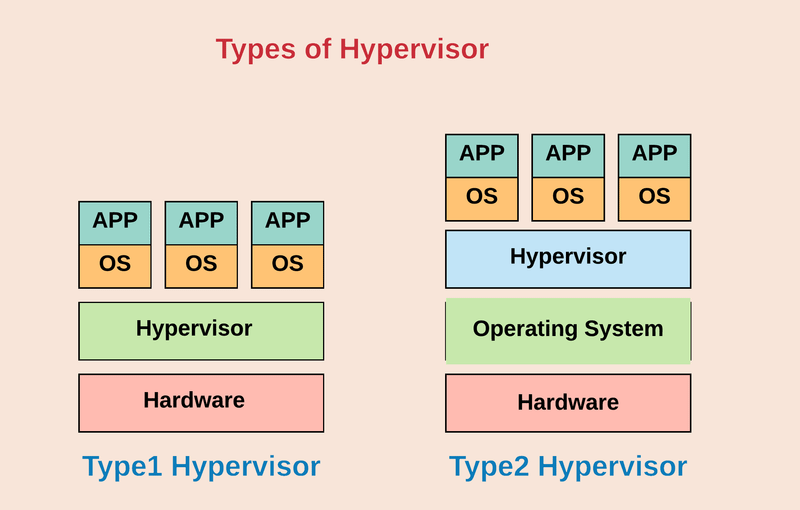
A Type 1 hypervisor, also known as a bare-metal hypervisor, runs directly on the host's hardware to control the hardware and manage guest operating systems. It does not rely on a host operating system and provides high performance and efficiency.
Example: VMware vSphere/ESXi
-
Characteristics:
- Installed directly on the physical hardware.
- Manages virtual machines independently of any underlying operating system.
- Provides high performance and minimal overhead.
- Suitable for enterprise-level virtualization and cloud computing environments.
- Offers advanced features such as live migration, resource pooling, and high availability.
Type 2 Hypervisor:
A Type 2 hypervisor, also known as a hosted hypervisor, runs on top of a host operating system and allows multiple guest operating systems to run as applications within the host operating system.
Example: Oracle VirtualBox
-
Characteristics:
- Installed as a software application within a host operating system.
- Relies on the host operating system for resource management.
- Provides flexibility and ease of use for desktop virtualization and development environments.
- Suitable for testing, development, and desktop virtualization scenarios.
- Offers features such as snapshotting, shared folders, and virtual networking.
Comparison:
Performance: Type 1 hypervisors typically offer better performance and efficiency compared to Type 2 hypervisors because they operate directly on the hardware without the overhead of a host operating system.
Resource Utilization: Type 1 hypervisors are more efficient in resource utilization as they have direct access to hardware resources. Type 2 hypervisors may suffer from performance overhead due to running on top of a host operating system.
Deployment: Type 1 hypervisors are commonly used in data centers and enterprise environments for server virtualization, whereas Type 2 hypervisors are often used for desktop virtualization and development environments due to their ease of use and flexibility.
Management: Type 1 hypervisors require more expertise for management and administration compared to Type 2 hypervisors, which typically have user-friendly interfaces and management tools.
Both Type 1 and Type 2 hypervisors have their use cases and advantages, and the choice between them depends on factors such as performance requirements, deployment scenarios, and management preferences.
Also known as a hosted hypervisor, the type 2 hypervisor is installed on an operating system. Type 2 hypervisors are suitable for end-user computing.
What are the benefits of virtualization?
Virtualization provides several benefits to any organization:
Efficient resource use
Virtualization improves hardware resources used in your data center. For example, instead of running one server on one computer system, you can create a virtual server pool on the same computer system by using and returning servers to the pool as required. Having fewer underlying physical servers frees up space in your data center and saves money on electricity, generators, and cooling appliances.
Automated IT management
Now that physical computers are virtual, you can manage them by using software tools. Administrators create deployment and configuration programs to define virtual machine templates. You can duplicate your infrastructure repeatedly and consistently and avoid error-prone manual configurations.
Faster disaster recovery
When events such as natural disasters or cyberattacks negatively affect business operations, regaining access to IT infrastructure and replacing or fixing a physical server can take hours or even days. By contrast, the process takes minutes with virtualized environments. This prompt response significantly improves resiliency and facilitates business continuity so that operations can continue as scheduled.
What are the different types of virtualization?
You can use virtualization technology to get the functions of many different types of physical infrastructure and all the benefits of a virtualized environment. You can go beyond virtual machines to create a collection of virtual resources in your virtual environment.
Server virtualization
Server virtualization is a process that partitions a physical server into multiple virtual servers. It is an efficient and cost-effective way to use server resources and deploy IT services in an organization. Without server virtualization, physical servers use only a small amount of their processing capacities, which leave devices idle.
Storage virtualization
Storage virtualization combines the functions of physical storage devices such as network attached storage (NAS) and storage area network (SAN). You can pool the storage hardware in your data center, even if it is from different vendors or of different types. Storage virtualization uses all your physical data storage and creates a large unit of virtual storage that you can assign and control by using management software. IT administrators can streamline storage activities, such as archiving, backup, and recovery, because they can combine multiple network storage devices virtually into a single storage device.
Network virtualization
Any computer network has hardware elements such as switches, routers, and firewalls. An organization with offices in multiple geographic locations can have several different network technologies working together to create its enterprise network. Network virtualization is a process that combines all of these network resources to centralize administrative tasks. Administrators can adjust and control these elements virtually without touching the physical components, which greatly simplifies network management.
The following are two approaches to network virtualization.
Software-defined networking
Software-defined networking (SDN) controls traffic routing by taking over routing management from data routing in the physical environment. For example, you can program your system to prioritize your video call traffic over application traffic to ensure consistent call quality in all online meetings.
Network function virtualization
Network function virtualization technology combines the functions of network appliances, such as firewalls, load balancers, and traffic analyzers that work together, to improve network performance.
Data virtualization
Modern organizations collect data from several sources and store it in different formats. They might also store data in different places, such as in a cloud infrastructure and an on-premises data center. Data virtualization creates a software layer between this data and the applications that need it. Data virtualization tools process an application’s data request and return results in a suitable format. Thus, organizations use data virtualization solutions to increase flexibility for data integration and support cross-functional data analysis.
Application virtualization
Application virtualization pulls out the functions of applications to run on operating systems other than the operating systems for which they were designed. For example, users can run a Microsoft Windows application on a Linux machine without changing the machine configuration. To achieve application virtualization, follow these practices:
- Application streaming – Users stream the application from a remote server, so it runs only on the end user's device when needed.
- Server-based application virtualization – Users can access the remote application from their browser or client interface without installing it.
- Local application virtualization – The application code is shipped with its own environment to run on all operating systems without changes.
Desktop virtualization
Most organizations have nontechnical staff that use desktop operating systems to run common business applications. For instance, you might have the following staff:
- A customer service team that requires a desktop computer with Windows 10 and customer-relationship management software
- A marketing team that requires Windows Vista for sales applications
You can use desktop virtualization to run these different desktop operating systems on virtual machines, which your teams can access remotely. This type of virtualization makes desktop management efficient and secure, saving money on desktop hardware. The following are types of desktop virtualization.
Virtual desktop infrastructure
Virtual desktop infrastructure runs virtual desktops on a remote server. Your users can access them by using client devices.
Local desktop virtualization
In local desktop virtualization, you run the hypervisor on a local computer and create a virtual computer with a different operating system. You can switch between your local and virtual environment in the same way you can switch between applications.
How is virtualization different from cloud computing?
Cloud computing is the on-demand delivery of computing resources over the internet with pay-as-you-go pricing. Instead of buying, owning, and maintaining a physical data center, you can access technology services, such as computing power, storage, and databases, as you need them from a cloud provider.
Virtualization technology makes cloud computing possible. Cloud providers set up and maintain their own data centers. They create different virtual environments that use the underlying hardware resources. You can then program your system to access these cloud resources by using APIs. Your infrastructure needs can be met as a fully managed service.
How is server virtualization different from containerization?
Containerization is a way to deploy application code to run on any physical or virtual environment without changes. Developers bundle application code with related libraries, configuration files, and other dependencies that the code needs to run. This single package of the software, called a container, can run independently on any platform. Containerization is a type of application virtualization.
You can think of server virtualization as building a road to connect two places. You have to recreate an entire virtual environment and then run your application on it. By comparison, containerization is like building a helicopter that can fly to either of those places. Your application is inside a container and can run on all types of physical or virtual environments.
Introduction to Vagrant
Vagrant is a tool for building and managing virtual machine environments in a single workflow. With an easy-to-use workflow and focus on automation, Vagrant lowers development environment setup time, increases production parity, and makes the "works on my machine" excuse a relic of the past.
Why Vagrant?
Vagrant provides easy to configure, reproducible, and portable work environments built on top of industry-standard technology and controlled by a single consistent workflow to help maximize the productivity and flexibility of you and your team.
To achieve its magic, Vagrant stands on the shoulders of giants. Machines are provisioned on top of VirtualBox, VMware, AWS, or any other provider. Then, industry-standard provisioning tools such as shell scripts, Chef, or Puppet can automatically install and configure software on the virtual machine.
For Developers
If you are a developer, Vagrant will isolate dependencies and their configuration within a single disposable, consistent environment, without sacrificing any of the tools you are used to working with (editors, browsers, debuggers, etc.). Once you or someone else creates a single Vagrantfile, you just need to vagrant up and everything is installed and configured for you to work. Other members of your team create their development environments from the same configuration, so whether you are working on Linux, Mac OS X, or Windows, all your team members are running code in the same environment, against the same dependencies, all configured the same way. Say goodbye to "works on my machine" bugs.
For Operators
If you are an operations engineer or DevOps engineer, Vagrant gives you a disposable environment and consistent workflow for developing and testing infrastructure management scripts. You can quickly test things like shell scripts, Chef cookbooks, Puppet modules, and more using local virtualization such as VirtualBox or VMware. Then, with the same configuration, you can test these scripts on remote clouds such as AWS or RackSpace with the same workflow. Ditch your custom scripts to recycle EC2 instances, stop juggling SSH prompts to various machines, and start using Vagrant to bring sanity to your life.
For Designers
If you are a designer, Vagrant will automatically set everything up that is required for that web app in order for you to focus on doing what you do best: design. Once a developer configures Vagrant, you do not need to worry about how to get that app running ever again. No more bothering other developers to help you fix your environment so you can test designs. Just check out the code, vagrant up, and start designing.
For Everyone
Vagrant is designed for everyone as the easiest and fastest way to create a virtualized environment!
Fundamentals
-
Boxes
The package format for Vagrant environments - create your own or use one from the public catalog.
-
Vagrantfile
Describe your virtual machine's configuration and how to provision it.
-
Provisioning
Provisioners allow you to automatically install software, alter configurations, and more.
-
The 'up' command
Create and configure your virtual machine with the single most important Vagrant CLI command.
-
Synced Folders
Sync files from your host machine to the guest machine.
-
Networking
Access your virtual machines through the high-level networking set up by Vagrant.
Vagrant Cloud
Vagrant Cloud serves a public, searchable index of Vagrant boxes.
-
Catalog
Use the public catalog to find boxes that contain the technologies you need for your Vagrant environment.
-
Creation
Create your boxes with Packer, the Vagrant Cloud web interface, or the API.
-
Lifecycle
Version and track the lifecycle of your boxes to make updates and fixes more efficiently.
Typing vagrant from the command line will display a list of all available commands.
Be sure that you are in the same directory as the Vagrantfile when running these commands!
Creating a VM
-
vagrant init-- Initialize Vagrant with a Vagrantfile and ./.vagrant directory, using no specified base image. Before you can do vagrant up, you'll need to specify a base image in the Vagrantfile. -
vagrant init <boxpath>-- Initialize Vagrant with a specific box. To find a box, go to the public Vagrant box catalog. When you find one you like, just replace it's name with boxpath. For example,vagrant init ubuntu/trusty64.
Starting a VM
-
vagrant up-- starts vagrant environment (also provisions only on the FIRST vagrant up) -
vagrant resume-- resume a suspended machine (vagrant up works just fine for this as well) -
vagrant provision-- forces reprovisioning of the vagrant machine -
vagrant reload-- restarts vagrant machine, loads new Vagrantfile configuration -
vagrant reload --provision-- restart the virtual machine and force provisioning
Getting into a VM
-
vagrant ssh-- connects to machine via SSH -
vagrant ssh <boxname>-- If you give your box a name in your Vagrantfile, you can ssh into it with boxname. Works from any directory.
Stopping a VM
-
vagrant halt-- stops the vagrant machine -
vagrant suspend-- suspends a virtual machine (remembers state)
Cleaning Up a VM
-
vagrant destroy-- stops and deletes all traces of the vagrant machine -
vagrant destroy -f-- same as above, without confirmation
Boxes
-
vagrant box list-- see a list of all installed boxes on your computer -
vagrant box add <name> <url>-- download a box image to your computer -
vagrant box outdated-- check for updates vagrant box update -
vagrant box remove <name>-- deletes a box from the machine -
vagrant package-- packages a running virtualbox env in a reusable box
Saving Progress
-vagrant snapshot save [options] [vm-name] <name> -- vm-name is often default. Allows us to save so that we can rollback at a later time
Tips
-
vagrant -v-- get the vagrant version -
vagrant status-- outputs status of the vagrant machine -
vagrant global-status-- outputs status of all vagrant machines -
vagrant global-status --prune-- same as above, but prunes invalid entries -
vagrant provision --debug-- use the debug flag to increase the verbosity of the output -
vagrant push-- yes, vagrant can be configured to deploy code! -
vagrant up --provision | tee provision.log-- Runsvagrant up, forces provisioning and logs all output to a file
Plugins
-
vagrant-hostsupdater :
$ vagrant plugin install vagrant-hostsupdaterto update your/etc/hostsfile automatically each time you start/stop your vagrant box.
Notes
- If you are using VVV, you can enable xdebug by running
vagrant sshand thenxdebug_onfrom the virtual machine's CLI.
Project 1: Setting Up a Web Server with Vagrant
Objective: Set up a virtual machine using Vagrant and provision it with a basic web server.
1. Prerequisites:
- Install Vagrant and VirtualBox on your local machine.
2. Project Structure:
Create a new directory for your project. Inside the project directory, you'll have the following files:
-
Vagrantfile: Configuration file for Vagrant. -
index.html: Sample HTML file for the web server.
3. Create Vagrantfile:
Open your text editor and create a file named Vagrantfile in your project directory. Add the following code to it:
Vagrant.configure("2") do |config|
  config.vm.box = "ubuntu/bionic64"

  config.vm.network "forwarded_port", guest: 80, host: 8080

  config.vm.provision "shell", inline: <<-SHELL
    sudo apt-get update
    sudo apt-get install -y apache2
    sudo systemctl enable apache2
  SHELL
end
This Vagrantfile sets up a virtual machine using the ubuntu/bionic64 box, forwards port 80 of the guest machine to port 8080 on the host machine, and installs Apache web server using a shell provisioner.
4. Create index.html:
Create a file named index.html in your project directory and add some sample HTML content to it. For example:
<!DOCTYPE html>
<html lang="en">
<head>
  <meta charset="UTF-8">
  <meta name="viewport" content="width=device-width, initial-scale=1.0">
  <title>Sample Web Page</title>
</head>
<body>
  <h1>Hello, World!</h1>
  <p>This is a sample web page served by Apache on a Vagrant virtual machine.</p>
</body>
</html>
5. Start the Virtual Machine:
Open a terminal or command prompt, navigate to your project directory, and run the following command:
vagrant up
This command will create and provision the virtual machine according to the configuration specified in the Vagrantfile.
6. Access the Web Server:
Open a web browser and navigate to http://localhost:8080. You should see the sample web page served by Apache running on the virtual machine.
7. Stopping and Destroying the Virtual Machine:
To stop the virtual machine, run:
vagrant halt
To completely remove the virtual machine, run:
vagrant destroy
Conclusion:
This simple Vagrant project demonstrates how to set up a virtual machine, provision it with a basic web server, and access the served web page. You can further customize and extend this project based on your requirements and use cases.
Project 2: Setting Up a Flask Development Environment with Vagrant
Objective: Set up a virtual machine using Vagrant and provision it with Python, Flask, and a sample Flask application.
1. Prerequisites:
- Install Vagrant and VirtualBox on your local machine.
2. Project Structure:
Create a new directory for your project. Inside the project directory, you'll have the following files:
-
Vagrantfile: Configuration file for Vagrant. -
app.py: Sample Flask application. -
templates/: Directory for Flask templates. -
static/: Directory for static files (CSS, JS, etc.).
3. Create Vagrantfile:
Open your text editor and create a file named Vagrantfile in your project directory. Add the following code to it:
Vagrant.configure("2") do |config|
  config.vm.box = "ubuntu/bionic64"

  config.vm.network "forwarded_port", guest: 5000, host: 5000

  config.vm.provision "shell", inline: <<-SHELL
    sudo apt-get update
    sudo apt-get install -y python3 python3-pip
    sudo pip3 install flask
  SHELL

  config.vm.synced_folder ".", "/vagrant", type: "virtualbox"
end
This Vagrantfile sets up a virtual machine using the ubuntu/bionic64 box, forwards port 5000 of the guest machine to port 5000 on the host machine, installs Python 3 and Flask, and sets up a synced folder to share files between the host and guest machines.
4. Create Flask Application:
Create a file named app.py in your project directory and add the following code to it:
from flask import Flask

app = Flask(__name__)

@app.route('/')
def hello():
    return 'Hello, World! This is a Flask application.'

if __name__ == '__main__':
    app.run(host='0.0.0.0', port=5000)
5. Start the Virtual Machine:
Open a terminal or command prompt, navigate to your project directory, and run:
vagrant up
This command will create and provision the virtual machine according to the configuration specified in the Vagrantfile.
6. Access the Flask Application:
Open a web browser and navigate to http://localhost:5000. You should see the sample Flask application running on the virtual machine.
7. Stopping and Destroying the Virtual Machine:
To stop the virtual machine, run:
vagrant halt
To completely remove the virtual machine, run:
vagrant destroy
Conclusion:
This Vagrant project demonstrates how to set up a development environment for a Python web application using Flask. You can further customize and extend this project by adding more dependencies, integrating with databases, or incorporating additional Flask features.
Project 3 : Setting Up a Node.js Development Environment with Vagrant
Objective: Set up a virtual machine using Vagrant and provision it with Node.js, Express, and a sample Express application.
1. Prerequisites:
- Install Vagrant and VirtualBox on your local machine.
2. Project Structure:
Create a new directory for your project. Inside the project directory, you'll have the following files:
-
Vagrantfile: Configuration file for Vagrant. -
app.js: Sample Express application. -
public/: Directory for static files (CSS, JS, etc.). -
views/: Directory for Express views (templates).
3. Create Vagrantfile:
Open your text editor and create a file named Vagrantfile in your project directory. Add the following code to it:
Vagrant.configure("2") do |config|
  config.vm.box = "ubuntu/bionic64"

  config.vm.network "forwarded_port", guest: 3000, host: 3000

  config.vm.provision "shell", inline: <<-SHELL
    sudo apt-get update
    curl -sL https://deb.nodesource.com/setup_14.x | sudo -E bash -
    sudo apt-get install -y nodejs
  SHELL

  config.vm.synced_folder ".", "/vagrant", type: "virtualbox"
end
This Vagrantfile sets up a virtual machine using the ubuntu/bionic64 box, forwards port 3000 of the guest machine to port 3000 on the host machine, installs Node.js, and sets up a synced folder to share files between the host and guest machines.
4. Create Express Application:
Create a file named app.js in your project directory and add the following code to it:
const express = require('express');
const app = express();
const port = 3000;

app.get('/', (req, res) => {
  res.send('Hello, World! This is an Express application.');
});

app.listen(port, () => {
  console.log(`Server running at http://localhost:${port}`);
});
5. Start the Virtual Machine:
Open a terminal or command prompt, navigate to your project directory, and run:
vagrant up
This command will create and provision the virtual machine according to the configuration specified in the Vagrantfile.
6. Access the Express Application:
Open a web browser and navigate to http://localhost:3000. You should see the sample Express application running on the virtual machine.
7. Stopping and Destroying the Virtual Machine:
To stop the virtual machine, run:
vagrant halt
To completely remove the virtual machine, run:
vagrant destroy
Conclusion:
This Vagrant project demonstrates how to set up a development environment for a Node.js application using Express. You can further customize and extend this project by adding more dependencies, integrating with databases, or incorporating additional Express features.
Project 4: Setting Up a LAMP Development Environment with Vagrant
Objective: Set up a virtual machine using Vagrant and provision it with a LAMP stack for web development.
1. Prerequisites:
- Install Vagrant and VirtualBox on your local machine.
2. Project Structure:
Create a new directory for your project. Inside the project directory, you'll have the following files:
-
Vagrantfile: Configuration file for Vagrant.
3. Create Vagrantfile:
Open your text editor and create a file named Vagrantfile in your project directory. Add the following code to it:
Vagrant.configure("2") do |config|
  config.vm.box = "ubuntu/bionic64"

  config.vm.network "forwarded_port", guest: 80, host: 8080

  config.vm.provision "shell", inline: <<-SHELL
    sudo apt-get update
    sudo apt-get install -y apache2 php libapache2-mod-php mysql-server php-mysql
    sudo mysql_secure_installation <<EOF
y
PASSWORD
PASSWORD
y
y
y
y
EOF
    sudo service apache2 restart
  SHELL

  config.vm.synced_folder ".", "/vagrant", type: "virtualbox"
end
This Vagrantfile sets up a virtual machine using the ubuntu/bionic64 box, forwards port 80 of the guest machine to port 8080 on the host machine, installs Apache, PHP, MySQL, and the necessary PHP extensions, and sets up a synced folder to share files between the host and guest machines.
4. Start the Virtual Machine:
Open a terminal or command prompt, navigate to your project directory, and run:
vagrant up
This command will create and provision the virtual machine according to the configuration specified in the Vagrantfile.
5. Access the LAMP Stack:
Open a web browser and navigate to http://localhost:8080. You should see the Apache default page, indicating that Apache is running successfully.
To access MySQL, you can SSH into the virtual machine using:
vagrant ssh
And then you can access MySQL with:
mysql -u root -p
6. Stopping and Destroying the Virtual Machine:
To stop the virtual machine, run:
vagrant halt
To completely remove the virtual machine, run:
vagrant destroy
Conclusion:
This Vagrant project sets up a basic LAMP development environment, allowing you to develop and test PHP-based web applications locally. You can further customize and extend this project by adding additional software or configurations based on your requirements.
Project 5: Setting Up a Ruby on Rails Development Environment with Vagrant
Objective: Set up a virtual machine using Vagrant and provision it with a Ruby on Rails development environment.
1. Prerequisites:
- Install Vagrant and VirtualBox on your local machine.
2. Project Structure:
Create a new directory for your project. Inside the project directory, you'll have the following files:
-
Vagrantfile: Configuration file for Vagrant.
3. Create Vagrantfile:
Open your text editor and create a file named Vagrantfile in your project directory. Add the following code to it:
Vagrant.configure("2") do |config|
  config.vm.box = "ubuntu/bionic64"

  config.vm.network "forwarded_port", guest: 3000, host: 3000

  config.vm.provision "shell", inline: <<-SHELL
    sudo apt-get update
    sudo apt-get install -y curl gnupg2
    curl -sSL https://deb.nodesource.com/gpgkey/nodesource.gpg.key | sudo apt-key add -
    echo "deb https://deb.nodesource.com/node_14.x bionic main" | sudo tee /etc/apt/sources.list.d/nodesource.list
    sudo apt-get update
    sudo apt-get install -y nodejs
    sudo apt-get install -y git ruby-full build-essential libssl-dev libreadline-dev zlib1g-dev
    gem install rails
  SHELL

  config.vm.synced_folder ".", "/vagrant", type: "virtualbox"
end
This Vagrantfile sets up a virtual machine using the ubuntu/bionic64 box, forwards port 3000 of the guest machine to port 3000 on the host machine, installs necessary dependencies including Node.js, Git, Ruby, and Rails, and sets up a synced folder to share files between the host and guest machines.
4. Start the Virtual Machine:
Open a terminal or command prompt, navigate to your project directory, and run:
vagrant up
This command will create and provision the virtual machine according to the configuration specified in the Vagrantfile.
5. Access the Rails Environment:
Once the virtual machine is provisioned, SSH into it by running:
vagrant ssh
Navigate to the shared folder (/vagrant) and create a new Rails application:
cd /vagrant
rails new myapp
Change directory to your newly created Rails application:
cd myapp
Start the Rails server:
rails server -b 0.0.0.0
You can now access your Rails application by opening a web browser and navigating to http://localhost:3000.
6. Stopping and Destroying the Virtual Machine:
To stop the virtual machine, run:
vagrant halt
To completely remove the virtual machine, run:
vagrant destroy
Conclusion:
This Vagrant project sets up a development environment for Ruby on Rails applications, allowing you to quickly get started with Rails development on any machine. You can further customize and extend this project by adding additional dependencies or configurations based on your specific requirements.
Project 6: Setting Up a Multi-Node Environment with Vagrant
Objective: Set up two virtual machines using Vagrant, one for a web server and another for a database server, and configure them to communicate with each other.
1. Prerequisites:
- Install Vagrant and VirtualBox on your local machine.
2. Project Structure:
Create a new directory for your project. Inside the project directory, you'll have the following files:
-
Vagrantfile: Configuration file for Vagrant.
3. Create Vagrantfile:
Open your text editor and create a file named Vagrantfile in your project directory. Add the following code to it:
# -*- mode: ruby -*-
# vi: set ft=ruby :

Vagrant.configure("2") do |config|

  # Define web server configuration
  config.vm.define "web" do |web|
    web.vm.box = "ubuntu/bionic64"
    web.vm.hostname = "web-server"
    web.vm.network "private_network", ip: "192.168.50.10"
    web.vm.provision "shell", inline: <<-SHELL
      # Install Apache and PHP
      sudo apt-get update
      sudo apt-get install -y apache2 php libapache2-mod-php
      sudo systemctl enable apache2
      sudo systemctl start apache2

      # Enable mod_rewrite for Apache
      sudo a2enmod rewrite
      sudo systemctl restart apache2
    SHELL
  end

  # Define database server configuration
  config.vm.define "db" do |db|
    db.vm.box = "ubuntu/bionic64"
    db.vm.hostname = "db-server"
    db.vm.network "private_network", ip: "192.168.50.11"
    db.vm.provision "shell", inline: <<-SHELL
      # Install MySQL and set root password
      sudo debconf-set-selections <<< 'mysql-server mysql-server/root_password password root'
      sudo debconf-set-selections <<< 'mysql-server mysql-server/root_password_again password root'
      sudo apt-get update
      sudo apt-get install -y mysql-server
      sudo systemctl enable mysql
      sudo systemctl start mysql
    SHELL
  end

end
This Vagrantfile sets up two virtual machines: one for the web server (web) and another for the database server (db). It configures private network interfaces for each VM with specific IP addresses. The web server is provisioned with Apache and PHP, while the database server is provisioned with MySQL.
4. Start the Virtual Machines:
Open a terminal or command prompt, navigate to your project directory, and run:
vagrant up
This command will create and provision both virtual machines according to the configuration specified in the Vagrantfile.
5. Accessing the Servers:
- To access the web server, open a web browser and navigate to
http://192.168.50.10. - To access the database server, you can SSH into the virtual machine using:
vagrant ssh db
6. Stopping and Destroying the Virtual Machines:
To stop the virtual machines, run:
vagrant halt
To completely remove the virtual machines, run:
vagrant destroy
Conclusion:
This advanced Vagrant project demonstrates how to set up a multi-node environment with multiple virtual machines configured to communicate with each other. You can further customize and extend this project by adding additional nodes, configuring network settings, or provisioning additional software as needed for your development or testing environment.


Top comments (2)
Fantastic resource.... but it would be helpful if you could go into more detail on configuring virtual machine resources such as CPU and memory limits. How can these parameters be fine-tuned for better performance in resource-intensive environments?
Thanks...
Archibald Latrine
CCO e-reputation
Thank you for adding that vagrant part :), make the process real simple to automate.
Some comments may only be visible to logged-in visitors. Sign in to view all comments.