Terraform
Infrastructure as Code (IaC) tools allow you to manage infrastructure with configuration files rather than through a graphical user interface. IaC allows you to build, change, and manage your infrastructure in a safe, consistent, and repeatable way by defining resource configurations that you can version, reuse, and share.
Terraform is HashiCorp's infrastructure as code tool. It lets you define resources and infrastructure in human-readable, declarative configuration files, and manages your infrastructure's lifecycle. Using Terraform has several advantages over manually managing your infrastructure:
- Terraform can manage infrastructure on multiple cloud platforms.
- The human-readable configuration language helps you write infrastructure code quickly.
- Terraform's state allows you to track resource changes throughout your deployments.
- You can commit your configurations to version control to safely collaborate on infrastructure.
Manage any infrastructure
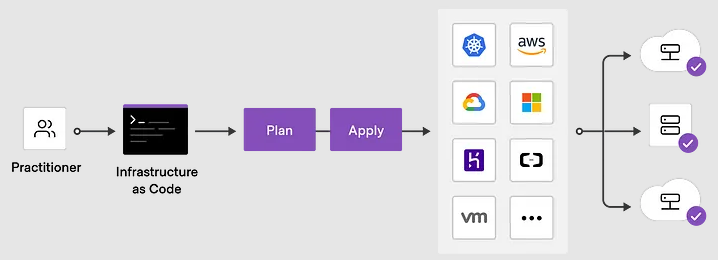
Terraform plugins called providers let Terraform interact with cloud platforms and other services via their application programming interfaces (APIs). HashiCorp and the Terraform community have written over 1,000 providers to manage resources on Amazon Web Services (AWS), Azure, Google Cloud Platform (GCP), Kubernetes, Helm, GitHub, Splunk, and DataDog, just to name a few. Find providers for many of the platforms and services you already use in the Terraform Registry. If you don't find the provider you're looking for, you can write your own.
Standardize your deployment workflow
Providers define individual units of infrastructure, for example compute instances or private networks, as resources. You can compose resources from different providers into reusable Terraform configurations called modules, and manage them with a consistent language and workflow.
Terraform's configuration language is declarative, meaning that it describes the desired end-state for your infrastructure, in contrast to procedural programming languages that require step-by-step instructions to perform tasks. Terraform providers automatically calculate dependencies between resources to create or destroy them in the correct order.
To deploy infrastructure with Terraform:
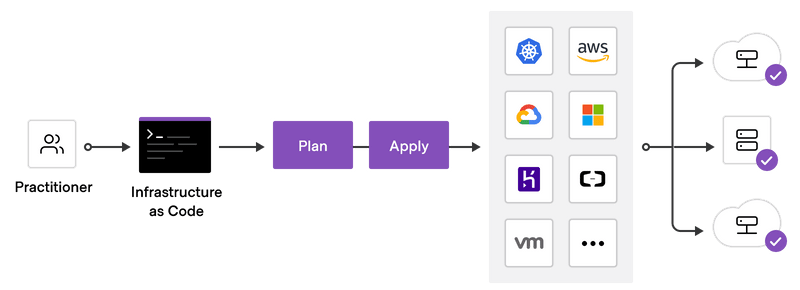
- Scope - Identify the infrastructure for your project.
- Author - Write the configuration for your infrastructure.
- Initialize - Install the plugins Terraform needs to manage the infrastructure.
- Plan - Preview the changes Terraform will make to match your configuration.
- Apply - Make the planned changes.
Track your infrastructure
Terraform keeps track of your real infrastructure in a state file, which acts as a source of truth for your environment. Terraform uses the state file to determine the changes to make to your infrastructure so that it will match your configuration.
Collaborate
Terraform allows you to collaborate on your infrastructure with its remote state backends. When you use Terraform Cloud (free for up to five users), you can securely share your state with your teammates, provide a stable environment for Terraform to run in, and prevent race conditions when multiple people make configuration changes at once.
You can also connect Terraform Cloud to version control systems (VCSs) like GitHub, GitLab, and others, allowing it to automatically propose infrastructure changes when you commit configuration changes to VCS. This lets you manage changes to your infrastructure through version control, as you would with application code.
Install Terraform
Install yum-config-manager to manage your repositories.
$ sudo yum install -y yum-utils
Use yum-config-manager to add the official HashiCorp Linux repository.
$ sudo yum-config-manager --add-repo https://rpm.releases.hashicorp.com/RHEL/hashicorp.repo
Install Terraform from the new repository.
$ sudo yum -y install terraform
Verify the installation
Verify that the installation worked by opening a new terminal session and listing Terraform's available subcommands.
$ terraform -help
Usage: terraform [-version] [-help] <command> [args]

The available commands for execution are listed below.
The most common, useful commands are shown first, followed by
less common or more advanced commands. If you're just getting
started with Terraform, stick with the common commands. For the
other commands, please read the help and docs before usage.
##...
Add any subcommand to terraform -help to learn more about what it does and available options.
$ terraform -help plan
Troubleshoot
If you get an error that terraform could not be found, your PATH environment variable was not set up properly. Please go back and ensure that your PATH variable contains the directory where Terraform was installed.
Quick start tutorial
Now that you've installed Terraform, you can provision an NGINX server in less than a minute using Docker on Mac, Windows, or Linux. You can also follow the rest of this tutorial in your web browser.
Click on the tab(s) below relevant to your operating system.
Create a directory named learn-terraform-docker-container.
$ mkdir learn-terraform-docker-container
This working directory houses the configuration files that you write to describe the infrastructure you want Terraform to create and manage. When you initialize and apply the configuration here, Terraform uses this directory to store required plugins, modules (pre-written configurations), and information about the real infrastructure it created.
Navigate into the working directory.
$ cd learn-terraform-docker-container
In the working directory, create a file called main.tf and paste the following Terraform configuration into it.
Mac or LinuxWindows
terraform {
  required_providers {
    docker = {
      source  = "kreuzwerker/docker"
      version = "~> 3.0.1"
    }
  }
}

provider "docker" {
  host    = "npipe:////.//pipe//docker_engine"
}

resource "docker_image" "nginx" {
  name         = "nginx"
  keep_locally = false
}

resource "docker_container" "nginx" {
  image = docker_image.nginx.image_id
  name  = "tutorial"

  ports {
    internal = 80
    external = 8000
  }
}
Initialize the project, which downloads a plugin called a provider that lets Terraform interact with Docker.
$ terraform init
Provision the NGINX server container with apply. When Terraform asks you to confirm type yes and press ENTER.
$ terraform apply
Verify the existence of the NGINX container by visiting localhost:8000 in your web browser or running docker ps to see the container.

$ docker ps
CONTAINER ID        IMAGE                     COMMAND                  CREATED             STATUS              PORTS                    NAMES
425d5ee58619        e791337790a6              "nginx -g 'daemon of…"   20 seconds ago      Up 19 seconds       0.0.0.0:8000->80/tcp     tutorial
To stop the container, run terraform destroy.
$ terraform destroy
You've now provisioned and destroyed an NGINX webserver with Terraform.
Build infrastructure
With Terraform installed, you are ready to create your first infrastructure.
In this tutorial, you will provision an EC2 instance on Amazon Web Services (AWS). EC2 instances are virtual machines running on AWS, and a common component of many infrastructure projects.
Prerequisites
To follow this tutorial you will need:
- The Terraform CLI (1.2.0+) installed.
- The AWS CLI installed.
- AWS account and associated credentials that allow you to create resources.
To use your IAM credentials to authenticate the Terraform AWS provider, set the AWS_ACCESS_KEY_ID environment variable.
$ export AWS_ACCESS_KEY_ID=
Copy
Now, set your secret key.
$ export AWS_SECRET_ACCESS_KEY=
Copy
Tip
If you don't have access to IAM user credentials, use another authentication method described in the AWS provider documentation.
This tutorial will provision resources that qualify under the AWS free tier. If your account does not qualify for free tier resources, we are not responsible for any charges that you may incur.
Write configuration
The set of files used to describe infrastructure in Terraform is known as a Terraform configuration. You will write your first configuration to define a single AWS EC2 instance.
Each Terraform configuration must be in its own working directory. Create a directory for your configuration.
$ mkdir learn-terraform-aws-instance
Change into the directory.
$ cd learn-terraform-aws-instance
Create a file to define your infrastructure.
$ touch main.tf
Open main.tf in your text editor, paste in the configuration below, and save the file.
Tip
The AMI ID used in this configuration is specific to the us-west-2 region. If you would like to use a different region, see the Troubleshooting section for guidance.
terraform {
  required_providers {
    aws = {
      source  = "hashicorp/aws"
      version = "~> 4.16"
    }
  }

  required_version = ">= 1.2.0"
}

provider "aws" {
  region  = "us-west-2"
}

resource "aws_instance" "app_server" {
  ami           = "ami-830c94e3"
  instance_type = "t2.micro"

  tags = {
    Name = "ExampleAppServerInstance"
  }
}
This is a complete configuration that you can deploy with Terraform. The following sections review each block of this configuration in more detail.
Terraform Block
The terraform {} block contains Terraform settings, including the required providers Terraform will use to provision your infrastructure. For each provider, the source attribute defines an optional hostname, a namespace, and the provider type. Terraform installs providers from the Terraform Registry by default. In this example configuration, the aws provider's source is defined as hashicorp/aws, which is shorthand for registry.terraform.io/hashicorp/aws.
You can also set a version constraint for each provider defined in the required_providers block. The version attribute is optional, but we recommend using it to constrain the provider version so that Terraform does not install a version of the provider that does not work with your configuration. If you do not specify a provider version, Terraform will automatically download the most recent version during initialization.
To learn more, reference the provider source documentation.
Providers
The provider block configures the specified provider, in this case aws. A provider is a plugin that Terraform uses to create and manage your resources.
You can use multiple provider blocks in your Terraform configuration to manage resources from different providers. You can even use different providers together. For example, you could pass the IP address of your AWS EC2 instance to a monitoring resource from DataDog.
Resources
Use resource blocks to define components of your infrastructure. A resource might be a physical or virtual component such as an EC2 instance, or it can be a logical resource such as a Heroku application.
Resource blocks have two strings before the block: the resource type and the resource name. In this example, the resource type is aws_instance and the name is app_server. The prefix of the type maps to the name of the provider. In the example configuration, Terraform manages the aws_instance resource with the aws provider. Together, the resource type and resource name form a unique ID for the resource. For example, the ID for your EC2 instance is aws_instance.app_server.
Resource blocks contain arguments which you use to configure the resource. Arguments can include things like machine sizes, disk image names, or VPC IDs. Our providers reference lists the required and optional arguments for each resource. For your EC2 instance, the example configuration sets the AMI ID to an Ubuntu image, and the instance type to t2.micro, which qualifies for AWS' free tier. It also sets a tag to give the instance a name.
Initialize the directory
When you create a new configuration — or check out an existing configuration from version control — you need to initialize the directory with terraform init.
Initializing a configuration directory downloads and installs the providers defined in the configuration, which in this case is the aws provider.
Initialize the directory.
$ terraform init

Initializing the backend...

Initializing provider plugins...
- Finding hashicorp/aws versions matching "~> 4.16"...
- Installing hashicorp/aws v4.17.0...
- Installed hashicorp/aws v4.17.0 (signed by HashiCorp)

Terraform has created a lock file .terraform.lock.hcl to record the provider
selections it made above. Include this file in your version control repository
so that Terraform can guarantee to make the same selections by default when
you run "terraform init" in the future.

Terraform has been successfully initialized!

You may now begin working with Terraform. Try running "terraform plan" to see
any changes that are required for your infrastructure. All Terraform commands
should now work.

If you ever set or change modules or backend configuration for Terraform,
rerun this command to reinitialize your working directory. If you forget, other
commands will detect it and remind you to do so if necessary.
Terraform downloads the aws provider and installs it in a hidden subdirectory of your current working directory, named .terraform. The terraform init command prints out which version of the provider was installed. Terraform also creates a lock file named .terraform.lock.hcl which specifies the exact provider versions used, so that you can control when you want to update the providers used for your project.
Format and validate the configuration
We recommend using consistent formatting in all of your configuration files. The terraform fmt command automatically updates configurations in the current directory for readability and consistency.
Format your configuration. Terraform will print out the names of the files it modified, if any. In this case, your configuration file was already formatted correctly, so Terraform won't return any file names.
$ terraform fmt
You can also make sure your configuration is syntactically valid and internally consistent by using the terraform validate command.
Validate your configuration. The example configuration provided above is valid, so Terraform will return a success message.
$ terraform validate
Success! The configuration is valid.
Create infrastructure
Apply the configuration now with the terraform apply command. Terraform will print output similar to what is shown below. We have truncated some of the output to save space.
$ terraform apply

Terraform used the selected providers to generate the following execution plan.
Resource actions are indicated with the following symbols:
  + create

Terraform will perform the following actions:

  # aws_instance.app_server will be created
  + resource "aws_instance" "app_server" {
      + ami                          = "ami-830c94e3"
      + arn                          = (known after apply)
##...

Plan: 1 to add, 0 to change, 0 to destroy.

Do you want to perform these actions?
  Terraform will perform the actions described above.
  Only 'yes' will be accepted to approve.

  Enter a value:
Tip
If your configuration fails to apply, you may have customized your region or removed your default VPC. Refer to the troubleshooting section of this tutorial for help.
Before it applies any changes, Terraform prints out the execution plan which describes the actions Terraform will take in order to change your infrastructure to match the configuration.
The output format is similar to the diff format generated by tools such as Git. The output has a + next to aws_instance.app_server, meaning that Terraform will create this resource. Beneath that, it shows the attributes that will be set. When the value displayed is (known after apply), it means that the value will not be known until the resource is created. For example, AWS assigns Amazon Resource Names (ARNs) to instances upon creation, so Terraform cannot know the value of the arn attribute until you apply the change and the AWS provider returns that value from the AWS API.
Terraform will now pause and wait for your approval before proceeding. If anything in the plan seems incorrect or dangerous, it is safe to abort here before Terraform modifies your infrastructure.
In this case the plan is acceptable, so type yes at the confirmation prompt to proceed. Executing the plan will take a few minutes since Terraform waits for the EC2 instance to become available.
  Enter a value: yes

aws_instance.app_server: Creating...
aws_instance.app_server: Still creating... [10s elapsed]
aws_instance.app_server: Still creating... [20s elapsed]
aws_instance.app_server: Still creating... [30s elapsed]
aws_instance.app_server: Creation complete after 36s [id=i-01e03375ba238b384]

Apply complete! Resources: 1 added, 0 changed, 0 destroyed.
You have now created infrastructure using Terraform! Visit the EC2 console and find your new EC2 instance.
Note
Per the aws provider block, your instance was created in the us-west-2 region. Ensure that your AWS Console is set to this region.
Inspect state
When you applied your configuration, Terraform wrote data into a file called terraform.tfstate. Terraform stores the IDs and properties of the resources it manages in this file, so that it can update or destroy those resources going forward.
The Terraform state file is the only way Terraform can track which resources it manages, and often contains sensitive information, so you must store your state file securely and restrict access to only trusted team members who need to manage your infrastructure. In production, we recommend storing your state remotely with Terraform Cloud or Terraform Enterprise. Terraform also supports several other remote backends you can use to store and manage your state.
Inspect the current state using terraform show.
$ terraform show
# aws_instance.app_server:
resource "aws_instance" "app_server" {
    ami                          = "ami-830c94e3"
    arn                          = "arn:aws:ec2:us-west-2:561656980159:instance/i-01e03375ba238b384"
    associate_public_ip_address  = true
    availability_zone            = "us-west-2c"
    cpu_core_count               = 1
    cpu_threads_per_core         = 1
    disable_api_termination      = false
    ebs_optimized                = false
    get_password_data            = false
    hibernation                  = false
    id                           = "i-01e03375ba238b384"
    instance_state               = "running"
    instance_type                = "t2.micro"
    ipv6_address_count           = 0
    ipv6_addresses               = []
    monitoring                   = false
    primary_network_interface_id = "eni-068d850de6a4321b7"
    private_dns                  = "ip-172-31-0-139.us-west-2.compute.internal"
    private_ip                   = "172.31.0.139"
    public_dns                   = "ec2-18-237-201-188.us-west-2.compute.amazonaws.com"
    public_ip                    = "18.237.201.188"
    secondary_private_ips        = []
    security_groups              = [
        "default",
    ]
    source_dest_check            = true
    subnet_id                    = "subnet-31855d6c"
    tags                         = {
        "Name" = "ExampleAppServerInstance"
    }
    tenancy                      = "default"
    vpc_security_group_ids       = [
        "sg-0edc8a5a",
    ]

    credit_specification {
        cpu_credits = "standard"
    }

    enclave_options {
        enabled = false
    }

    metadata_options {
        http_endpoint               = "enabled"
        http_put_response_hop_limit = 1
        http_tokens                 = "optional"
    }

    root_block_device {
        delete_on_termination = true
        device_name           = "/dev/sda1"
        encrypted             = false
        iops                  = 0
        tags                  = {}
        throughput            = 0
        volume_id             = "vol-031d56cc45ea4a245"
        volume_size           = 8
        volume_type           = "standard"
    }
}
When Terraform created this EC2 instance, it also gathered the resource's metadata from the AWS provider and wrote the metadata to the state file. In later tutorials, you will modify your configuration to reference these values to configure other resources and output values.
Manually Managing State
Terraform has a built-in command called terraform state for advanced state management. Use the list subcommand to list of the resources in your project's state.
$ terraform state list
aws_instance.app_server
Troubleshooting
If terraform validate was successful and your apply still failed, you may be encountering one of these common errors.
If you use a region other than
us-west-2, you will also need to change yourami, since AMI IDs are region-specific. Choose an AMI ID specific to your region by following these instructions, and modifymain.tfwith this ID. Then re-runterraform apply.-
If you do not have a default VPC in your AWS account in the correct region, navigate to the AWS VPC Dashboard in the web UI, create a new VPC in your region, and associate a subnet and security group to that VPC. Then add the security group ID (
vpc_security_group_ids) and subnet ID (subnet_id) arguments to youraws_instanceresource, and replace the values with the ones from your new security group and subnet.
 resource "aws_instance" "app_server" {
   ami                    = "ami-830c94e3"
   instance_type          = "t2.micro"
+  vpc_security_group_ids = ["sg-0077..."]
+  subnet_id              = "subnet-923a..."
 }
Save the changes to
main.tf, and re-runterraform apply.Remember to add these lines to your configuration for later tutorials.
Change infrastructure
Infrastructure is continuously evolving, and Terraform helps you manage that change. As you change Terraform configurations, Terraform builds an execution plan that only modifies what is necessary to reach your desired state.
When using Terraform in production, we recommend that you use a version control system to manage your configuration files, and store your state in a remote backend such as Terraform Cloud or Terraform Enterprise.
Prerequisites
This tutorial assumes that you are continuing from the previous tutorials. If not, follow the steps below before continuing.
Install the Terraform CLI (1.2.0+), and the AWS CLI (configured with a default profile), as described in the last tutorial.
-
Create a directory named
learn-terraform-aws-instanceand paste the following configuration into a file namedmain.tf.
terraform { required_providers { aws = { source = "hashicorp/aws" version = "~> 4.16" } } required_version = ">= 1.2.0" } provider "aws" { region = "us-west-2" } resource "aws_instance" "app_server" { ami = "ami-830c94e3" instance_type = "t2.micro" tags = { Name = "ExampleAppServerInstance" } } -
Initialize the configuration.
$ terraform init -
Apply the configuration. Respond to the confirmation prompt with a
yes.
$ terraform apply
Once you have successfully applied the configuration, you can continue with the rest of this tutorial.
Configuration
Now update the ami of your instance. Change the aws_instance.app_server resource under the provider block in main.tf by replacing the current AMI ID with a new one.
Tip
The below snippet is formatted as a diff to give you context about which parts of your configuration you need to change. Replace the content displayed in red with the content displayed in green, leaving out the leading + and - signs.
Note
The new AMI ID used in this configuration is specific to the us-west-2 region. If you are working in a different region, be sure to select an appropriate AMI for that region by following these instructions.
 resource "aws_instance" "app_server" {
-  ami           = "ami-830c94e3"
+  ami           = "ami-08d70e59c07c61a3a"
   instance_type = "t2.micro"
 }
This update changes the AMI to an Ubuntu 16.04 AMI. The AWS provider knows that it cannot change the AMI of an instance after it has been created, so Terraform will destroy the old instance and create a new one.
Apply Changes
After changing the configuration, run terraform apply again to see how Terraform will apply this change to the existing resources.
$ terraform apply
aws_instance.app_server: Refreshing state... [id=i-01e03375ba238b384]

Terraform used the selected providers to generate the following execution plan.
Resource actions are indicated with the following symbols:
-/+ destroy and then create replacement

Terraform will perform the following actions:

  # aws_instance.app_server must be replaced
-/+ resource "aws_instance" "app_server" {
      ~ ami                          = "ami-830c94e3" -> "ami-08d70e59c07c61a3a" # forces replacement
      ~ arn                          = "arn:aws:ec2:us-west-2:561656980159:instance/i-01e03375ba238b384" -> (known after apply)
##...

Plan: 1 to add, 0 to change, 1 to destroy.

Do you want to perform these actions?
  Terraform will perform the actions described above.
  Only 'yes' will be accepted to approve.

  Enter a value:
The prefix -/+ means that Terraform will destroy and recreate the resource, rather than updating it in-place. Terraform can update some attributes in-place (indicated with the ~ prefix), but changing the AMI for an EC2 instance requires recreating it. Terraform handles these details for you, and the execution plan displays what Terraform will do.
Additionally, the execution plan shows that the AMI change is what forces Terraform to replace the instance. Using this information, you can adjust your changes to avoid destructive updates if necessary.
Once again, Terraform prompts for approval of the execution plan before proceeding. Answer yes to execute the planned steps.
  Enter a value: yes

aws_instance.app_server: Destroying... [id=i-01e03375ba238b384]
aws_instance.app_server: Still destroying... [id=i-01e03375ba238b384, 10s elapsed]
aws_instance.app_server: Still destroying... [id=i-01e03375ba238b384, 20s elapsed]
aws_instance.app_server: Still destroying... [id=i-01e03375ba238b384, 30s elapsed]
aws_instance.app_server: Still destroying... [id=i-01e03375ba238b384, 40s elapsed]
aws_instance.app_server: Destruction complete after 42s
aws_instance.app_server: Creating...
aws_instance.app_server: Still creating... [10s elapsed]
aws_instance.app_server: Still creating... [20s elapsed]
aws_instance.app_server: Still creating... [30s elapsed]
aws_instance.app_server: Still creating... [40s elapsed]
aws_instance.app_server: Creation complete after 50s [id=i-0fd4a35969bd21710]

Apply complete! Resources: 1 added, 0 changed, 1 destroyed.
As indicated by the execution plan, Terraform first destroyed the existing instance and then created a new one in its place. You can use terraform show again to have Terraform print out the new values associated with this instance.
Destroy infrastructure
Once you no longer need infrastructure, you may want to destroy it to reduce your security exposure and costs. For example, you may remove a production environment from service, or manage short-lived environments like build or testing systems. In addition to building and modifying infrastructure, Terraform can destroy or recreate the infrastructure it manages.
Destroy
The terraform destroy command terminates resources managed by your Terraform project. This command is the inverse of terraform apply in that it terminates all the resources specified in your Terraform state. It does not destroy resources running elsewhere that are not managed by the current Terraform project.
Destroy the resources you created.
$ terraform destroy
Terraform used the selected providers to generate the following execution plan.
Resource actions are indicated with the following symbols:
  - destroy

Terraform will perform the following actions:

  # aws_instance.app_server will be destroyed
  - resource "aws_instance" "app_server" {
      - ami                          = "ami-08d70e59c07c61a3a" -> null
      - arn                          = "arn:aws:ec2:us-west-2:561656980159:instance/i-0fd4a35969bd21710" -> null
##...

Plan: 0 to add, 0 to change, 1 to destroy.

Do you really want to destroy all resources?
  Terraform will destroy all your managed infrastructure, as shown above.
  There is no undo. Only 'yes' will be accepted to confirm.

  Enter a value:
The - prefix indicates that the instance will be destroyed. As with apply, Terraform shows its execution plan and waits for approval before making any changes.
Answer yes to execute this plan and destroy the infrastructure.
  Enter a value: yes

aws_instance.app_server: Destroying... [id=i-0fd4a35969bd21710]
aws_instance.app_server: Still destroying... [id=i-0fd4a35969bd21710, 10s elapsed]
aws_instance.app_server: Still destroying... [id=i-0fd4a35969bd21710, 20s elapsed]
aws_instance.app_server: Still destroying... [id=i-0fd4a35969bd21710, 30s elapsed]
aws_instance.app_server: Destruction complete after 31s

Destroy complete! Resources: 1 destroyed.
Just like with apply, Terraform determines the order to destroy your resources. In this case, Terraform identified a single instance with no other dependencies, so it destroyed the instance. In more complicated cases with multiple resources, Terraform will destroy them in a suitable order to respect dependencies.
now have enough Terraform knowledge to create useful configurations, but the examples so far have used hard-coded values. Terraform configurations can include variables to make your configuration more dynamic and flexible.
Prerequisites
After following the earlier tutorials, you will have a directory named learn-terraform-aws-instance with the following configuration in a file called main.tf.
terraform {
  required_providers {
    aws = {
      source  = "hashicorp/aws"
      version = "~> 4.16"
    }
  }

  required_version = ">= 1.2.0"
}

provider "aws" {
  region  = "us-west-2"
}

resource "aws_instance" "app_server" {
  ami           = "ami-08d70e59c07c61a3a"
  instance_type = "t2.micro"

  tags = {
    Name = "ExampleAppServerInstance"
  }
}
Ensure that your configuration matches this, and that you have run terraform init in the learn-terraform-aws-instance directory.
Set the instance name with a variable
The current configuration includes a number of hard-coded values. Terraform variables allow you to write configuration that is flexible and easier to re-use.
Add a variable to define the instance name.
Create a new file called variables.tf with a block defining a new instance_name variable.
variable "instance_name" {
  description = "Value of the Name tag for the EC2 instance"
  type        = string
  default     = "ExampleAppServerInstance"
}
Note
Terraform loads all files in the current directory ending in .tf, so you can name your configuration files however you choose.
In main.tf, update the aws_instance resource block to use the new variable. The instance_name variable block will default to its default value ("ExampleAppServerInstance") unless you declare a different value.
 resource "aws_instance" "app_server" {
   ami           = "ami-08d70e59c07c61a3a"
   instance_type = "t2.micro"

   tags = {
-    Name = "ExampleAppServerInstance"
+    Name = var.instance_name
   }
 }
Apply your configuration
Apply the configuration. Respond to the confirmation prompt with a yes.
$ terraform apply

Terraform used the selected providers to generate the following execution plan.
Resource actions are indicated with the following symbols:
  + create

Terraform will perform the following actions:

  # aws_instance.app_server will be created
  + resource "aws_instance" "app_server" {
      + ami                          = "ami-08d70e59c07c61a3a"
      + arn                          = (known after apply)
##...

Plan: 1 to add, 0 to change, 0 to destroy.

Do you want to perform these actions?
  Terraform will perform the actions described above.
  Only 'yes' will be accepted to approve.

  Enter a value: yes

aws_instance.app_server: Creating...
aws_instance.app_server: Still creating... [10s elapsed]
aws_instance.app_server: Still creating... [20s elapsed]
aws_instance.app_server: Still creating... [30s elapsed]
aws_instance.app_server: Still creating... [40s elapsed]
aws_instance.app_server: Creation complete after 50s [id=i-0bf954919ed765de1]

Apply complete! Resources: 1 added, 0 changed, 0 destroyed.
Now apply the configuration again, this time overriding the default instance name by passing in a variable using the -var flag. Terraform will update the instance's Name tag with the new name. Respond to the confirmation prompt with yes.
$ terraform apply -var "instance_name=YetAnotherName"
aws_instance.app_server: Refreshing state... [id=i-0bf954919ed765de1]

Terraform used the selected providers to generate the following execution plan.
Resource actions are indicated with the following symbols:
  ~ update in-place

Terraform will perform the following actions:

  # aws_instance.app_server will be updated in-place
  ~ resource "aws_instance" "app_server" {
        id                           = "i-0bf954919ed765de1"
      ~ tags                         = {
          ~ "Name" = "ExampleAppServerInstance" -> "YetAnotherName"
        }
        # (26 unchanged attributes hidden)


        # (4 unchanged blocks hidden)
    }

Plan: 0 to add, 1 to change, 0 to destroy.

Do you want to perform these actions?
  Terraform will perform the actions described above.
  Only 'yes' will be accepted to approve.

  Enter a value: yes

aws_instance.app_server: Modifying... [id=i-0bf954919ed765de1]
aws_instance.app_server: Modifications complete after 7s [id=i-0bf954919ed765de1]

Apply complete! Resources: 0 added, 1 changed, 0 destroyed.
Setting variables via the command-line will not save their values. Terraform supports many ways to use and set variables so you can avoid having to enter them repeatedly as you execute commands.
Query data with outputs
Initial configuration
After following the previous tutorials, you will have a directory named learn-terraform-aws-instance with the following configuration.
# main.tf

terraform {
  required_providers {
    aws = {
      source  = "hashicorp/aws"
      version = "~> 4.16"
    }
  }

  required_version = ">= 1.2.0"
}

provider "aws" {
  region  = "us-west-2"
}

resource "aws_instance" "app_server" {
  ami           = "ami-08d70e59c07c61a3a"
  instance_type = "t2.micro"

  tags = {
    Name = var.instance_name
  }
}

# variables.tf

variable "instance_name" {
  description = "Value of the Name tag for the EC2 instance"
  type        = string
  default     = "ExampleAppServerInstance"
}
Ensure that your configuration matches this, and that you have initialized your configuration in the learn-terraform-aws-instance directory.
$ terraform init
Apply the configuration before continuing this tutorial. Respond to the confirmation prompt with a yes.
$ terraform apply
Output EC2 instance configuration
Create a file called outputs.tf in your learn-terraform-aws-instance directory.
Add the configuration below to outputs.tf to define outputs for your EC2 instance's ID and IP address.
output "instance_id" {
  description = "ID of the EC2 instance"
  value       = aws_instance.app_server.id
}

output "instance_public_ip" {
  description = "Public IP address of the EC2 instance"
  value       = aws_instance.app_server.public_ip
}
Inspect output values
You must apply this configuration before you can use these output values. Apply your configuration now. Respond to the confirmation prompt with yes.
$ terraform apply
aws_instance.app_server: Refreshing state... [id=i-0bf954919ed765de1]

Changes to Outputs:
  + instance_id        = "i-0bf954919ed765de1"
  + instance_public_ip = "54.186.202.254"

You can apply this plan to save these new output values to the Terraform state,
without changing any real infrastructure.

Do you want to perform these actions?
  Terraform will perform the actions described above.
  Only 'yes' will be accepted to approve.

  Enter a value: yes


Apply complete! Resources: 0 added, 0 changed, 0 destroyed.

Outputs:

instance_id = "i-0bf954919ed765de1"
instance_public_ip = "54.186.202.254"
Terraform prints output values to the screen when you apply your configuration. Query the outputs with the terraform output command.
$ terraform output
instance_id = "i-0bf954919ed765de1"
instance_public_ip = "54.186.202.254"
You can use Terraform outputs to connect your Terraform projects with other parts of your infrastructure, or with other Terraform projects.
Destroy infrastructure
Tip
If you plan to continue to later tutorials, skip this destroy step.
Destroy your infrastructure. Respond to the confirmation prompt with yes.
$ terraform destroy

Terraform used the selected providers to generate the following execution plan.
Resource actions are indicated with the following symbols:
  - destroy

Terraform will perform the following actions:

  # aws_instance.app_server will be destroyed
  - resource "aws_instance" "app_server" {
      - ami                          = "ami-08d70e59c07c61a3a" -> null
      - arn                          = "arn:aws:ec2:us-west-2:561656980159:instance/i-0bf954919ed765de1" -> null
##...

Plan: 0 to add, 0 to change, 1 to destroy.

Changes to Outputs:
  - instance_id        = "i-0bf954919ed765de1" -> null
  - instance_public_ip = "54.186.202.254" -> null

Do you really want to destroy all resources?
  Terraform will destroy all your managed infrastructure, as shown above.
  There is no undo. Only 'yes' will be accepted to confirm.

  Enter a value: yes

aws_instance.app_server: Destroying... [id=i-0bf954919ed765de1]
aws_instance.app_server: Still destroying... [id=i-0bf954919ed765de1, 10s elapsed]
aws_instance.app_server: Still destroying... [id=i-0bf954919ed765de1, 20s elapsed]
aws_instance.app_server: Still destroying... [id=i-0bf954919ed765de1, 30s elapsed]
aws_instance.app_server: Destruction complete after 31s

Destroy complete! Resources: 1 destroyed.
Store remote state
Login to Terraform Cloud
Next, log into your Terraform Cloud account with the Terraform CLI in your terminal.
$ terraform login
Terraform will request an API token for app.terraform.io using your browser.

If login is successful, Terraform will store the token in plain text in
the following file for use by subsequent commands:
    /Users/<USER>/.terraform.d/credentials.tfrc.json

Do you want to proceed?
  Only 'yes' will be accepted to confirm.

  Enter a value:
Confirm with a yes and follow the workflow in the browser window that will automatically open. You will need to paste the generated API key into your Terminal when prompted. For more detail on logging in, follow the Authenticate the CLI with Terraform Cloud tutorial.
Initialize Terraform
Now that you have configured your Terraform Cloud integration, run terraform init to re-initialize your configuration and migrate your state file to Terraform Cloud. Enter "yes" when prompted to confirm the migration.
$ terraform init

Initializing Terraform Cloud...
Do you wish to proceed?
  As part of migrating to Terraform Cloud, Terraform can optionally copy your
  current workspace state to the configured Terraform Cloud workspace.

  Answer "yes" to copy the latest state snapshot to the configured
  Terraform Cloud workspace.

  Answer "no" to ignore the existing state and just activate the configured
  Terraform Cloud workspace with its existing state, if any.

  Should Terraform migrate your existing state?

  Enter a value: yes


Initializing provider plugins...
- Reusing previous version of hashicorp/aws from the dependency lock file
- Using previously-installed hashicorp/aws v4.17.0

Terraform Cloud has been successfully initialized!

You may now begin working with Terraform Cloud. Try running "terraform plan" to
see any changes that are required for your infrastructure.

If you ever set or change modules or Terraform Settings, run "terraform init"
again to reinitialize your working directory.
Now that Terraform has migrated the state file to Terraform Cloud, delete the local state file.
$ rm terraform.tfstate
When using Terraform Cloud with the CLI-driven workflow, you can choose to have Terraform run remotely, or on your local machine. When using local execution, Terraform Cloud will execute Terraform on your local machine and remotely store your state file in Terraform Cloud. For this tutorial, you will use the remote execution mode.
Set workspace variables
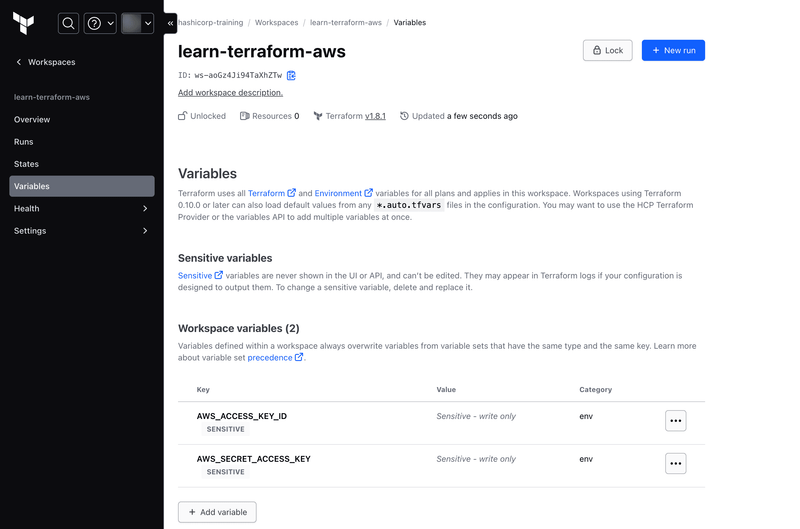
The terraform init step created the learn-tfc-aws workspace in your Terraform Cloud organization. You must configure your workspace with your AWS credentials to authenticate the AWS provider.
Navigate to your learn-tfc-aws workspace in Terraform Cloud and go to the workspace's Variables page. Under Workspace Variables, add your AWS_ACCESS_KEY_ID and AWS_SECRET_ACCESS_KEY as Environment Variables, making sure to mark them as "Sensitive".
Apply the configuration
Now, run terraform apply to trigger a run in Terraform Cloud. Terraform will show that there are no changes to be made.
$ terraform apply

## ...
No changes. Your infrastructure matches the configuration.

Terraform has compared your real infrastructure against your configuration
and found no differences, so no changes are needed.

------------------------------------------------------------------------
This means that Terraform did not detect any differences between your configuration and real physical resources that exist. As a result, Terraform does not need to do anything.
Terraform is now storing your state remotely in Terraform Cloud. Remote state storage makes collaboration easier and keeps state and secret information off your local disk. Remote state is loaded only in memory when it is used.
Destroy your infrastructure
Make sure to run terraform destroy to clean up the resources you created in these tutorials. Terraform will execute this run in Terraform Cloud and stream the output to your terminal window. When prompted, remember to confirm with a yes. You can also confirm the operation by visiting your workspace in the Terraform Cloud web UI and confirming the run.
$ terraform destroy
Running apply in Terraform Cloud. Output will stream here. Pressing Ctrl-C
will cancel the remote apply if it's still pending. If the apply started it
will stop streaming the logs, but will not stop the apply running remotely.

Preparing the remote apply...

To view this run in a browser, visit:
https://app.terraform.io/app/hashicorp-training/learn-tfc-aws/runs/run-kovFzCiUSrbMP3sD

Waiting for the plan to start...

Terraform v1.2.0
on linux_amd64
Initializing Terraform configuration...
aws_instance.app_server: Refreshing state... [id=i-0e756c00e19ec8f6b]

Terraform used the selected providers to generate the following execution
plan. Resource actions are indicated with the following symbols:
  - destroy

Terraform will perform the following actions:

  # aws_instance.app_server will be destroyed
##...
Apply complete! Resources: 0 added, 0 changed, 1 destroyed.


Top comments (0)